
Never lose your lip balm again with this Free Crochet Chapstick Holder Pattern that’s stylish, functional, and perfect for beginners.
Keeping your chapstick handy just got a lot cuter with this quick and charming crochet project. This little chapstick holder pattern is not only practical but also adds a personal touch to your everyday essentials. Using the single crochet stitch, which is one of the simplest and most versatile stitches, makes this pattern perfect for both beginners and those looking for a fun, fast crochet. Working in rounds, you’ll start with a magic ring and build up the size gradually with increases, creating a neat cylinder just right to fit your chapstick or lip balm snugly.
Cutest Crochet Chapstick Holder Pattern for Gifting or Personal Use

What makes this project truly enjoyable is how quickly it comes together—many can finish it in under an hour! Along with being a functional accessory, the holder can be customized with your favorite colors and even personalized by adding a keychain, making it a lovely gift for friends or family. Tools like stitch markers help keep track of your rounds easily, and sewing on a small strap with a D-ring lobster clasp adds convenience to carry it wherever you go.
Explore More Projects Using This Pattern
The skills you learn with this chapstick holder pattern can open doors to many other fun crochet creations. With the single crochet stitch and working in rounds, you could make things like coin pouches, small bags, or cozy covers for bottles and jars. These straightforward techniques allow you to experiment and create useful items while enjoying the relaxing rhythm of crocheting.
Crochet Pattern: Chapstick Holder
Introduction:
This Chapstick Holder is a quick, practical, and beginner-friendly crochet project that’s perfect for when you’re short on time but still want to create something handmade and thoughtful. It’s not only great for carrying your chapstick or lip balm securely but also an excellent way to use up scrap yarn. The finished product can be attached to your keychain, bag, or even gifted to loved ones. Plus, you’ll master working in the round and creating a strap using simple stitches.
What You’ll Learn:
- How to work in the round using magic rings.
- Adding structural elements such as a strap for attachment.
- Seamless finishing techniques for small crochet pieces.
Uses:
- Organize and easily carry chapstick, lip balm, or small accessories.
- Create thoughtful handmade gifts.
- Customize for a keychain, bag charm, or small storage option.
Skill Level & Terminology:
- Skill Level: Beginner-Friendly.
- Terminology: US Crochet Terms.
Materials & Tools:
- Yarn:
- Cotton yarn, preferably medium thickness (approx. 13 WPI – wraps per inch). You can use leftover scrap yarn as well!
- Crochet Hook: 3 mm hook.
- Other Tools:
- D-ring lobster keychain or any similar keychain with a hook.
- Stitch markers to track the beginning of rounds.
- Darning (tapestry) needle for weaving in ends and sewing.
- Scissors, any size, for cutting yarn.
Gauge:
Gauge is not essential for this project, but the crochet stitches should be close and tight to give the chapstick holder a solid structure.
Abbreviations List:
- Ch: Chain
- Sc: Single Crochet
- Sl St: Slip Stitch
- Inc: Increase (work two single crochets into the same stitch).
Special Stitch Instructions:
Magic Ring:
- Place the yarn tail over your two fingers.
- Wrap the working yarn around your fingers to form an “X” shape.
- Insert your hook under the first strand and over the second strand to pull up a loop.
- Twist the loop and yarn over, pulling through the loop on your hook. Tighten to create your magic ring.
Single Crochet (Sc):
- Insert your hook into the stitch.
- Yarn over, pull up a loop (two loops on hook).
- Yarn over and pull through both loops.
Single Crochet Increase (Inc):
Work two single crochets into the same stitch.
Finished Size:
Approximately 3 inches tall (7.6 cm), depending on yarn tension and chapstick size.
Step-by-Step Details:
- Begin Crochet with Magic Ring:
- Create the magic ring by wrapping the yarn around your fingers in an “X” shape.
- Insert the hook under and over, twist, and yarn over to pull through the loop, forming the base.
- Work six single crochets into this ring and tighten by pulling the yarn tail.
- Increase Stitches:
- For Round 2, work six increases (two single crochets in each stitch) for a total of 12 stitches.
- Use a stitch marker to track the first stitch of each round.
- Build Base Diameter:
- For Round 3, crochet two single stitches followed by one increase. Repeat this sequence four times to reach 16 stitches.
- Check the diameter using your chapstick, ensuring the base fits.
- Crochet the Cylinder Shape:
- From Round 4 onwards, work one single crochet into each stitch (16 stitches per round).
- Crochet up to Round 20, or until the height accommodates your chapstick. Adjust the rounds if needed for a perfect fit.
- Add the Strap:
- Start chaining one stitch, then create six single crochets for the strap width.
- Continue repeating single crochet rows until the strap reaches the desired length (27 rows recommended).
- Perform another fit check to ensure the strap fits well around the D-ring.
- Finish and Sew:
- Fasten off the yarn and slide the D-ring onto the strap before sewing it into place.
- Use a darning needle to align the strap with the chapstick holder and sew securely with basic back-and-forth stitches.
- Weave in all yarn tails and trim off any excess.


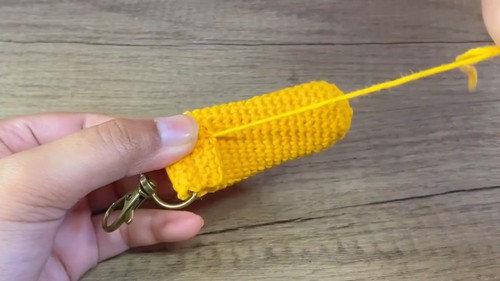
Assembly & Finishing
- Attach any additional details like decorative embroidery or charms if desired.
- Ensure the strap and body are aligned well and sturdy.
Tutor’s Suggestions:
- Use a 3 mm hook and cotton yarn for similar sizing to the example demonstrated.
- Pay attention to stitch structure and placement to maintain neatness.
- Utilize the stitch marker to keep track of round transitions.
- Check the fit regularly as you work to ensure the chapstick holder is correctly sized.
Why You’ll Love This Pattern:
This pattern is simple and satisfying, offering quick results and functional value. It’s a great introduction to basic crochet techniques like working in rounds, increases, and strap-making. Perfect for personal use and gifting, this chapstick holder is a fun yet practical piece that showcases creativity and utility.
Pro Tip:
To keep your work neat, weave in the yarn tail before completing the top. Turning the holder inside out can be tricky later, so handle it early for ease.
Conclusion:
With simple steps, minimal materials, and creative customization options, crocheting a chapstick holder is a fun and rewarding project for beginners. Its practicality and charm make it a delightful gift or personal accessory.
Leave a Reply