
Solve gift-giving dilemmas using the Free Crochet Mini Rolled Cake Pattern for a cute handmade surprise everyone will adore.
Creating miniatures with yarn is such a fun way to add a dash of charm to your day! This delightful Mini Rolled Cake project brings to life a tiny rolled cake that’s not only adorable but also beginner-friendly. The magic lies in using simple stitches like chains, double crochet, slip stitches, and the bobble stitch, which together shape the cake layers, the fluffy whipped cream, and the cheerful cherry on top. These stitches are easy to learn and perfect for anyone just starting their crochet journey.
Guidance to Crochet a Mini Rolled Cake Pattern that Add Whimsy to Your Home

Starting with a foundation chain, you build the cake layers and filling by working rows of double crochets, carefully counting stitches to keep things neat. The whipped cream is crocheted with a clever use of the magic ring and single crochets worked in rounds, creating a soft, round shape. The cherry uses the fun and textured bobble stitch, giving it a playful 3D effect that stands out beautifully. The combination of these stitches results in a textured, squishy little cake that you can proudly display or gift.
The assembled rolled cake is cleverly rolled and sewn together to mimic that delicious spiral look of the real dessert. Plus, it’s finished with a key ring so you can carry this sweet treat wherever you go! Beyond just being cute, this project teaches important skills like tension control, reading stitches, working in rows and rounds, and finishing techniques such as weaving in ends and sewing parts neatly.
More Fun to Crochet
Once you’ve mastered these stitches and small-scale shaping, you can use the same skills to create other charming mini amigurumi like cupcakes, donuts, or tiny fruits. The bobble stitch adds lovely texture, great for cuddly toys or decorative accents. Plus, practicing the magic ring opens the door to making all sorts of circular crochet projects, from coasters to flowers and beyond. This mini rolled cake pattern is a sweet way to build crochet confidence and creativity!

Mini Rolled Cake Crochet Pattern
Welcome to this beginner-friendly crochet project where you’ll create a mini rolled cake keychain! This pattern is perfect for those just starting their crochet journey or for seasoned crocheters who want a quick and adorable project. The process combines basic stitches with simple shaping and assembly to create a delightful, realistic mini rolled cake complete with whipped cream and a cherry. It’s a fun and rewarding project you can turn into a keyring accessory or decorative charm.
What You’ll Learn From this Pattern
- Master Basic Techniques: Hone skills like double crochet, single crochet, and working in the round.
- Shape and Assemble Pieces: Practice assembling small crochet components into a cohesive and detailed design.
- Creative Keyring Integration: Attach functional accessories to enhance your crochet creations.
Skill Level & Terminology
Skill Level:
Beginner – This pattern is straightforward, with basic stitches like slip stitches, single crochet, and double crochet.
Crochet Terminology:
This pattern is written using US crochet terms.
Materials & Tools
- Yarn:
- Orange (for the cake layer).
- White (for the filling and whipped cream).
- Red (for the cherry).
- Hook: 4 mm crochet hook.
- Accessories:
- Scissors.
- Stitch marker (or a paper clip).
- Yarn needle.
- Keyring.
Gauge
Gauge is not critical for this project since it is decorative. However, ensure your stitches are tight enough so the stuffing is not visible.
Abbreviations List
| Abbreviation | Meaning |
|---|---|
| ch | Chain |
| sc | Single Crochet |
| dc | Double Crochet |
| sl st | Slip Stitch |
| st | Stitch |
| yo | Yarn Over |
Special Stitch Instructions
Double Crochet (dc):
- Yarn over (yo).
- Insert the hook into the designated stitch.
- Yo and pull up a loop (3 loops on hook).
- Yo and pull through the first 2 loops (2 loops on hook).
- Yo and pull through the last 2 loops to complete the stitch.
Magic Ring (Beginner-Friendly Method):
- Chain 4 and slip stitch into the first chain to create a small ring. Work into this ring for the initial stitches.
Finished Size
Approximately 2 inches in diameter and 1 inch in height (excluding keyring).
The Pattern Itself
Below is a clear step-by-step guide to crocheting each component of the mini rolled cake.
Step 1: Cake Layer
Instructions
- Slip Knot and Foundation Chain:
- Create a slip knot and tighten around your hook.
- Chain (ch) 32. Ensure the chain is long enough to roll into a cake base (approx. 4–5 inches).
- Row 1:
- Skip the first two chains from the hook for height.
- Begin placing double crochets (dc) in each chain across.
- At the end of the row, you should have 30 dc stitches.
- Row 2:
- Chain 2 and turn your work.
- Place 1 dc in each stitch across for the second row.
- Finish off with a chain 1 and leave a long yarn tail for assembly.


Simplified Notes:
The cake layer consists of two rows of 30 double crochets, forming the textured base of the rolled cake. Roll this tightly later for assembly!
Step 2: Filling Layer
Instructions
- Slip Knot and Foundation Chain:
- Use the white yarn.
- Create a slip knot and chain 22.
- Row 1:
- Skip the first two chains.
- Work 1 dc in each chain across (20 sts).
- Row 2:
- Chain 2 and turn.
- Place 1 dc in each stitch across.
- Finish with a chain 1, leaving a tail for sewing, and fasten off.

Simplified Notes:
The white filling layer is slightly shorter than the orange layer. It will fold neatly as you roll the cake base.
Step 3: Whipped Cream
Instructions
- Magic Ring:
- Create a beginner-friendly magic ring using a chain-4 loop.
- Slip stitch into the first chain to join and form a ring.
- Round 1:
- Work 6 sc into the magic ring.
- Slip stitch into the first sc, then tighten the ring.
- Round 2 (Increase Round):
- Work 2 sc in each stitch around (12 sts total).
- Slip stitch to join and fasten off, leaving a long tail for sewing.
Simplified Notes:
The whipped cream forms a small circular section. Adjust its placement on top of the cake during assembly.
Step 4: Cherry
Instructions
- Foundation Chain:
- Create a slip knot with red yarn.
- Chain 3.
- Bobble Stitch in Second Chain:
- Work 5 bobble stitches into the second chain to form a round cherry.
- Yarn over each time and pull through loops on the hook to create a textured puff.
- Slip Stitch:
- Slip stitch back into the first chain to close the cherry.
- Finish with a chain 1 and leave a long tail.

Simplified Notes:
The cherry is worked as a small bobbled circle that will sit atop the whipped cream.
Assembly and Finishing
Assembly Steps:
- Roll the Cake Base:
- Place the filling layer on top of the cake layer.
- Begin rolling the layers into a tight spiral.
- Sewing the Cake:
- Use the long tail from the cake layer to stitch along the edge of the spiral, holding the roll in place. Secure the edges firmly.
- Attach Whipped Cream and Cherry:
- Center the whipped cream on top of the cake roll.
- Use the longer tail to sew it securely to the cake.
- Place the cherry on top of the whipped cream and use its tail to secure it firmly.
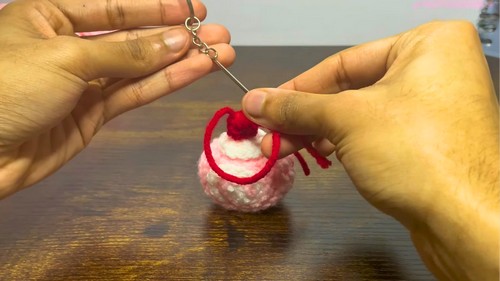
- Add the Keyring:
- Thread the keyring through the top-center of the cherry using the long red tail.
- Secure the keyring by weaving the thread and tying knots.

Difficulties and Solutions
Difficulty: Maintaining even tension and shaping small components can be tricky.
Solution: Take your time with stitches, tighten tails securely, and use stitch markers to stay consistent.
Why You’ll Love This Pattern
This mini rolled cake crochet pattern is quick, easy, and irresistibly adorable! It makes an ideal project for gifting, accessorizing, or simply having fun with creative designs. You’ll never look at a ball of yarn the same way again—get ready to turn simple stitches into dessert-inspired cuteness.
Leave a Reply