
Wish for a little more magic in your room as DIY Polymer Clay Resin Disney Wish Star shines with a golden glow and sweet smile, ideal for a charming gift.
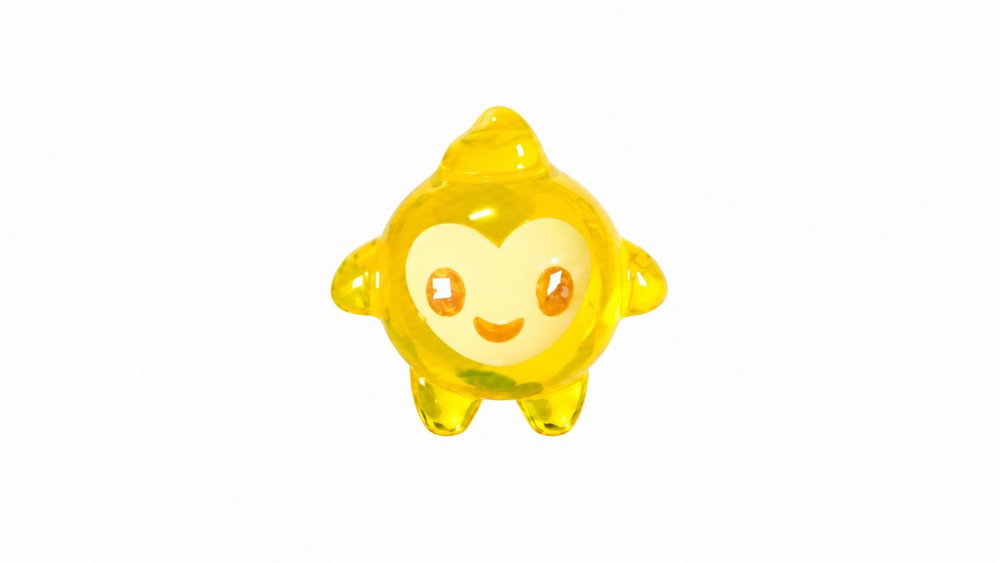
A cheerful little face can change the feeling of a quiet corner in an instant. DIY Polymer Clay Resin Disney Wish Star is inspired by the lovable yellow star from Disney’s Wish. Its warm color, rounded points, and lively expression give this small decoration an uplifting look that suits a bright room.
Featured By: PolymomoTea
Golden Glow With DIY Polymer Clay Resin Disney Wish Star

The shape is different from an ordinary sharp-pointed star. Its points are softer, and the face sits in the middle where the eyes can stand out clearly. A rich yellow shade forms the main body. Tiny eyebrows and a little mouth help show the character’s playful personality. The overall design stays simple, but the expression is what gives it life.
Polymer clay can form the star’s shape and facial details, while a resin finish can give the surface a smooth shine. Careful shaping matters more than adding lots of extras. Each point should feel balanced so the character keeps its friendly outline. The glossy finish can also help the yellow appear more lively under natural light.
This piece would look lovely on a bedside table, beside a favorite storybook, or with a small Disney collection. It could be a birthday surprise for someone who loves animated films and cheerful characters. A tiny star with a smile has a way of standing out without taking over the whole room, which is part of its charm.

Disney Wish Star (Polymer Clay & Resin) – Easy DIY Pattern
Materials & Tools
Materials
- Polymer clay (scrap clay, yellow/light yellow, gold)
- UV resin (for glazing, and as adhesive for clay face in resin)
- Yellow resin pigment (for colored resin layer)
- Clear resin (preferably UV cure)
- Tape (masking, clear, or painter’s tape—helps with dust and mold support)
- Disposable paintbrush (for applying resin glaze)
Tools
- Silicone mold (small container or handmade; for star shape)
- Oven (for baking clay)
- Mixing cups and stirrers (for resin)
- Blade/craft knife (for trimming, removing clay pieces)
- UV lamp (for curing UV resin)
- Clay sculpting tools (optional)
- Sandpaper or file (for smoothing rough resin edges, optional)
Step-by-Step Instructions
1. Sculpt the Star Body (Polymer Clay)
- Take a ball of scrap clay.
- Flatten it slightly into a plump donut shape (not too flat, not a perfect circle).
- Form the points:
- Head/Top point: Roll clay into a chubby cone, cut base flat, and stick on top center of star.
- Arms & Legs: Roll clay into skinnier cones, cut at a slant.
- Attach two cones at the sides for arms and two at the bottom for legs (angled slightly and spaced evenly).
- Adjust positions of arms and legs for a cute, animated look.
- Bake according to clay instructions.
- Let cool before proceeding.


2. Make the Silicone Mold
- Stick tape to the bottom of a small container.
- Place baked star body template inside container.
- Pour silicone mold material around and over the star template. Let cure fully (follow package directions).
- Carefully demold the clay star; now you have your custom mold.
3. Sculpt the Star Face (Polymer Clay)
- Face base:
- Roll out light yellow clay and flatten.
- Cut into a cartoony heart shape (not sharp, smooth out edges with fingers).
- Eyes:
- Flatten small ovals of gold clay for eyes; place evenly onto the face.
- Mouth:
- Flatten gold clay into a circle, cut off one end, and pinch corners upward for a cute smile.
- Place below the eyes on the face.
- Bake the face piece.
- Once cooled, gently carve underneath with a blade to remove from surface.

4. Resin Pour – Embedding the Face
- Spread clear UV resin in your mold; make a thin first layer for clarity.
- Place baked clay face flat into the mold, centered and carefully positioned.
- Cure under UV lamp to fully set that layer.
- Mix yellow pigment with clear resin for star body color.
- Pour yellow resin mix into mold, halfway first.
- Use a small tool to push resin into arms/legs areas to avoid air bubbles.
- Pour the rest of yellow resin to fill mold; cure as needed (UV lamp or per resin instructions).

5. Demold & Clean Up
- Once cured, remove the star from silicone mold.
- Trim excess resin or rough edges from the back with a blade or file for neat finish.
6. Glazing & Final Touches
- Roll scrap clay into a thick cylinder and press onto the back of the star to create a temporary holder (makes handling easier during glazing).
- Brush a layer of UV resin (glaze) over the front and sides of the star for shine.
- Cure under UV lamp.
- Remove from clay holder, glaze the back as well, and cure again.
- If needed, repeat glaze for extra shine or smoothness.
7. Finished Star!
- Your Disney Wish star is now cute, shiny, and ready to display or gift!
Beginner Tips & Explanation
- Clay shapes: Don’t stress about perfection—round, smooth, cartoony shapes work best!
- Resin layers: Always check for air bubbles and push resin into tight spots.
- Glaze: The UV resin glaze makes your star really shiny and professional-looking.
- Making a mold: If you’re new to mold-making, follow silicone package instructions carefully and use tape to keep your master clean and supported.
- Face placement: If not perfect, gently move with tweezers before curing resin.
Conclusion
You’ve created an adorable, shiny star inspired by Disney’s Wish using simple clay and resin techniques! Enjoy your cute character and experiment with other faces or body shapes for new projects.
Leave a Reply