
Buzz into a sweeter display with tiny blocky wings, golden stripes, and a friendly face in DIY Resin Miniature Minecraft Bee, a fun treat for game lovers.
Thanks To : PolymomoTea
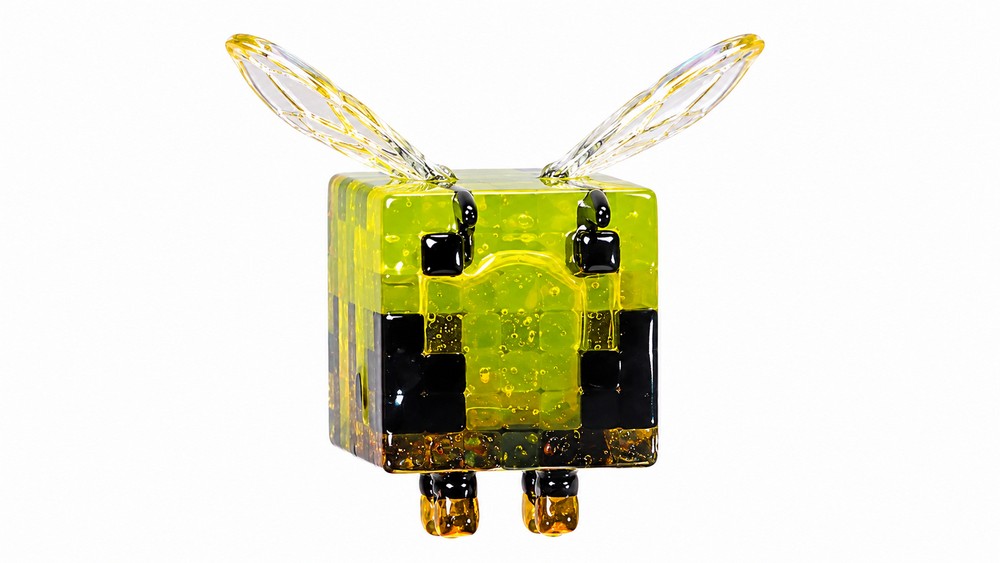
Square shapes do not usually sound adorable, but one famous game insect proves otherwise. DIY Resin Miniature Minecraft Bee keeps the blocky look of the Minecraft world while showing off a cheerful yellow body and little wings. Its simple face helps it feel friendly even in a very small size.
Little Buzzing Friend: DIY Resin Miniature Minecraft Bee
Yellow and brown or black stripes are the main details to notice. The body has a boxy form rather than a rounded one, and the tiny wings sit near the top. Small eyes and a clean pattern on the sides help the miniature resemble the character from the game. Resin gives the piece a solid surface, and a smooth finish can keep the stripes easy to see. Keeping the colors in clear sections is especially useful for this design.

You could display the finished bee beside a small plant pot to give the area a playful touch. Another idea is to place it with other Minecraft figures on a shelf, where its yellow color stands out among green and brown blocks. It would also suit a simple birthday present for someone who likes game animals.
The appeal comes from how well the familiar pixel-style shape works in a tiny object. It has just a few important parts, so the face, wings, and stripes each have a clear job. The result is cheerful without needing extra decorations.

Mini Minecraft Resin Bee – Easy Tutorial
In this project, you’ll create an adorable, tiny Minecraft bee out of resin by casting and assembling small colored cubes. This pattern is beginner-friendly, so you can follow along even if you’re new to resin crafting or pixel art projects.
Materials & Tools
Materials
- Two-part epoxy resin (for clear, durable cubes)
- Resin pigments or acrylic colorants (in yellow, brown, black, and white)
- UV resin (for gluing and glazing)
- Homemade or small cube silicone mold (for making bee cubes)
- Silicone mold-making compound or small premade molds (for wings, stinger, antenna)
- Strong clear tape (for building sections before gluing)
- Paper craft template or reference image (for arranging bee’s pattern)
Tools
- Mixing cups and stirrers
- Tweezers (for handling small pieces)
- UV lamp (for curing UV resin)
- Craft knife or blade (for trimming resin)
- Scissors (for cutting tape)
- Flat working surface
Step-by-Step Instructions
1. Prepare the Colored Resin Cubes
- Mix the two-part resin as directed (mix until no swirls remain).
- Color your batches:
- Make one batch yellow (for the bee’s main color)
- Make a batch dark brown or black (for stripes, eyes, legs)
- Make a small batch white (for eye dots, wings)
- (Optional) Mix a slightly lighter brown for subtle stripe differences.
- Pour resin into your cube mold: Use a dropper or stir stick to fill each cavity with colored resin.
- Scrape off the excess from the top with a flat edge.
- Let the resin cure for at least 24 hours.
- Pop out your cubes once cured and sort by color.


2. Build the Bee’s Face
- Lay strong clear tape sticky-side-up on a flat surface to hold your cubes.
- Arrange cubes to match the bee’s face, using a reference/template. Typical face colors are yellow, black (for eyes & outline), and white (eye highlight).
- Once all cubes are placed, add a thin layer of UV resin over the cubes and cure under a UV lamp to “fuse” the face plate together.
3. Assemble the Bee’s Body
- Repeat the process for the other bee surfaces (top, sides, bottom, butt), following a reference for stripe patterns.
- The top and side pieces are simpler and have striped or solid patterns.
- Once you have all plates ready, add UV resin to the seams and carefully assemble the box shape of the bee.
- Glaze the inside: Before completely closing the body, tilt and swirl a bit of UV resin inside to create a shiny interior; cure.
- Close the last panel and apply UV resin all along the outside seams for strength and shine; cure thoroughly.
4. Make and Attach Details (Stinger, Legs, Wings, Antenna)
Wings & Stinger
- Use silicone mold or flat mold: Cut small squares and rectangles matching your cubes’ size.
- Fill molds with white resin (for wings) and brown/black resin (for stinger); cure under UV lamp.
- De-mold your flat components.
- The stinger can be a small rectangle or triangle.
- Wings can be arranged from several small squares and rectangles, assembled with UV resin on tape, then fully glazed and trimmed.

Legs
- For each leg: Fuse together a brown square and black rectangle/square (half-&-half). You’ll need six legs.
- Cure with UV resin.
Antenna
- Attach a black rectangle to a black square (using UV resin) for each antenna.
- Cure under UV lamp.

5. Final Assembly and Glazing
- Antenna: Attach to top/side of bee’s face with a dab of UV resin; cure.
- Face: Glaze the face with UV resin for extra shine and durability; cure.
- Stinger: Attach brown/black rectangle to center of bee’s “butt” with UV resin; cure.
- Legs: Attach six legs (black part up against black stripe on the bee’s sides) with UV resin; cure.
- Wings: Attach wings one at a time on top of the bee body at a slight angle, so the bee looks like it’s flapping; cure after each wing.
- Glaze: Go over any remaining seams/edges with UV resin for a final shiny coating; cure thoroughly.

Beginner Tips & Explanations
- Tape method: Using tape to hold cubes in position makes it easier to build flat faces and wings before gluing and curing.
- UV resin: Cures quickly and acts as a “glue” and “glaze.” Always use in a well-ventilated area and protect skin.
- Color difference: Don’t worry if your shades aren’t exact! Be sure to double-check arrangement with a Minecraft sprite or papercraft pattern.
- Tiny molds: Smaller molds = cuter, more efficient, less resin used, but work carefully as pieces are tiny!
- Glazing last: Extra coats of UV resin seal the figure and provide a glassy, professional look.
Conclusion
Now you’ve made an adorable, mini resin Minecraft bee! This project is perfect for beginners and can be adapted for other Minecraft mobs. Display your cute bee next to your other pixel pals or on your desk as a fun gamer decoration.
Leave a Reply