
Decorate your holidays with this Crochet Christmas Bauble Pattern, perfect for festive gifts, and adding cozy, handmade charm to your tree.
Watching the twinkle of Christmas lights always brings back memories of decorating the tree with bright, joyful ornaments. Creating your own crochet Christmas bauble pattern adds a special handmade charm that’s both heartwarming and festive. These crochet baubles are delightfully cute and versatile; they can hang from your tree, decorate garlands, or even become thoughtful gifts. Their soft texture and lovely shapes give a fresh twist to holiday décor, making your space feel cozy and personalized.
Cute Crochet Christmas Bauble Pattern for Small Spaces

The pattern is built around the magic circle technique and single crochet stitches, which help form a smooth, perfectly round shape. Starting with a magic circle keeps the center tight, while systematic increases and decreases shape the bauble beautifully. The special touch comes from working in the round and carefully tightening the loops to avoid holes, creating a neat and sturdy structure. Beginner crocheters will appreciate the clear step-by-step guidance, making it easy and fun to bring these joyful ornaments to life.
Expanding Your Crochet Creations
Once you feel confident with this bauble pattern, you can explore making matching holiday decorations such as mini stockings, tiny Santa hats, or festive little animals using similar stitches and techniques. These projects complement your baubles and help create a coordinated handmade holiday collection that you and your loved ones can cherish year after year.
Crochet Christmas Bauble Pattern
1. Introduction
This festive Christmas bauble crochet pattern is perfect for personalizing your holiday decorations. Whether you add playful feet and a smiley face or keep it as a classic bauble, these handmade creations will brighten up any Christmas tree or space. This pattern is beginner-friendly, uses simple stitches, and allows for creative customization with colors and decorations.
What You’ll Learn:
- How to use the magic ring technique for crocheting seamless rounds.
- Basic increasing and decreasing for shaping amigurumi pieces.
- Working with single crochet and its variations, such as BLO stitches.
- How to assemble small parts, including attaching feet and facial features.
2. Skill Level & Terminology
- Skill Level: Beginner-Friendly
- Terminology: US Crochet Terms
This project is suitable for beginners comfortable with the basics, like single crochet, increases, and decreases. The tutorial uses the magic circle technique and works in rounds.
3. Materials & Tools
Materials
- Yarn:
- Yellow or any color of your choice for the bauble body.
- White yarn for the bauble top.
- Black yarn for facial details (eyes, pupil, smile).
- Optional: Felt or safety eyes for easier eye detailing.
Tools
- Crochet hook: 2 mm (adjust to suit your yarn and tension).
- Stuffing: Fiberfill or any clean scraps of yarn for filling the bauble.
- Scissors: For trimming yarn ends.
- Stitch marker: To keep track of the first stitch in each round.
- Darning (tapestry) needle: For sewing and adding facial elements.
4. Gauge
Gauge is not critical for this project. However, stitches should be tight enough that the stuffing doesn’t show through. If desired, make a small swatch of single crochets to test your tension.
5. Abbreviations
Here’s a list of terms used in this pattern:
- MR – Magic Ring
- sc – Single Crochet
- inc – Increase (2 sc in the same stitch)
- dec – Decrease (work 2 stitches together)
- sl st – Slip Stitch
- ch – Chain
- st(s) – Stitch(es)
6. Special Stitch Instructions
Magic Ring (MR):
- Wrap the yarn around two fingers to create a loop. Cross the tail end behind the working yarn.
- Insert your hook under the loop, yarn over, and pull up a loop.
- Yarn over and pull through to secure the loop.
- Work the required number of stitches into the ring. Pull the tail end to close the ring.
Single Crochet Decrease (dec):
- Insert hook into the front loop only of the next stitch.
- Without yarning over, insert your hook into the front loop of the following stitch.
- Yarn over and pull through both loops.
- Yarn over again and pull through the last two loops on your hook.
7. Finished Size
The finished bauble measures approximately 8–10 cm (3–4 inches) in diameter, with feet and additional details adding slight variations to the size.
Step-by-Step Instructions
Steps
1. Create the Bauble Body
- Row 1: Start with a magic circle and crochet 6 single crochets (sc). Pull the circle tight and place a stitch marker in the last stitch.
- Row 2: Work an increase in each stitch, resulting in 12 stitches.
- Row 3: Alternate between 1 single crochet and 1 increase around the circle (18 stitches).
- Row 4: Crochet 2 single crochets, followed by 1 increase (24 stitches).
- Row 5: Work 3 single crochets and 1 increase (30 stitches).
- Row 6: Increase further by alternating 4 single crochets and 1 increase (36 stitches).
- Rows 7–12: Crochet 1 single crochet in every stitch without increasing. This creates the height of the bauble.


2. Shape the Bauble
- Row 13: Decrease the number of stitches by crocheting 4 single crochets followed by a decrease. Repeat this pattern around.
- Row 14: Alternate 3 single crochets and 1 decrease.
- Row 15: Alternate 2 single crochets and 1 decrease. Before advancing, stuff the bauble with fiberfill firmly to ensure a round shape.
- Row 16: Alternate 1 single crochet and 1 decrease.
- Row 17: Perform decreases all the way around until the top is closed. Use your needle to pick up the last stitches and tug gently to close the opening securely.

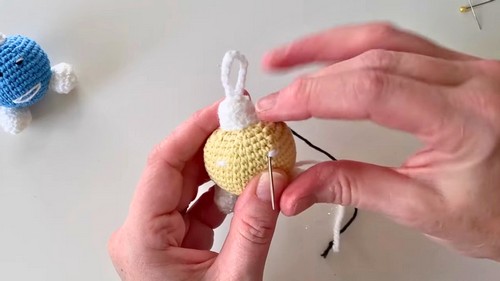
3. Make the Bauble Top (Hanger)
- Row 1: Create a magic circle and crochet 6 single crochets in it.
- Row 2: Increase each stitch (12 stitches).
- Row 3: Crochet one single crochet in the back loops only around for texture. (12 stitches)
- Row 4: Finish the top by crocheting through both loops of each stitch. Slip stitch the last stitch and leave a long tail for sewing.
- Hanger: Chain 16 to create the loop, sew it to the top piece, and secure the threads inside the magic circle. Attach this top piece to the bauble body discreetly using hidden stitches.


4. Add the Feet (Optional)
- Step 1: Chain 6 and begin working back along the chain. Crochet 4 single crochets back. In the last chain, crochet 3 single crochets in the same stitch to create the round edge.
- Step 2: Work along the other side of the chain, crocheting 3 single crochets, and again do 3 single crochets in the last stitch.
- Step 3: Continue working around with alternating increases and decreases to shape the foot. Continue until the desired shape is created, and add a small amount of stuffing. Make a second foot and sew both securely to the bauble body.
5. Add Facial Features (Optional)
- Use black yarn to stitch small pupils and white yarn to create the whites of the eyes. Position them symmetrically using pins if needed.
- Use white yarn to create a simple mouth by stitching across the desired shape. Sew securely and hide all yarn tails inside the bauble.
Special Features
- The customizable design allows you to add or omit facial features or feet, making these baubles flexible for various styles.
- The tutorial includes techniques like the magic circle, working in the round with increases and decreases, and crocheting in the back loops only, which adds textured detailing.
- The finished bauble can serve as tree decorations, gifts, or festive ornaments.
Tutor’s Suggestions
- The tutor suggests firmly stuffing the bauble to ensure a perfectly round shape.
- Use stitch markers to avoid losing track while working in the round.
- You can experiment with colors and leave out the eyes, mouth, or feet if you want simpler designs.
Level of Difficulty
This project is beginner-friendly but involves techniques like the magic circle, increases, decreases, and working in the back loops, which provide a good learning opportunity for those new to crochet.
Uses and Applications
- Create charming Christmas tree decorations.
- Use as festive gifts for friends and family.
- Add them to gift wrapping for a playful touch.
- Hang them on garlands or wreaths for holiday decor.
Tip
When working the magic circle, pull the tail gently to close the gap tightly but avoid over-pulling, as it may snap the yarn. Always tuck in yarn ends securely to prevent unraveling over time.
Why You’ll Love This Pattern:
This Christmas bauble pattern is joyful and customizable, making it a fun and creative holiday craft. From simple classic ornaments to playful designs with feet and faces, this pattern lets you add your personal touch to your décor. The repetitive stitch techniques help beginners gain confidence while creating delightful decorations for themselves or as gifts.
Conclusion
This Christmas bauble crochet pattern is a fun, versatile project perfect for adding a handmade touch to your holiday decorations. With easy-to-follow steps and room for creative customization, you can crochet cheerful ornaments that bring smiles to all who see them.
Leave a Reply