
Head on to crafting a DIY deluxe dog house for your furry friend following this project. This venture is ideal for pet owners looking to enhance their woodworking skills while providing a cozy, personalized shelter for their pets. Utilizing everyday materials and straightforward tools, this project not only offers a practical solution to your pet’s needs but also adds a touch of charm to your outdoor space. So, be ready to transform raw materials into a comfortable, stylish haven that your dog will love.

DIY Deluxe Dog House Project
Materials:
- Cricut vinyl cutter
- Plywood
- 2×4 pieces of wood
- Acrylic paint
- Permanent 651 vinyl
- Exterior polyurethane
- Brackets
- Carpet tiles
Tools:
- Table saw
- Jigsaw
- Orbital sander
Step-by-Step Construction
Crafting the Base
Starting with a recycled coffee table, we trimmed its legs to elevate the base and protect against water damage, then shaped plywood to create the unique contours of a hobbit house. It’s important to note cutting the initial shape prematurely was a misstep; boxing in the base first ensures a perfect fit.
Box in the Base
We framed the base using 2x4s for a sturdy foundation and added extra stability by gluing and screwing wooden offcuts to the base, a crucial step meant to precede side cutting for a snug arch fit.
Cutting the Sides
After framing the base, we could accurately determine and draw the true size of the arch. We used recycled plywood, and despite its less-than-ideal condition and imperfect surfaces, planned to conceal any flaws with paint.
Sanding
Prior to attachment, it was easier to smooth the plywood surfaces, ensuring a clean, prepared canvas for painting later on.
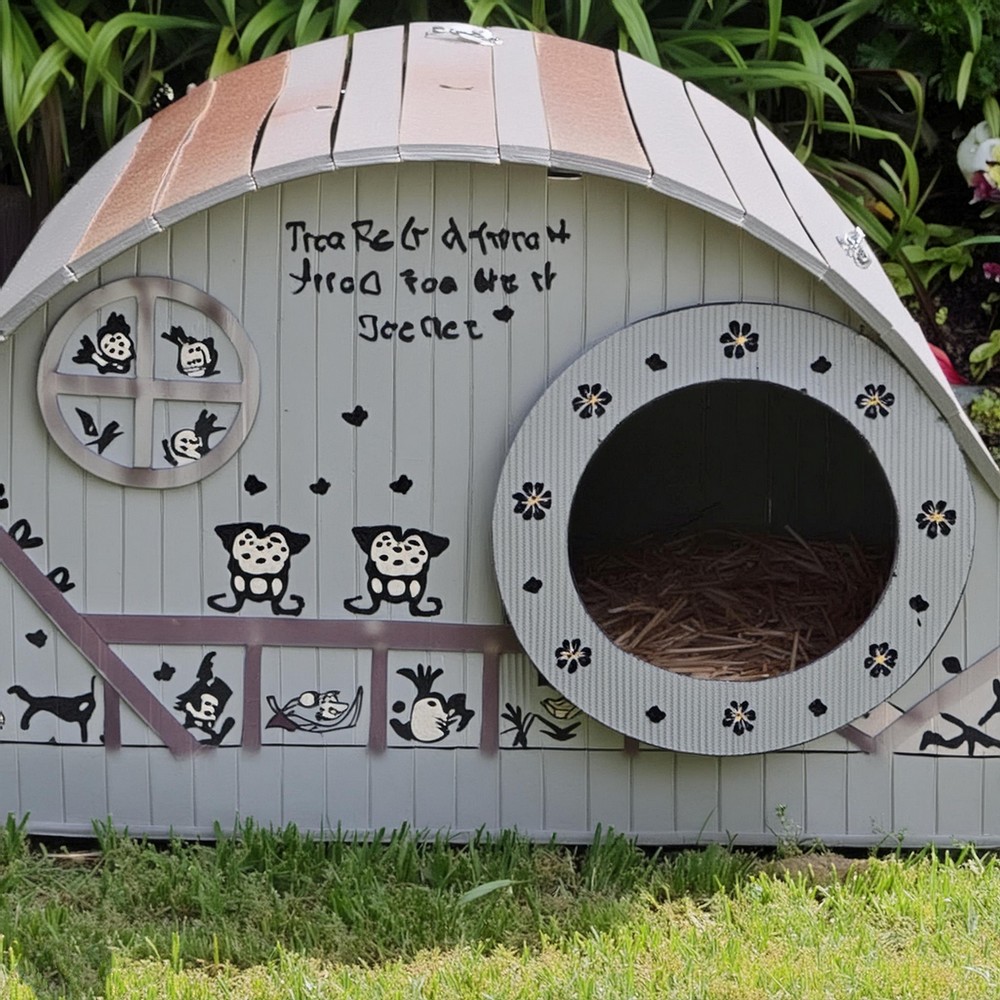
Door Creation
A sizable entrance was cut into one side, initially oversized in a lapse of judgment. The appropriate size for their breed was smaller, adjustments to be made later.

Adding Comfort with Carpet
To enhance comfort, carpet tiles were adhered to the base, with the option to line the sides for added warmth.
Attaching the Sides
An early mishap necessitated a deviation from our original plan; instead of screwing the sides directly into the frame, we secured them to the base using brackets for added support.
Constructing the Roof
We created a lighter roof structure by halving 2×4 boards. To suit a non-grass roof and enhance the overall look, we modified the design to include an overhang, which also provides extra weather protection.
Securing the Roof
Since the plywood sides weren’t robust enough to support the roof directly, we installed internal supports along the perimeter, ensuring that we could securely fasten the roof slats in place.

Assessing the Progress
At this juncture, the basic structure stood completed, ready for the final flourish or to serve as a simple shelter.
Final Touches to the Entrance
The door problem was addressed by designing a larger circular frame to reduce the entrance size, simultaneously crafting a window from the excess plywood.
Decorative Painting
The entire structure received coats of acrylic paint for a homely finish, sealed with polyurethane to withstand the elements, particularly under the sheltered location it was to reside.
Personalizing with Vinyl Decals
For a touch of whimsy, custom vinyl decals were added to the front, showcasing the personality of its inhabitants and the creativity of the maker.

Conclusion
The project concludes with the dog house transforming into not just a shelter, but a statement of care, creativity, and resilience against the playful antics of two spirited pups. Not forgetting the essential addition of soft bedding to invite the new tenants in. And with that, the deluxe dog house stands ready to welcome its mischievous occupants, proving that even the smallest members of the family deserve a place to call their own.

Leave a Reply