
It won’t be long till it’s time to decorate for Christmas!
With a painted, lighted, and well-decorated DIY shadow box, you can beautifully display family photos, ornaments, etc, at events like Christmas. So, here is a step-by-step tutorial on how to make a showcase from an ordinary wooden box. This is one of my best Christmas crafts you can complete in an hour. So, let’s get started!

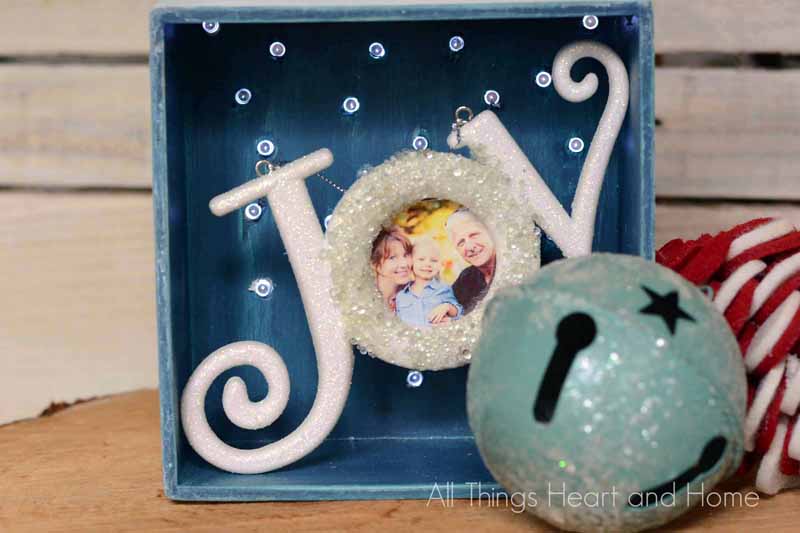
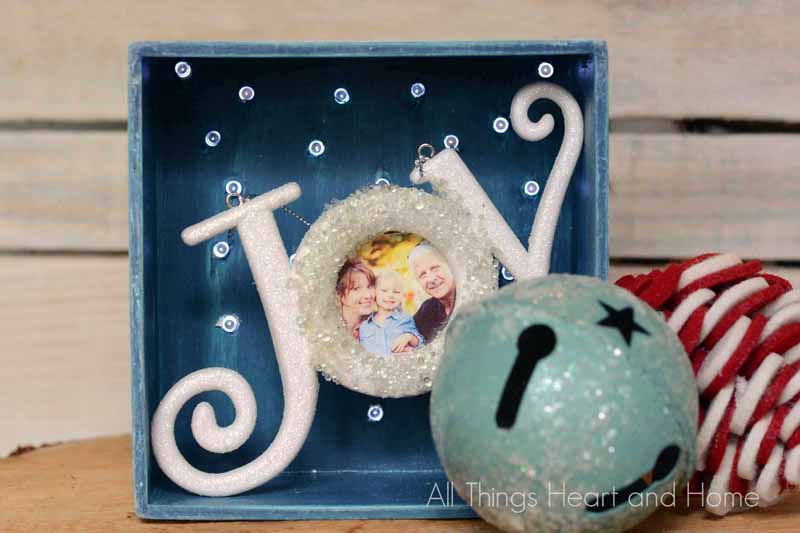
I love photo ornaments and get a new one every year. I thought this lighted shadow or display box would be a perfect place to show off one of my favorites below the mason jar lights. Of course, this DIY shadow box could be used to show off any ornament or even a tiny Christmas scene like all those village pieces I see everywhere!
This is super easy. Do you have a minute?
Supplies For Lighted DIY Shadow Box Decoration
It is not difficult to make a shadow box or showcase for Christmas when you already have the following supplies:
- A shadow box made of soft wood like balsa wood (these are in the unfinished wood section of your craft store. Balsa wood is very thin, making it easy to make holes in the back!)
- Acrylic Paint
- Sand Paper
- Needle Nose Pliers (I used my jewelry pliers)
- Ornament (Make sure the ornament will fit inside your box & that it’s not too small!)
- Battery-operated LED String lights (getting lights on a timer is best!)
- Hot Glue Gun (for gluing your ornament inside the box!)
Steps To DIY Shadow Box Christmas Decoration
If you follow these below steps, you can learn how to DIY shadow box Christmas decorations in 5 simple steps:
Step 1: Make the Holes In the Box
Use pliers to make the holes on the bottom of the box, each at an appropriate distance from the other (don’t make it too messy).
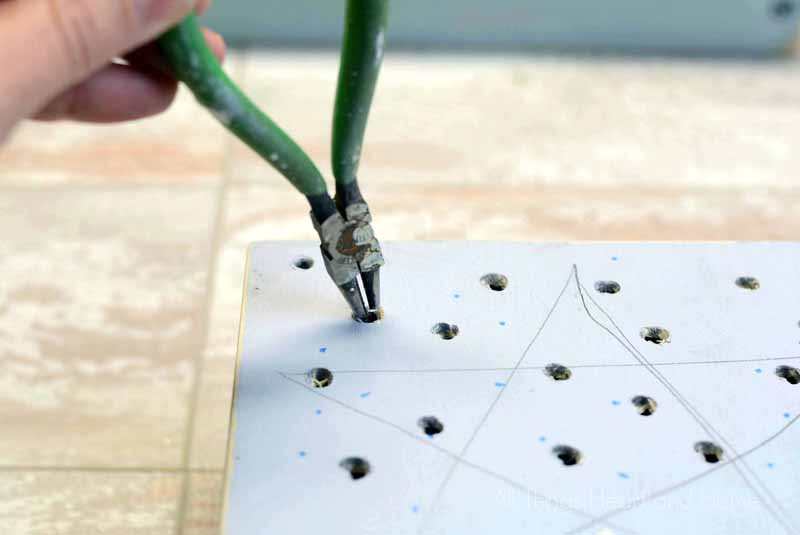
For this,
- Press gently until the tip goes through from outside to inside, and then spin and press to ensure the hole is the right size.
- You may want to test the lights after one hole to get an idea of how big they should be…you don’t want the lights going all the way in, just the tip.
- I made more holes on one side than the other, which took a minute.
It is also possible to make holes in terra cotta pots.
Check the Guide Section: How to Make Holes In Terra Cotta Pots.
Step 2: Clean Inside & Soften The Holes
You will see the loosely attached pushed fragments of the box inside it. First, remove them individually and lightly sand the inside to soften the holes.

Step 3: Paint the Box
- Apply thin layers of acrylic color because the more wipe box is, the more it will get warped.
- If you are using a cardboard box, first coat it with a layer of white paint. It will make the final paint look bright.
- Never brush on certain areas too much. It may cause uneven layers.
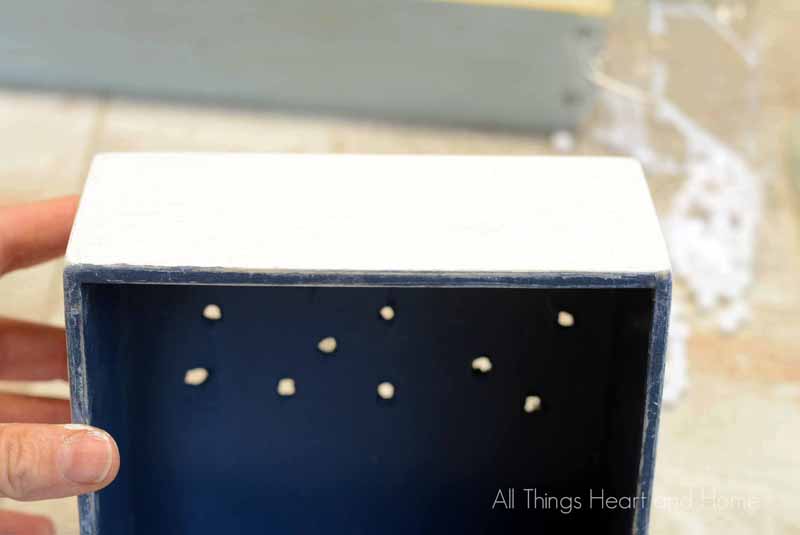
I painted the outside in white and the inside in blue (try your favorite), then went back over both inside and out with a dry brush of turquoise (color between green and blue). However, I also wiped off (with a baby wipe) any areas that I thought looked too saturated with the turquoise. I was trying to soften the colors…
- After the painted box has dried, you can optionally sand the surface if you like a more distressed look.
You can paint a lot of other things like blinds with acrylic paints.
Check The Guide: How to Paint Window Blinds For Beginners
Step 4: Insert & Tape the Lights
Now you’re ready for your LEDs to be inserted in each hole! I used small tape to keep the lights steady and in place. These are attached to each other, so manage the stuff. (I used the blue tape so you could see where I taped!)
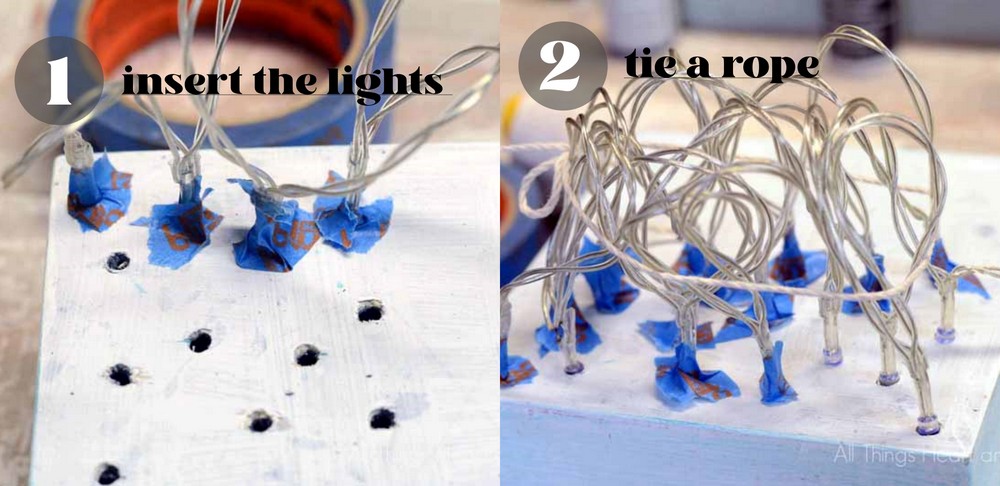
When all your lights are in place, you may want to tie a string around the excess wiring to keep it from showing from the front!
- Never work with the string lights while you have turned them ON.
It’s fun to make string light projects, so
Check: How to Make Mason Jar Lanterns Filled With String Lights
Last Step: Put the Photos and Ornament
Now, hot glue your ornament inside! (My ornament, “Joy,” fits tightly and doesn’t need to be glued. I also stuck our family photo there). You can put any decoration you made or bought and family photos.
I hope you’re enjoying dreaming up projects for the holidays~Have a wonderful day, my friends~ xo
Leave a Reply