
Give every outfit extra charm with Free Crochet Bow Bag Pattern bringing elegant bow details practical space and lovely everyday fashion.
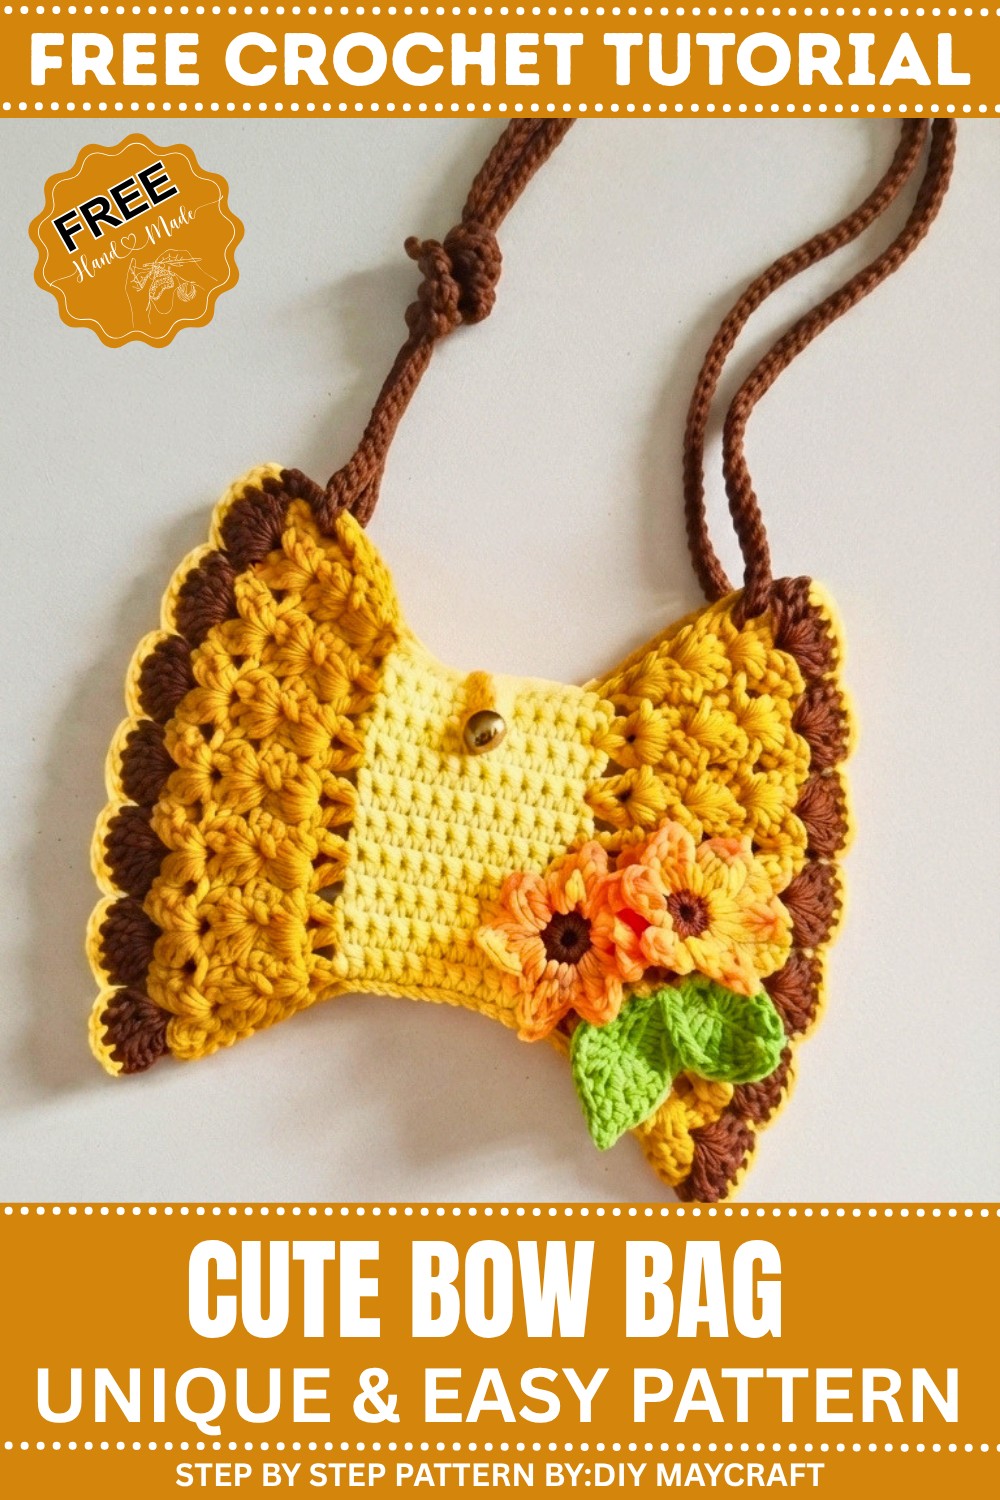
One of my favorite crochet projects has been making a cute little bag that looks like a bow. If you’re looking for something fun and different to create, the Free crochet Bow Bag Pattern is a great place to start. This pattern is not only for making the bow-shaped bag itself, but with just a few small changes, you can turn it into a clutch or a small pouch. It’s a versatile design that lets you practice your skills while creating something stylish and useful.
What makes this bag special is its lovely bow shape combined with textured details that give it a modern yet charming look. Made with soft milk cotton yarn, the bag keeps its shape well but still feels comfortable to carry around. The surface has an interesting pattern that draws attention without being over-the-top. Its design is both playful and elegant, so it easily matches casual daywear or more dressed-up outfits. This makes it a handy accessory that works for many occasions.
Easy Crochet Bow Bag with Free Pattern
This project is perfect for those who have some experience with crochet and want to try something a little different. The pattern mainly uses some techniques for joining motifs, so it’s a nice challenge without being too hard. It’s ideal for building your skills while making something unique.

Beyond being a practical accessory, this bow bag makes a thoughtful gift or a charming addition to your collection. It’s a stylish piece that’s wearable, decorative, and sure to get compliments. If you enjoy projects that combine creativity with function, this pattern is a wonderful choice. Give it a try—you’ll love both the process and the finished bag!
Easy Free Crochet Ribbon Bag Pattern
Summary
Create a stylish and practical crochet bag featuring a beautiful ribbon shape motif. This project uses simple stitches such as single crochets and double crochets to create a textured pattern, with color changes to enhance the design. The bag is finished with a strap that can be adjusted without a clasp and decorative sunflower and leaf appliques for a charming touch.
Pattern Notes
- Worked in rows and motifs, combining to form two “wings” which are then joined.
- Uses back loops for initial rows to create texture.
- Multiple yarn color changes make the ribbon shapes stand out.
- Straps are worked separately and inserted through the motifs to allow adjustability.
- Ideal for intermediate crocheters familiar with basic stitches and motif joining.
Skill Level
Intermediate
Materials
- Milk cotton yarn in 2 or more colors
- Crochet hook 6/0 (Tulip brand recommended)
- Scissors
- Button for closure
- Yarn needle for weaving in ends
- Optional: Yarn for sunflower and leaf decorations
Measurements / Sizing
- Approximate strap length: 100–120 cm (adjustable)
- Number of motifs per wing: 14 motifs (folded to form 7 combined motifs)
- Final bag dimensions and size depend on yarn thickness and tension; adjust as needed.
Gauge and Stitch Pattern
- Gauge not critical; project depends on motif count.
- Stitch pattern involves:
- Single crochets (sc)
- Slip stitches (sl st)
- Double crochets (dc)
- Chains (ch)
Stitch Abbreviations
- ch = chain
- sc = single crochet
- dc = double crochet
- sl st = slip stitch
- st(s) = stitch(es)
Special Stitches
- Back loop single crochet: Insert hook into the back loop only when working single crochets on the foundation rows.
- Cluster of double crochets separated by chains to create motif openings.
The Crochet Pattern!
Wing 1 & 2 (Make 2)
Foundation Row:
- Make a slip knot and chain 12.
- Starting from second chain from hook, work 11 single crochets (sc) into the back loops only.
Rows 2:
- Chain 1 and turn.
- Work 11 sc across, again working into the back loops for texture.

Rows 3:
- Chain 1 and turn.
- Work 11 sc across, again working into the back loops for texture.
Rows 4:
- Chain 1 and turn.
- Work 11 sc across, again working into the back loops for texture.
Rows 5:
- Chain 1 and turn.
- Work 11 sc across, again working into the back loops for texture.
Rows 6:
- Chain 1 and turn.
- Work 11 sc across, again working into the back loops for texture.
Rows 7:
- Chain 1 and turn.
- Work 11 sc across, again working into the back loops for texture.
Rows 8:
- Chain 1 and turn.
- Work 11 sc across, again working into the back loops for texture.
Rows 9:
- Chain 1 and turn.
- Work 11 sc across, again working into the back loops for texture.
Rows 3:
- Chain 1 and turn.
- Work 11 sc across, again working into the back loops for texture.
Rows 10:
- Chain 1 and turn.
- Work 11 sc across, again working into the back loops for texture.
Rows 11:
- Chain 1 and turn.
- Work 11 sc across, again working into the back loops for texture.
Rows 12:
- Chain 1 and turn.
- Work 11 sc across, again working into the back loops for texture.
Rows 13:
- Chain 1 and turn.
- Work 11 sc across, again working into the back loops for texture.
Rows 14:
- Chain 1 and turn.
- Work 11 sc across, again working into the back loops for texture.
Rows 15:
- Chain 1 and turn.
- Work 11 sc across, again working into the back loops for texture.
Rows 16:
- Chain 1 and turn.
- Work 11 sc across, again working into the back loops for texture.
Rows 17:
- Chain 1 and turn.
- Work 11 sc across, again working into the back loops for texture.
Rows 18:
- Chain 1 and turn.
- Work 11 sc across, again working into the back loops for texture.
Rows 19:
- Chain 1 and turn.
- Work 11 sc across, again working into the back loops for texture.
Rows 20:
- Chain 1 and turn.
- Work 11 sc across, again working into the back loops for texture.
Rows 21:
- Chain 1 and turn.
- Work 11 sc across, again working into the back loops for texture.
Rows 22:
- Chain 1 and turn.
- Work 11 sc across, again working into the back loops for texture.
Rows 23:
- Chain 1 and turn.
- Work 11 sc across, again working into the back loops for texture.
Rows 24:
- Chain 1 and turn.
- Work 11 sc across, again working into the back loops for texture.
Rows 25:
- Chain 1 and turn.
- Work 11 sc across, again working into the back loops for texture.
Rows Repeat 26 to 39:
- Chain 1 and turn.
- Work 11 sc across, again working into the back loops for texture.
- Repeat this until you complete row 39.
Row 40:
- Chain 1 and turn.
- Work 5 slip stitches (sl st).
- Chain 12.
- Skip next stitch, then work 5 slip stitches in the subsequent stitches.
- Chain 1.
- Fasten off by breaking the yarn and weaving in ends.
Motif Ribbon Detail (Color Change)
- Join new color by making a slip knot.
- Insert hook into the 40th row holes:
- Chain 4 (counts as 1 dc + ch 1),
- Work 1 dc in the same stitch.
- Skip 2 stitches, work (1 dc, ch 1, 1 dc) in the same stitch (this forms the ribbon motif).
- Repeat across the row.
- End the row by working (1 dc, ch 1, 1 dc) in the last hole.
- Turn and chain 3.


Row 2 of Motif
- Chain 3 and turn.
- Work (1 dc, ch 1, 2 dc) into each “cavity” or chain-1 space created in the previous row.
- Repeat across the row.
Rows 3 of Motif
- Chain 3 and turn each row.
- Repeat the pattern of two double crochets, one chain, two double crochets (2 dc, ch 1, 2 dc) into each motif hole.
- End each row with a single dc in the last stitch.
Rows 4:
- Chain 3 and turn each row.
- Repeat the pattern of two double crochets, one chain, two double crochets (2 dc, ch 1, 2 dc) into each motif hole.
- End each row with a single dc in the last stitch.

Row 5 of Motif (Color Change)
- Join a third color.
- Chain 3 and turn.
- Into each motif cavity, work 5 double crochets (5 dc).
- End with 1 dc, chain 1.
- Fasten off and weave in yarn ends.
Repeat Assembly for Second Wing
- Repeat rows 1 through 5 to create the second wing identical to the first.
Joining Wings
- Fold each wing in half to combine 7 motifs.
- Using yarn with slip knot at the very end, combine motifs as follows:
- Join two stitches into one.
- Chain 1.
- Combine 5 double crochets of one motif to 5 single crochets of the adjoining motif.
- Make a slip stitch into the motif cavity in the middle.
- Repeat the combo of 5 sc and a slip stitch 6 more times across the motifs.
- End with a slip stitch in the same hole, chain 1, fasten off, and weave ends.
- Repeat joining for the other wing side.

Closure & Strap
- Sew a button in the center of the joined motifs for closure.
Strap:
- Using two strands of yarn held together, crochet a long chain to approximately 100–120 cm.
- Fasten off by cutting the yarn and tying a secure knot.
- Insert the strap through the openings of the 4th-row motif cavities.
- Tie adjustable knots as desired allowing length variation without a clasp.
Decoration
- Add sunflower and leaf embellishments on the bag surface.
- Refer to previous tutorials for sunflower and leaf crochet applique patterns.
Assembly & Finishing
- Weave in all loose ends neatly.
- Attach the strap securely inserted through the motif gaps.
- Confirm the button closure is nicely centered and functional.
- Adjust the strap to desired length with the adjustable knot.

Conclusion
- This beautiful ribbon bag combines basic stitches and color changes to produce an eye-catching accessory.
- The adjustable strap offers customization for comfortable wear.
- Decorative appliques add a personal and charming finish.
- Perfect for everyday use or gifting.

Leave a Reply