
Bring coastal charm to every outing with Free Crochet Seashell Bag Pattern featuring graceful shell inspired texture roomy space and stylish.
I’ve always loved creating fun and useful accessories with yarn, and one of my favorites has been making bags inspired by nature. The Free crochet Seashell Bag Pattern is a charming project that lets you craft a small, pretty bag shaped like a seashell. With a few minor changes, you can even turn this pattern into a clutch or a cute little pouch, giving you lots of options depending on what you need.
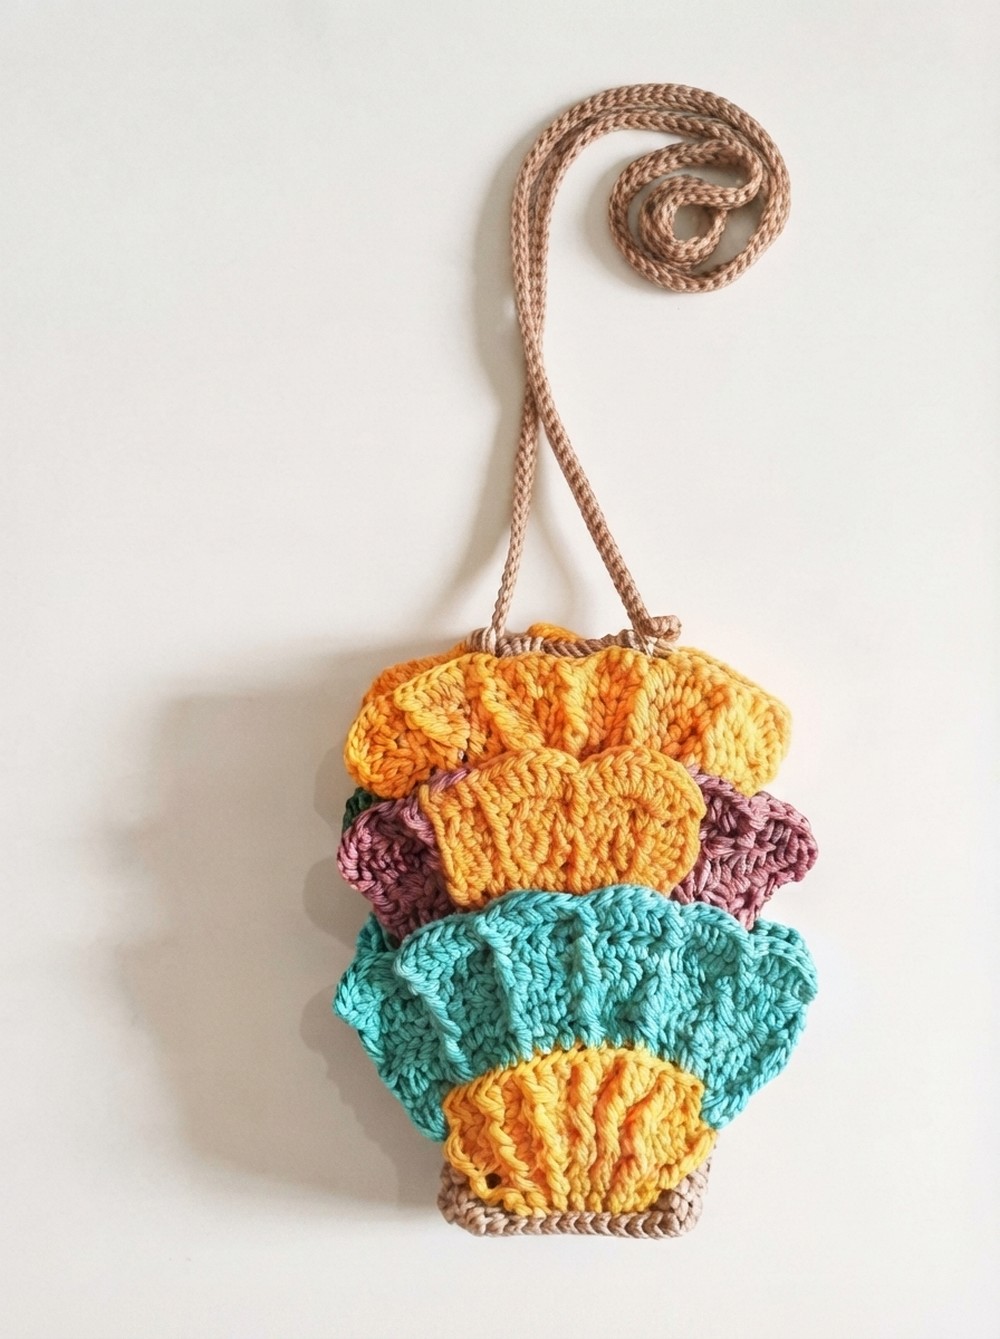
This seashell bag is eye-catching and perfect for carrying essentials like your phone, keys, or wallet. Its shape looks just like a real shell, with gentle curves and ridges that make it feel soft and interesting to touch. The bag’s simple round form and the flap designed to look like the opening of a shell give it a unique and playful style. It’s a great accessory for warm days, trips to the beach, or casual outings when you want to add a bit of natural beauty to your look.
Free Crochet Basket Bag Pattern That’s Easier Than It Looks

This project is great for anyone who knows a little about crochet and wants something straightforward but fun. It helps you build your skills in an easy, stress-free way while creating something special and stylish at the same time.

This seashell bag also makes a thoughtful gift for loved ones who enjoy beach themes or pretty accessories. It’s easy to wear and adds a unique touch to any outfit. If you want a project that’s simple, creative, and full of personality, this free crochet seashell bag pattern is a perfect pick.
Free Crochet Pattern for Sea Shell-Shaped Bag
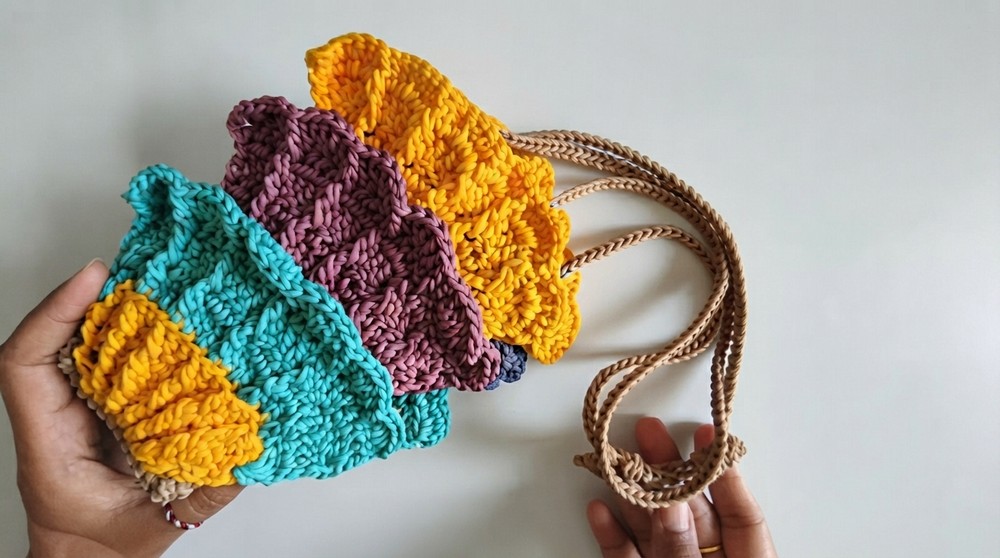
Welcome to this beautiful crochet project where you will make a sea shell-shaped bag. This elegant design features a sturdy rectangular base and textured, dimensional shell motifs sewn onto it. Perfect as a handbag or sling bag, its unique shape and texture will catch many eyes. Follow along carefully to create this lovely accessory.
Skill Level & Terminology
- Skill Level: Intermediate (some experience with post stitches recommended)
- Terminology: US crochet terms
Materials & Tools
- Yarn: Onitsuga Polithick yarn (or similar bulky yarn)
- Hook: Size 6/0 (Tulip recommended)
- Scissors
- Tapestry needle
- Lighter (to finish yarn ends)
- Sewing needle and thread (for attaching shells)
Gauge
- 12 single crochets per row × 12 rows = approximately 8 cm length rectangle base piece.
- Gauge is flexible; focus on consistent tension to maintain shape.
Abbreviations
- ch = chain
- sc = single crochet
- dc = double crochet
- sl st = slip stitch
- fpdc = front post double crochet
- bpdc = back post double crochet
- inc = increase (2 stitches in same stitch)
- dec = decrease (combine two stitches into one)
Special Stitch Instructions
- Front Post Double Crochet (fpdc): Yarn over, insert hook from front to back around the post of the stitch below, yarn over, pull through, yarn over twice and complete.
- Back Post Double Crochet (bpdc): Yarn over, insert hook from back to front around the post of the stitch below, finish as regular dc.
- These posts create ribs and textures imitating sea shell ridges.
Finished Size
- Base rectangle: approx 8 cm length × width per gauge.
- Bag height depends on your tension and side wall rounds worked.
- Final shell motifs add dimension and expand width slightly.
Base Fabric (Rectangle)
Foundation chain: Ch 13.
Row 1:
- Skip first chain from hook.
- Work 12 single crochet (sc) stitches evenly across the remaining chains.
Row 2:
- Ch 1 and turn.
- Work sc in each stitch across, making 12 sc.
- In the video, it mentions including the same stitch twice — this likely means making 1 sc in each stitch, as usual.
Rows 3:
- Repeat Row 2 exactly:
- Ch 1, turn.
- Work 12 sc stitches across each row.
Rows 4:
- Repeat Row 2 exactly:
- Ch 1, turn.
- Work 12 sc stitches across each row.
Rows 5:
- Repeat Row 2 exactly:
- Ch 1, turn.
- Work 12 sc stitches across each row.
Rows 6:
- Repeat Row 2 exactly:
- Ch 1, turn.
- Work 12 sc stitches across each row.
Rows 7:
- Repeat Row 2 exactly:
- Ch 1, turn.
- Work 12 sc stitches across each row.

Rows 8:
- Repeat Row 2 exactly:
- Ch 1, turn.
- Work 12 sc stitches across each row.
Rows 9:
- Repeat Row 2 exactly:
- Ch 1, turn.
- Work 12 sc stitches across each row.
Rows 10:
- Repeat Row 2 exactly:
- Ch 1, turn.
- Work 12 sc stitches across each row.
Rows 11:
- Repeat Row 2 exactly:
- Ch 1, turn.
- Work 12 sc stitches across each row.
Rows 12:
- Repeat Row 2 exactly:
- Ch 1, turn.
- Work 12 sc stitches across each row.
Rows 13:
- Repeat Row 2 exactly:
- Ch 1, turn.
- Work 12 sc stitches across each row.
At the end of Row 12, mark the opposite end to your starting edge; this helps with orientation for next steps.
Single Crochet Border Around Rectangular Base
- Starting from the marked end:
- Work 11 sc stitches along the holes of the first long side row.
- At the corner, increase by working 2 sc in one stitch (inc) to shape the corner.
- Work 10 sc along the holes of the short side.
- At the next corner, another inc (2 sc in one stitch).
- Work 11 sc along the other long side back to starting point.
- Join the last sc to the first with a slip stitch (sl st).
You now have a neat rounded border framing the rectangle base.
Back Loop Single Crochet Round (Round 1)
- Ch 1.
- Work 48 sc in only the back loops around this round (this rounds the base vertically).
- Join with sl st.
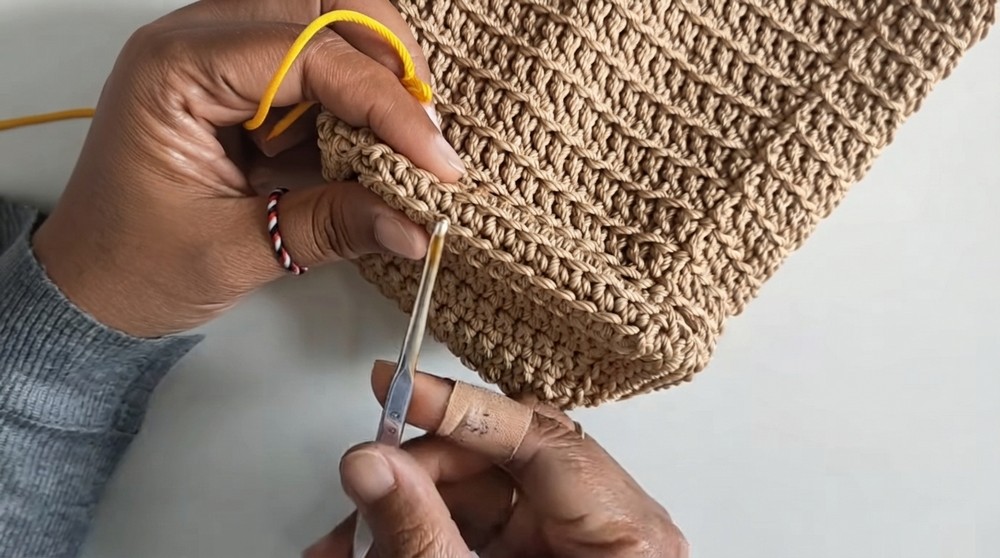
Back Loop Double Crochet Rounds (Rounds 2 to 13)
Round 2:
- Ch 2 (counts as dc).
- Work 48 double crochet (dc) in back loops only, including 2 dc in the same stitch as starting ch 2 (counts as first dc).
- Join with sl st at the beginning dc.
Rounds 3 (Repeat Round 2):
- For each round:
- Ch 2, turn.
- Work 48 dc in back loops only.
- Join with sl st.
Rounds 4 (Repeat Round 2):
- For each round:
- Ch 2, turn.
- Work 48 dc in back loops only.
- Join with sl st.

Rounds 5 (Repeat Round 2):
- For each round:
- Ch 2, turn.
- Work 48 dc in back loops only.
- Join with sl st.
Rounds 6 (Repeat Round 2):
- For each round:
- Ch 2, turn.
- Work 48 dc in back loops only.
- Join with sl st.
Rounds 7 (Repeat Round 2):
- For each round:
- Ch 2, turn.
- Work 48 dc in back loops only.
- Join with sl st.
Rounds 4 (Repeat Round 2):
- For each round:
- Ch 2, turn.
- Work 48 dc in back loops only.
- Join with sl st.
Rounds 8 (Repeat Round 2):
- For each round:
- Ch 2, turn.
- Work 48 dc in back loops only.
- Join with sl st.
Rounds 9 (Repeat Round 2):
- For each round:
- Ch 2, turn.
- Work 48 dc in back loops only.
- Join with sl st.
Rounds 10 (Repeat Round 2):
- For each round:
- Ch 2, turn.
- Work 48 dc in back loops only.
- Join with sl st.
Rounds 4 (Repeat Round 2):
- For each round:
- Ch 2, turn.
- Work 48 dc in back loops only.
- Join with sl st.
Rounds 11 (Repeat Round 2):
- For each round:
- Ch 2, turn.
- Work 48 dc in back loops only.
- Join with sl st.
Rounds 12 (Repeat Round 2):
- For each round:
- Ch 2, turn.
- Work 48 dc in back loops only.
- Join with sl st.
Rounds 13 (Repeat Round 2):
- For each round:
- Ch 2, turn.
- Work 48 dc in back loops only.
- Join with sl st.
This builds the textured and sturdy side wall of the bag.
Final Single Crochet Round (Round 14)
- Ch 1.
- Work 48 sc evenly around.
- Join with sl st.
- Fasten off, break yarn, and tidy the ends.
Shell Motif 1 (Crocheting on Front Loops)
- Attach yarn to the third front loop from the slip stitch on the base for starting.
Row 1:
- Ch 2.
- Work 7 dc + dc in the same stitch as ch 2 (8 dc total in first stitch).
Row 2:
- Ch 2 and turn.
- Work 1 back post double crochet (bpdc), then 1 dc in same stitch, repeat across next 6 stitches.
- End with 1 bpdc on last stitch.
Row 3:
- Ch 2 and turn.
- Work 1 front post double crochet (fpdc), then 2 dc in the next stitch (increase), repeat 6 times.
- End with 1 fpdc.
Row 4:
- Ch 2 and turn.
- Work 1 bpdc, then 2 dc, repeat 6 times.
- End with 1 bpdc.
Row 5:
- Ch 1 and turn.
- Make a single crochet decrease (sc dec) combining two sc into one, then 1 fpdc, then 2 dc, repeat 4 times.
- End with 1 fpdc.
- Join with sl st, break yarn.
Shell 1 is complete — a textured fan-shaped motif.
Shell Motif 2
- Attach yarn to Row 4 of Shell 1 with a slip knot.
Row 1:
- Ch 2.
- Work 3 dc in the same stitch.
Rows 2:
- Work 2 dc in back loop.
- Increase by working 2 dc in one back loop (dc inc) four times.
- Finish rows with 3 dc in back loop.
Rows 3:
- Work 2 dc in back loop.
- Increase by working 2 dc in one back loop (dc inc) four times.
- Finish rows with 3 dc in back loop.
Rows 4:
- Work 2 dc in back loop.
- Increase by working 2 dc in one back loop (dc inc) four times.
- Finish rows with 3 dc in back loop.
Skip fifth row.
Row 6 onwards:
- Repeat the shell fan pattern, using front and back post stitches and double crochet clusters as with Shell 1, adapted to fit this shell size.
Shell Motif 3
- Beginning at Shell 2 Row 1.
Rows 1:
- Work alternating fpdc and bpdc clusters, combining increases, similar shaping to Shell 1 but with variations: e.g., 1 fpdc, 3 dc; 1 bpdc, 3 dc repeated, finishing with fpdc or bpdc on ends.
Rows 2:
- Work alternating fpdc and bpdc clusters, combining increases, similar shaping to Shell 1 but with variations: e.g., 1 fpdc, 3 dc; 1 bpdc, 3 dc repeated, finishing with fpdc or bpdc on ends.
Rows 3:
- Work alternating fpdc and bpdc clusters, combining increases, similar shaping to Shell 1 but with variations: e.g., 1 fpdc, 3 dc; 1 bpdc, 3 dc repeated, finishing with fpdc or bpdc on ends.
Rows 4:
- Work alternating fpdc and bpdc clusters, combining increases, similar shaping to Shell 1 but with variations: e.g., 1 fpdc, 3 dc; 1 bpdc, 3 dc repeated, finishing with fpdc or bpdc on ends.
Rows 5:
- Work alternating fpdc and bpdc clusters, combining increases, similar shaping to Shell 1 but with variations: e.g., 1 fpdc, 3 dc; 1 bpdc, 3 dc repeated, finishing with fpdc or bpdc on ends.

Shell Motif 4
- Follow same pattern as Shell 3 for Rows 1–3.
Row 4:
- Ch 2 and turn.
- Pattern: 1 bpdc, 1 dc, 3 dc in one hole (cluster), 1 dc, repeated 6 times.
- End with 1 bpdc.
- Finish with ch 1, break yarn, tidy ends.
Attaching Shell Motifs
- Arrange all four shell motifs on the bag evenly.
- Sew securely with yarn and tapestry needle or sewing needle and thread.
Strap and Final Assembly
- Fold top of the bag for the strap placement.
- Make an adjustable rope strap following the technique in the creator’s previous video (a long chain or braid that can be knotted).
- Attach strap ends to bag’s top edges securely.
- The strap length can be adjusted with a knot for comfortable wearing.
Final Finishing Steps
- Weave in all yarn ends carefully.
- Seal yarn ends with a lighter if synthetic yarn is used (cautiously).
- Tidy up and block bag if desired.
Summary for Users Who Prefer Quick Info:
You start with a rectangular base made of 12 rows × 12 single crochet stitches. Then you work a sc border around it to round the corners nicely. The sides of the bag are built by doing back loop double crochet rounds to create texture and structure. Next, you crochet four separate shell fan-shaped motifs using post stitches (front and back post double crochet) and double crochet increases to create the signature shell texture. These shells are sewn onto the bag base evenly. Finally, an adjustable rope strap is added at the top, completing your unique sea shell bag!
Leave a Reply