
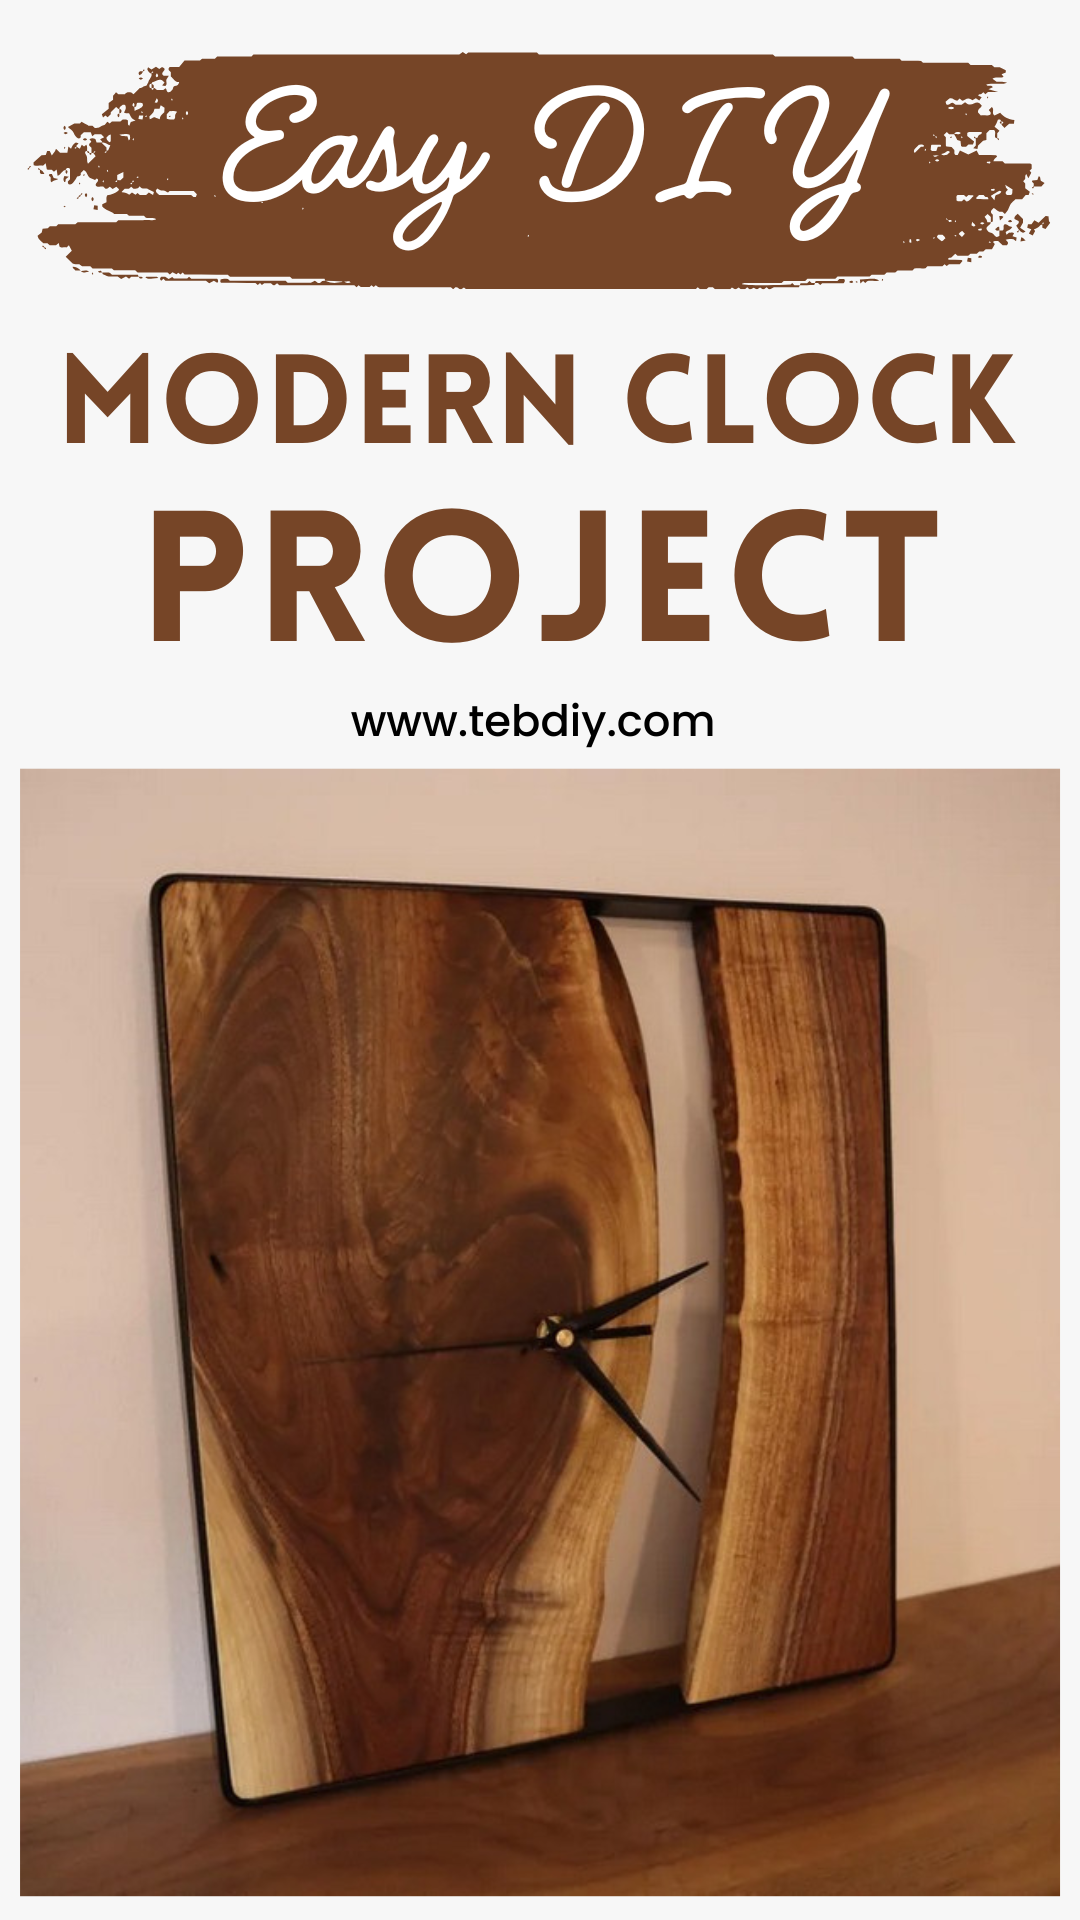
Transform the piece of live edge walnut that’s just screaming for a second life by following this DIY Modern Clock Project. It will suit best for making a sleek, modern clock, a fusion of rustic wood and industrial steel, ticking away time on your wall. This DIY Modern Clock Project is not just about tracking hours; it’s about elevating a space, starting conversations, and satisfying that itch to create something extraordinary with your own hands. So be ready to explore a world where timepieces are not just bought, but born.
DIY Modern Clock Project

Materials:
- Live Edge Wood (Walnut)
- Steel Flat Bar (48″ x 1″ x 3/16″)
- (6) Flathead Wood Screws (1/2″ Length)
- Quartz Clock Mechanism
- Tung Oil
- Paint Degreaser
- 2 in 1 Paint/Primer (Black)
- Clear Coat
- Drilling Oil/Lubricant
Tools:
- Miter Saw
- Flat Bar Bender
- Tape Measure
- Marking Pen
- Center Punch
- Bench Grinder with Deburring Wheel
- Welder (Flux Core)
- Belt Sander
- Drill Press with 1/16″, 1/4″, & 1/8″ Drill Bits
- Fusion 360
- Vice
- Angle Grinder
- File
- Router
- Screw Driver
- Palm Sander with 60/180/220/320 Grit Sandpaper
- Personal Protective Equipment (PPE)
Step By Step Creation Process
Fabricating the Steel Frame
- Design with Fusion 360: Start by designing a sleek frame to compliment the walnut. Utilize Fusion 360 to craft a model that specifies bend locations and total length.
- Marking Bend Locations: Transfer the bend locations from your design onto the steel flat bar to set the stage for craftmanship.
- Executing the Bend: Secure the steel bar in the bender, ensuring it’s positioned correctly before bending it at a 90-degree angle.
- Bridging the Gap: Identify any gaps in your design. Use an angle grinder and a small piece of flat bar to fill in as necessary.
- Welding Magic: Clamp the frame, add the small gap piece, and weld them together, embracing the sparks and transformation.
- Smoothness Attained: Post-welding, use a belt sander and a bench grinder with a deburring wheel to smooth out the welds. Finish up with a palm sander for a polished look.
- Crafting Brackets: Measure and mark bracket outlines on the flat bar steel, preparing for precise drilling.
- Precise Drilling: Drill the outlined holes with meticulous care, applying oil to reduce friction.
- Flush Countersinking: Use a 1/4″ bit to countersink the holes ensuring a smooth fit for the screws.
- Bracket Finishing Touches: Cut out the brackets, sanding down and deburring edges for final preparation.
- Grand Assembly: Weld the brackets to the frame, marrying the pieces into a singular form.

The Woodwork
- Outline Mastery: Place the frame onto the walnut board. Trace the outline, ready for cutting.
- Rounding Perfection: Cut out the wood as traced. Use a belt sander to gently round the edges until the wood snugly fits the frame.
- Bracket Preparation: Mark bracket locations on the wood. Employ a router to ensure that the brackets will sit flush against the wood.
- Chamfer Creation: File a chamfer on the routered edges to accommodate the bracket fillets.
- Precision Drilling: Drill a 1/4″ hole for the clock mechanism and 1/8″ pilot holes for the bracket screws.
- Carving a Home for Time: Router out a recess to accommodate the clock movement, ensuring a snug fit.
Prepping and Painting Your Masterpiece
- Degrease and Clean: Spray degreaser on the frame, thoroughly wiping it down for a clean surface.
- Bold Painting: Apply three light coats of the 2 in 1 black paint/primer, allowing each coat to dry thoroughly.
- Sealing with Clear Coat: Finish with two coats of clear lacquer for a glossy, protective layer.
The Finishing Touches
- Wood Sanding Journey: Start with coarse and move to fine sanding papers, from 60-grit to 320-grit, until the wood reveals its deep, natural beauty.
- The Tung Oil Transformation Apply two coats of tung oil to protect and enhance the wood’s grain and color.

Assembly of Time
- Component Symphony: Prepare all your components for the final assembly.
- Marrying Wood and Steel: Fasten the wood into the steel frame with the screws, uniting them as one.
- The Heart of Time: Carefully place the quartz clock movement into its dedicated space, securing with a washer and nut.
- Hands of Time: Attach the clock hands according to the mechanism’s instructions.
- Bringing Time to Life: Insert the battery, and watch as your creation comes to life, ready to keep time and turn heads.
Conclusion
And just like that, you’ve turned a piece of ignored walnut and steel into a modern, elegant clock. It’s not just a device to tell time, but a statement piece that adds a touch of personality to any room it graces. This project not only challenged your creativity and craftsmanship but also provided an opportunity to create something truly unique. Remember, the journey matters as much as the destination. Enjoy every tick of your new, modern clock, and may it inspire countless conversations and projects in the time to come.

Leave a Reply