
Give daily essentials with this Free Crochet Bag Pattern that’s perfect for practical storage elegant looks and everyday convenience.
There’s something truly satisfying about creating your own bag with yarn and a hook. A Free Crochet Bag Pattern invites you into a world where creativity meets practicality. Whether you want a tote for groceries, a stylish purse for daily outings, or a handy pouch to keep your small things organized, crochet bags come in all shapes and sizes to fit your needs—and this free pattern gives you a great start.
Crochet bags are popular because they’re both useful and fun to make. You can choose thick, sturdy yarn to crochet a strong market tote or go with soft, delicate threads for an elegant evening bag. The pattern you follow can be simple with basic stitches or more detailed with patterns like shells or granny squares. This variety means you get to decide how intricate or straightforward your bag will be, making the project enjoyable no matter your skill level.
Easy Free Crochet Bag Pattern for Every Occasion

One of the best parts about a crochet bag project is how customizable it is. You can play with colors, add buttons, attach pockets, or even incorporate different stitch patterns. This makes every bag unique and personal, and it’s always exciting to see your own style come to life through yarn.
Beyond being a handy accessory, a handmade crochet bag is special because it carries a piece of you. It’s perfect as a gift for friends or family since each stitch shows effort and care. Plus, once you have a homemade bag that fits just right, you might find yourself reaching for it more often than any store-bought one.

If you want a project that blends creativity, usefulness, and the joy of making something with your own hands, a free crochet bag pattern is a wonderful place to begin. Grab your hook and yarn, and enjoy turning simple stitches into a bag you’ll love!
Crochet Bag from Sheets – Fully Expanded Step-by-Step Pattern
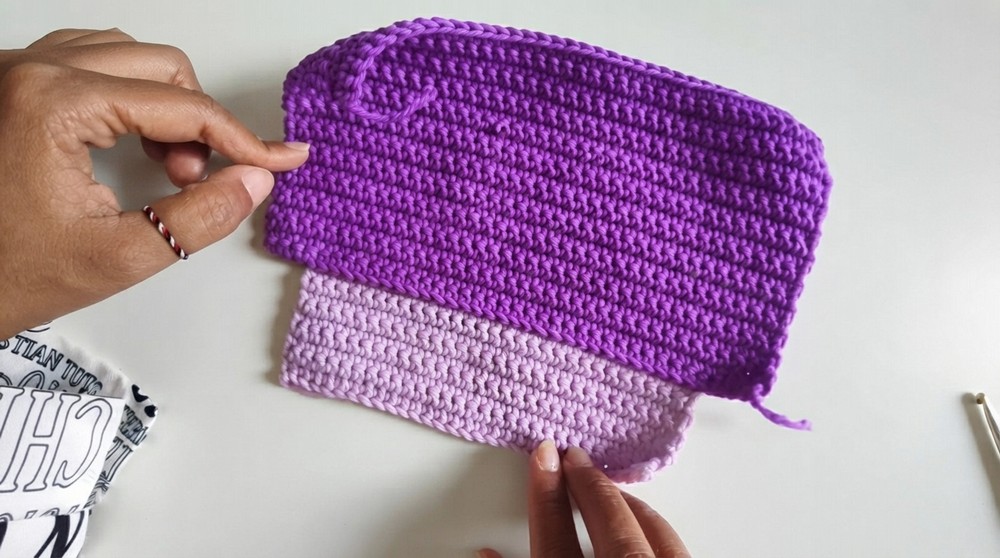
This handmade crochet bag is constructed from two rectangular sheets, joined by side panels, and topped with a shaped lid and crocheted straps. Made with simple crochet stitches and basic shaping, it’s perfect for beginners and intermediate crafters who want a practical yet beautiful accessory. The pattern uses straightforward techniques like single crochet, slip stitches, and decreases to create a finished product with a professional look.
Skill Level & Terminology
- Skill Level: Beginner–Intermediate
- Terms: This pattern uses US crochet terminology.
Materials & Tools
- Milk cotton yarn (main body)
- Purple and cream-colored yarn for accents and lid
- Crochet hook size 6/0 (Tulip Gold recommended)
- Scissors
- Tapestry needle
- Magnetic button (for closure)
- Ribbon for decoration (optional)
Gauge
Crochet a 10 cm x 10 cm swatch in single crochet to test tension. Keeping consistent tightness ensures neat rows and even bag dimensions.
Abbreviations
- ch = chain
- sc = single crochet
- sl st = slip stitch
- dec = single crochet decrease (combine two sc into one)
Special Stitch
Single Crochet Decrease (dec): Insert hook into first stitch, yarn over and pull through (two loops on hook), insert into next stitch, yarn over and pull through (three loops on hook), yarn over and pull through all three loops.
Finished Size
- Approximate bag body width: 30 cm
- Height per panel: about 38 rows (may vary with gauge)
- Lid width: 24 stitches
- Lid height: 11 rows + shaping rows
- Side depth approx. 64 rows tall, 8 stitches wide
Pattern Details
Part 1: Bag Body – Sheet 1 and Sheet 2 (Make 2 identical sheets)
Foundation chain:
- Make a slip knot.
- Chain 31 (30 base chains plus 1 turning chain).
Row 1:
- Starting in second chain from hook, work 1 sc in each chain across.
- Total of 30 single crochets.
Row 2:
- Ch 1, turn.
- Work 1 sc into each stitch across (30 sc).

Row 3:
- Ch 1, turn.
- Work 30 sc across.
Row 4:
- Ch 1, turn.
- Work 30 sc across.
Row 5:
- Ch 1, turn.
- Work 30 sc across.
Row 6:
- Ch 1, turn.
- Work 30 sc across.
Row 7:
- Ch 1, turn.
- Work 30 sc across.
Row 8:
- Ch 1, turn.
- Work 30 sc across.
Row 9:
- Ch 1, turn.
- Work 30 sc across.
- After completing Row 9, finish off yarn by cutting and securing.
This forms the initial bag body rectangle.
Color change accent with purple yarn:
- Attach purple yarn with slip knot at last stitch of Row 9.
Row 10:
- Work 30 slip stitches (sl st) across the last row of body fabric.
Chain 5 (counts as 1 sc plus 4 chains), turn your work.
Row 11:
- Work 4 sc into the 4 chains just made.
- Then work 30 sc across Row 9 stitches.

Row 12:
- Ch 1, turn.
- Work 38 sc across (30 previous stitches plus 4 sc plus 4 chains equals 38 stitches).
Row 13:
- Ch 1, turn.
- Work 38 sc across.
Row 14:
- Ch 1, turn.
- Work 38 sc across.
Row 15:
- Ch 1, turn.
- Work 38 sc across.
Row 16:
- Ch 1, turn.
- Work 38 sc across.
Row 17:
- Ch 1, turn.
- Work 38 sc across.
Row 18:
- Ch 1, turn.
- Work 38 sc across.
Row 19:
- Ch 1, turn.
- Work 38 sc across.
Row 20:
- Ch 1, turn.
- Work 38 sc across.
Row 21:
- Ch 1, turn.
- Work 38 sc across.
Row 22:
- Ch 1, turn.
- Work 38 sc across.
Row 23:
- Ch 1, turn.
- Work 38 sc across.
- Fasten off and cut yarn.
Extend the piece sidewise by adding 8 stitches in color contrast.
Repeat the entire body sheet process (rows 1–23) for Sheet 2 to create the back panel for the bag.
Part 2: Bag Lid
- Fold one sheet’s long edge. Using a marker, count 7 stitches from the edge and mark stitch 8.
- Skip 23 stitches, then mark stitch 24.
- Join cream-colored yarn at first marker, working only in back loops.
Row 1:
- Ch 1.
- Work 24 sc in back loops between markers.
Row 2:
- Ch 1, turn.
- Work 24 sc across back loops.
Rows 3 to 11:
- Repeat: ch 1, turn, work 24 sc across.
Row 12 (Decrease row):
- Ch 1, turn.
- Work a sc decrease (dec) over the first two stitches (combine into 1 stitch).
- Work 20 sc across.
- Work a dec over last two stitches.
- Total 22 stitches.
Row 13:
- Ch 1, turn.
- Work a dec, then 18 sc, then a dec.
- Total 20 stitches.
Row 14:
- Ch 1, turn.
- Work a dec, then 16 sc, then a dec.
- Total 18 stitches.
Row 15:
- Ch 1, turn.
- Work a dec, then 14 sc, then a dec.
- Total 16 stitches.
- Finish off and secure yarn.
The lid’s width decreases gradually through decreases to create a rounded flap.
Part 3: Decoration Edge on Lid
- Attach cream yarn at edge hole of lid.
Row 1:
- Work 11 sc evenly along edge.
- Then work the pattern: (1 sc, 1 ch) repeated 5 times along the curved edge.
Row 2:
- Work 14 sc along the next edge area.
Row 3:
- Work again (1 sc, 1 ch) repeated 5 times along the opposite side curve.
Row 4:
- Work 11 sc completing edge and join with sl st to start.
- Cut yarn and weave ends.
Adds a pretty chain-loop decoration around lid edge.

Part 4: Side Panels – Joining Sheets & Bag Structure
- Place the two large sheets together, edges aligned.
- Attach yarn in slip knot to last stitch on one short edge.
Join Sides:
- Chain 1.
- Work 22 sc through aligned row holes of both sheets, joining front and back.
Join Bottom:
- Fold bottom corner.
- Chain 4.
- Work 4 sc, then 1 sc in fold center, then 4 sc for total of 9 sc joining bottom part.
- Cut yarn, weave ends.
Repeat joining bottom on opposite side.
Part 5: Bag Ears and Strap Attachment
- Make 4 slip knots as starting points for straps.
- Work 3 sc in rows back and forth for 15 rows on each strap.
- Add banana stitch decorations along strap sides.
- Use tapestry needle to sew straps securely to bag sides.
- Attach adjustable straps on both sides using knots for sizing ease.

Part 6: Finishing Touches
- Turn bag inside out before sewing for easier handling; flip right side out after assembly.
- Sew magnetic button onto lid flap for closure.
- Decorate bag by tying in ribbons, Romanian rope, or chains as desired.
- Finish all ends tidily, trimming with scissors and carefully melting ends with a lighter if synthetic yarn is used.
Assembly & Finishing Summary
- Two identical sheets form bag body; widened by extra chains and stitches in accent color.
- Shaped lid is crocheted separately with decreases and adorned by chain loops.
- Side panels join the sheets with single crochet stitches to create the bag’s form.
- Edges and corners are reinforced with neat stitches.
- Straps/ears are crocheted rectangles sewn on and adjusted with sliding knots for length.
- Button closure and decorations finish the bag making it functional and attractive.

For Users Who Want Quick Understanding:
- The bag starts with two rectangular panels, worked mainly with single crochet stitches.
- The panels get wider using additional chains and working across them for rows 10–23.
- The lid is worked separately with 24 sc per row on back loops only, shaped by decreases starting at row 12.
- Side seams and bottom are joined with single crochet stitches to form bag shape.
- Straps are small rectangles worked in single crochet and sewn on.
- The bag closes with a magnetic button and is decorated as desired.
This project uses only single crochet, slip stitches, chains, and simple decreases, making it perfect for those familiar with basic crochet who want to create a beautiful, practical bag.

Leave a Reply