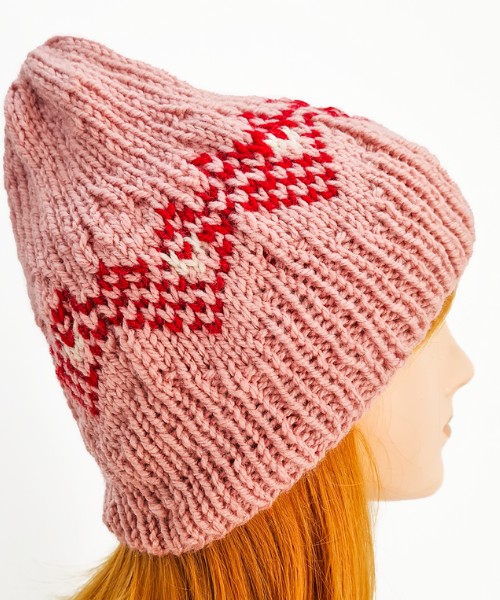
As we edge closer to the day we celebrate the essence of motherhood, few things can convey the depths of our fondness quite like a personal, handcrafted gift. In the realm of knitwear, the ‘Your Mother and Mine knit Hat pattern’ stands as an emblem of such affection. It’s more than just a beanie; each stitch is a testament to the nurturing warmth and comfort mothers provide. It will be best for transforming simple strands of yarn into a snug cocoon of love, shaped perfectly to cradle your beloved recipient’s head. The pattern is love made visible, set in the soft embrace of a beanie, sure to bring a smile to her face.
Mother And Mine Hat Knit Pattern


Materials List and Tools
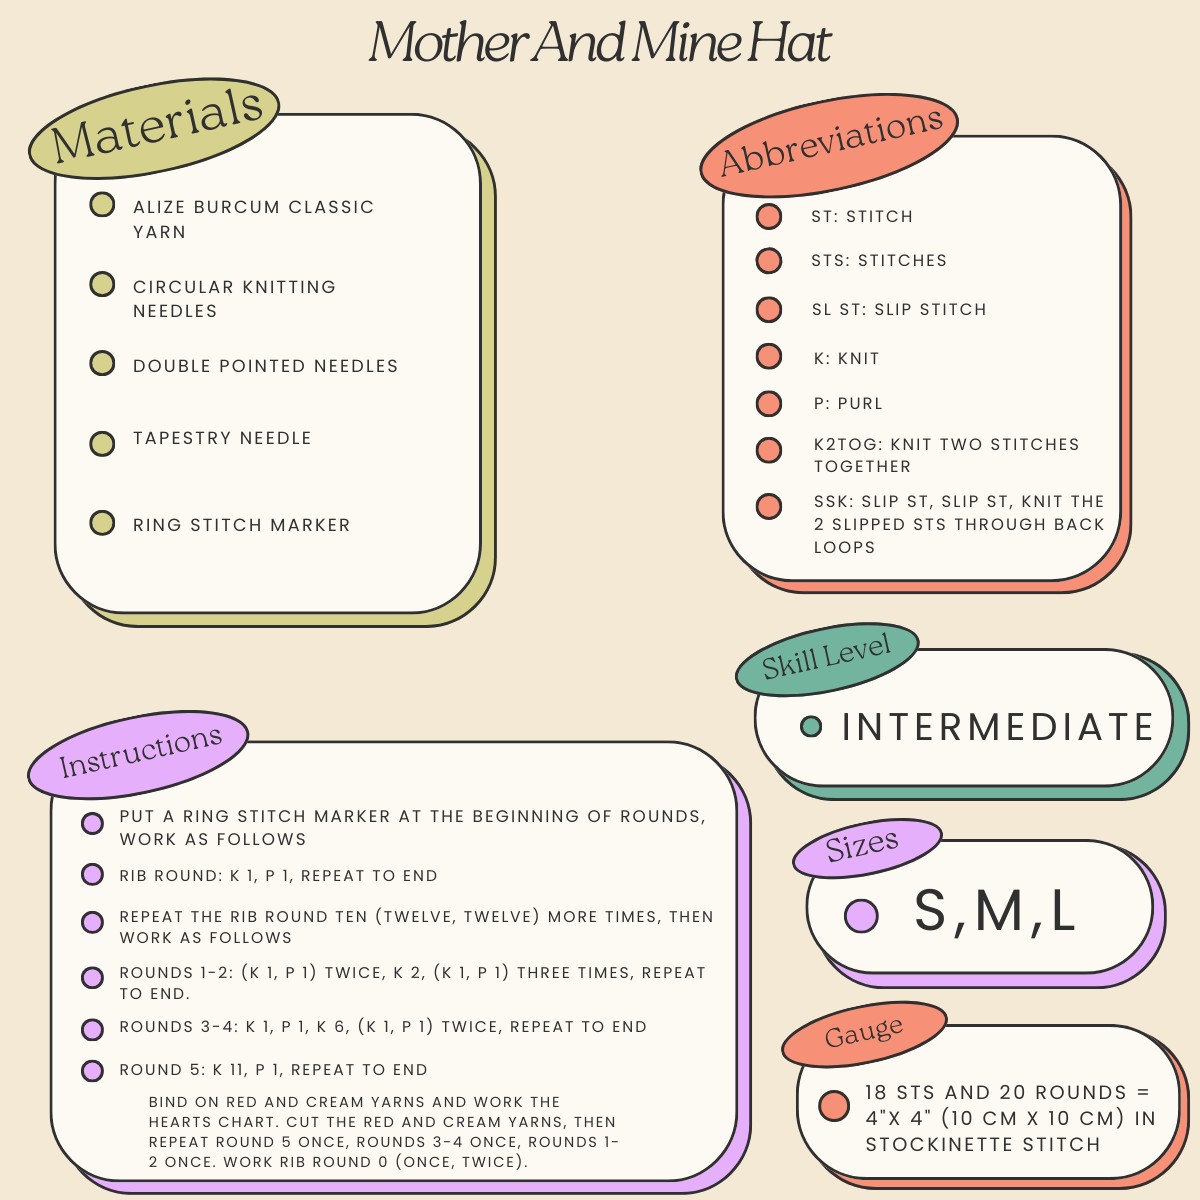
To create the ‘Your Mother and Mine Hat,’ you will need the following materials:
- Yarn: Alize Burcum Classic yarn is recommended, with its 100% acrylic softness and 230 yards (210 m) per 3.5 oz (100 g) skein. Required shades and quantities include:
- Rose Berry 170 (1 skein)
- Red 106 (1 skein)
- Cream 01 (1 skein)
- Needles:
- Circular knitting needles (16″ or 40 cm in length) in US 8 (5 mm)
- A set of Double pointed needles (DPNs) in US 8 (5 mm) for the decreasing rounds.
- Accessories:
- A tapestry needle to weave in ends.
- A ring stitch marker to denote the beginning of rounds.
Sizes and Measurements
The hat pattern is designed for a spectrum of sizes:
- Size S (for kids): Fits head circumference of 18″ (46 cm), height of the beanie at 8″ (20 cm)
- Size M: Suitable for head circumference 20″ (51 cm), height of 8.5″ (21.5 cm)
- Size L (for teens and adults): Made for a head circumference of 22″ (56 cm), with a height of 9″ (23 cm)
Gauge
To ensure proper sizing, gauge should be as follows:
- 18 stitches and 20 rounds equating to a 4″ x 4″ (10 cm x 10 cm) square in a stockinette stitch pattern.
Yardage
Approximate yarn lengths required for each size:
- Size S: 108 – 110 yards (100 – 102 m)
- Size M: 128 – 130 yards (118 – 120 m)
- Size L: 148 – 150 yards (135 – 137 m)
Knitting Terminology
- st: stitch
- sts: stitches
- sl st: slip stitch
- k: knit
- p: purl
- k2tog: knit two stitches together
- ssk: slip a stitch, slip the next stitch, then knit those two slipped stitches together through back loops

Step-by-Step Instructions
Casting On and Ribbing
- Start with the Rose Berry yarn, casting on 72 (84, 96) stitches for sizes S (M, L) respectively.
- Form a ring by joining the end of the row to the beginning, careful to maintain a proper tension and alignment.
- Place your ring stitch marker here to denote the start of each round.
- Initiate the ribbing with one knit stitch followed by one purl stitch, repeating this until the end of the round.
- Extend the ribbing pattern for ten (or twelve for larger sizes) additional rounds.
Main Hat Body
- Progress to Rounds 1-2 by alternating between knit and purl stitches in a set pattern repeated until the round’s completion.
- Move to Rounds 3-4 by adjusting the number of knit stitches between purl stitches as per the pattern instruction.
- In Round 5, knit eleven stitches followed by a single purl stitch, echoing this sequence until the round ends.
Heart Pattern Chart
- Introduce Red and Cream yarns following the heart chart for knitting a lovely heart pattern.
- During this pattern phase, ensure a steady tension is maintained to keep the heart shapes defined and consistent.
- Once the heart pattern is complete, revert to the Rose Berry yarn and repeat the aforementioned knit and purl rounds, in the order according to the pattern.
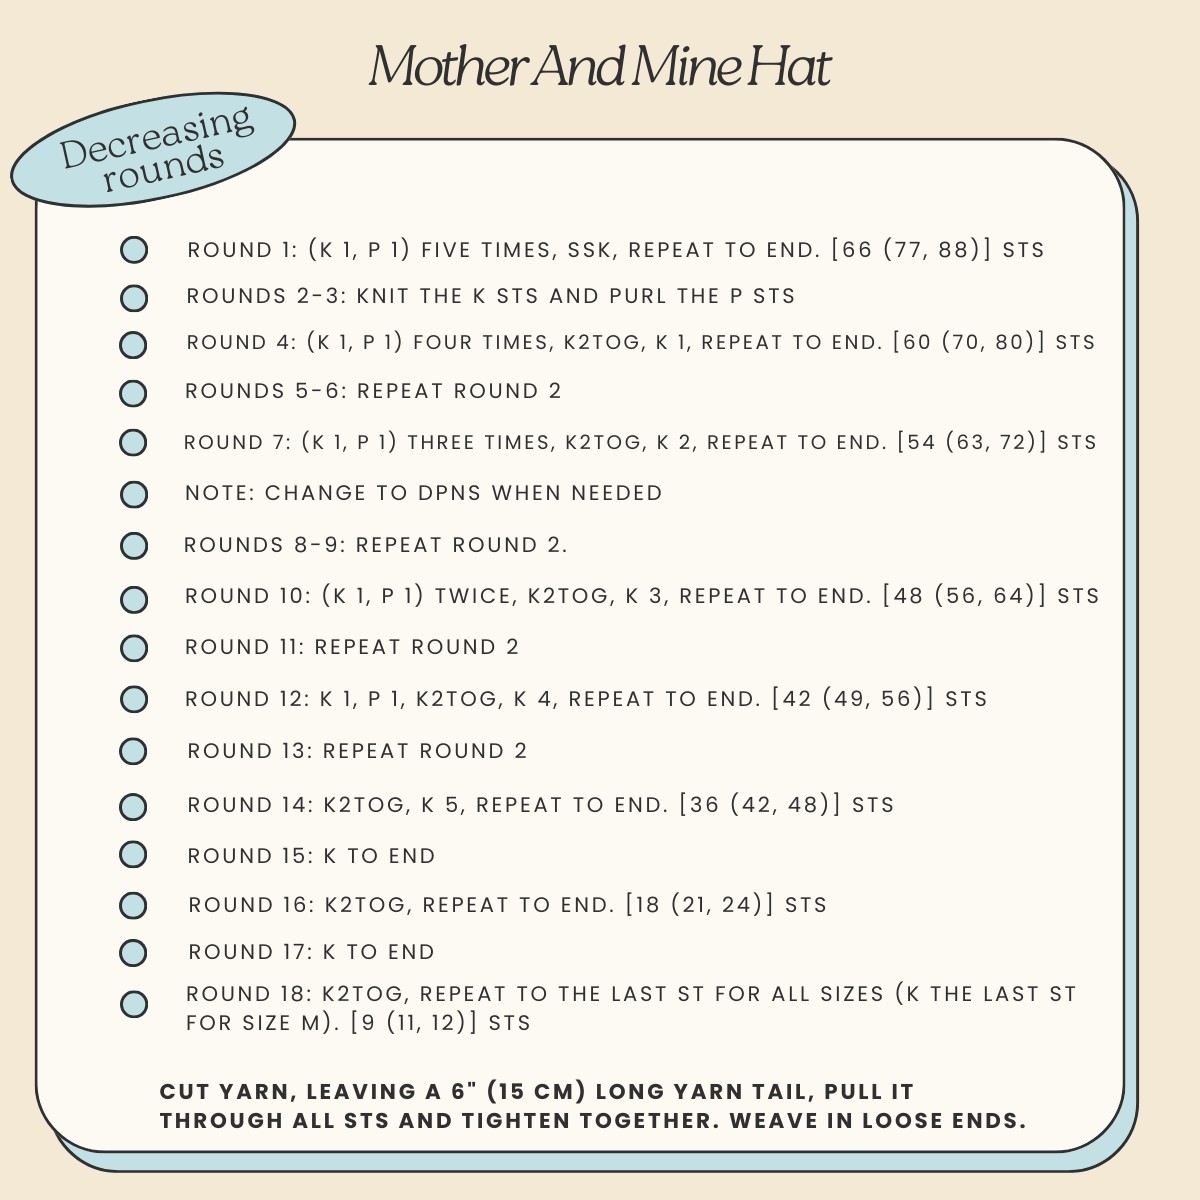
Decreasing Rounds
This part of the project will see your piece take its final shape as you decrease the number of stitches:
- Engage in a series of decreasing rounds by changing the knit and purl pattern, reducing the stitches systematically.
- As the circumference decreases, there will be a point when you’ll need to switch from circular needles to DPNs (double-pointed needles).
- Continue decreasing as delineated in the pattern until only a few stitches are left.
Finishing
- The final round involves knitting two stitches together until only one stitch remains (may differ slightly for size M).
- Cut the yarn, ensuring a long tail, thread it through the remaining stitches using a tapestry needle, pull tightly to secure, and then neatly weave in all loose ends to finish.

Conclusion
Now, with your final loose ends woven in and the hat sitting plump and pretty, you’ve knitted more than a beanie — you’ve crafted a keepsake. It’s a warm hug from a distance, a soft touch on a breezy day, a tangible whisper of ‘I cherish you.’ Happy knitting, and may your heartfelt creation bring joy and comfort to the special mother figure in your life!
Pattern By ravelry

Leave a Reply