
Wrap yourself in cozy comfort with this vibrant free crochet granny square hoodie pattern, combining warmth and style for a fun and comfortable everyday look.
Slipping into something colorful and cozy that feels like a burst of happiness wrapped around you. A free crochet granny square hoodie pattern is all about cheerful vibes, creativity, and comfort combined. The bright, hand-stitched granny squares create a playful patchwork of colors that makes it as fun to wear as it is to make.
Granny Square Hoodie Free Crochet Pattern – for Any Season
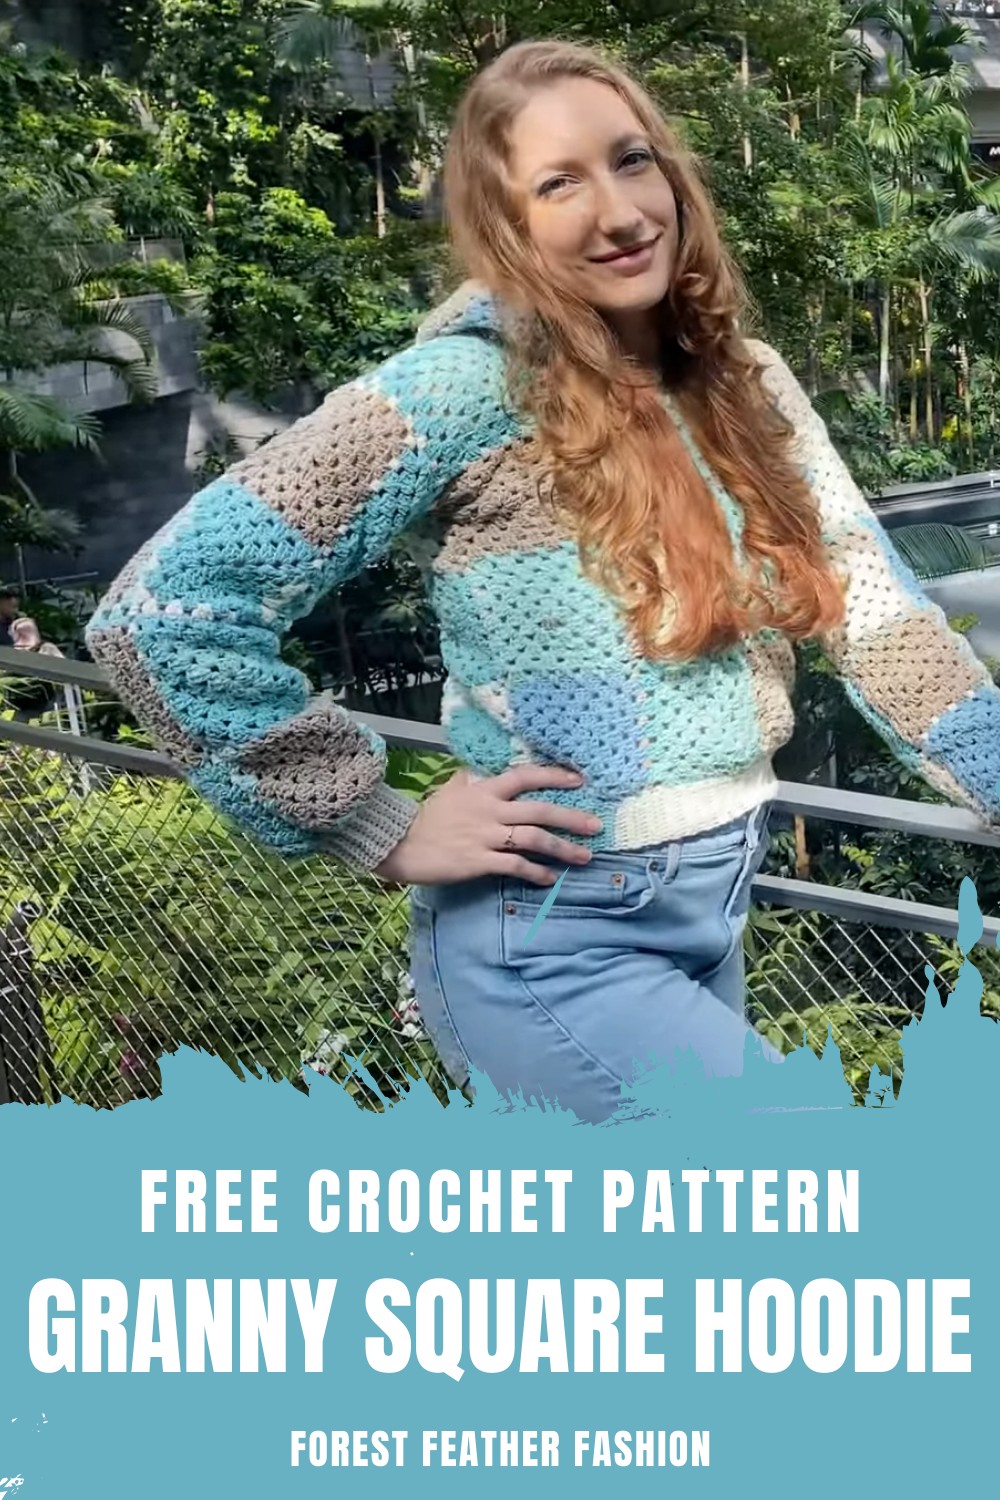
With its relaxed fit and cozy hood, this hoodie is perfect for staying warm and stylish while lounging around or heading out for a casual day. It’s like wearing a piece of art that turns heads and sparks conversations. Pair it with jeans, leggings, or even a cute skirt, and you’ll have a versatile outfit for any occasion. This hoodie brings together comfort, warmth, and creativity, making it the perfect project for anyone who loves fun and unique fashion pieces!

Step-by-Step Crochet Pattern: Funky Hooded Granny Square Sweater
Materials Needed
- Yarn:
- Variegated yarn such as Crafter’s Hub “Marshmallow” (5-ply cotton and acrylic blend).
- Approximate Usage: 7 x 100g skeins (you may need more or less depending on size).
- Crochet Hook:
- 3.5 mm crochet hook or size required for your gauge.
- Additional Tools:
- Scissors.
- Tapestry needle (for sewing seams and weaving in ends).
- Stitch markers (optional, to align squares).
Special Techniques Used
- Granny Square Clusters: Cluster = 3 double crochets (dc) together in the same space.
- Double Crochet (dc): Yarn over, insert hook, pull up a loop, yarn over, pull through two loops, yarn over, pull through the last two loops.
- Chain (ch): Simple loops for building foundation rows or separating clusters.
- Slip Stitch (sl st): Insert hook, yarn over, pull through the stitch and loop on the hook.
- Single Crochet (sc): Insert hook, yarn over, pull up a loop, yarn over, pull through both loops.
- Back Loop Only (BLO): Insert hook into the back loop of the stitch for a ribbed texture.
Taking Measurements and Adjusting the Square Size
- Shoulder Measurement:
- Measure the width from one outer shoulder to the other.
- Example: If your measurement is 18 inches, divide this by 4.
- Each granny square needs to measure 4.5 inches wide.
- Child’s Size:
- Measure as described above and adjust square size accordingly.
- Create squares that match the calculated size. Utilize a consistent tension or adjust your hook size for accuracy.

Pattern Instructions
Step 1: Triangular Granny Squares for Neckline
You’ll make two triangular granny squares to shape the neckline.
Foundation:
- Create a slip knot on your hook.
- Chain 4, then make a slip stitch into the first chain to form a ring.
Row 1 (Center Ring):
- Chain 4 (this counts as the first dc + ch 1).
- Yarn over, make 1 dc into the ring, then make 2 more dc into the ring.
- Chain 2, then make 3 dc into the ring.
- Chain 1, and make 1 more dc into the ring.
- You will now have a triangle forming.
Row 2 and Beyond:
- Turn your work and chain 4 (counts as your first dc + ch 1).
- Work 3 dc into the next ch-1 space from the previous row.
- In the ch-2 corner, work 3 dc, ch 2, 3 dc.
- Continue working 3 dc clusters into each ch-1 space, except for the turning chain where you will end with 1 dc.
- Repeat this routine, ensuring the triangle expands row by row.
- Repeat until the triangle measures the correct size from center to edge (e.g., 4.5 inches), then fasten off yarn.
- Make a second triangular granny square and set both aside.
Step 2: Classic Granny Squares for Body, Arms, and Hood
Each square consists of granny clusters (3 dc in one space).
Foundation:
- Start with a slip knot.
- Chain 4, then make a slip stitch into the first chain to form a ring.
Round 1:
- Chain 3 (counts as the first dc), add 2 more dc into the ring.
- Chain 2 to form the first corner.
- Make 3 more dc clusters into the ring, with 2 chains between each cluster.
- After 4 clusters, chain 2 for the last corner and join with a slip stitch to the top of the initial ch-3.
Round 2:
- Slip stitch into the ch-2 corner space.
- Chain 3 (counts as the first dc), then add 2 more dc into the same corner space.
- Chain 2, then work 3 dc into the same corner space.
- Continue this pattern for all corners:
- Work 3 dc, ch 2, 3 dc into ch-2 corner spaces.
Round 3 and Beyond:
- Work 3 dc clusters in spaces between clusters from previous rounds.
- Add corners (3 dc, ch 2, 3 dc) into every ch-2 space in the corners.
Complete the Squares:
- Repeat rounds until each square reaches the calculated size.
- Finish with a slip stitch, cut the yarn, chain 1, and pull through to secure.
Step 3: Placement and Number of Squares
- Front Panel:
- Use 2 triangular granny squares to form a V-shape for the neckline.
- Arrange 14 squares (4×4 rectangle: including triangles at the top corners).
- Back Panel:
- No triangles needed. Use 16 squares and arrange as a 4×4 full rectangle.
- Sleeves:
- Each sleeve: 3×4 rectangle consisting of 12 squares.
- For shorter sleeves, adjust the layout (e.g., 2×4 or 2×6 rectangles).
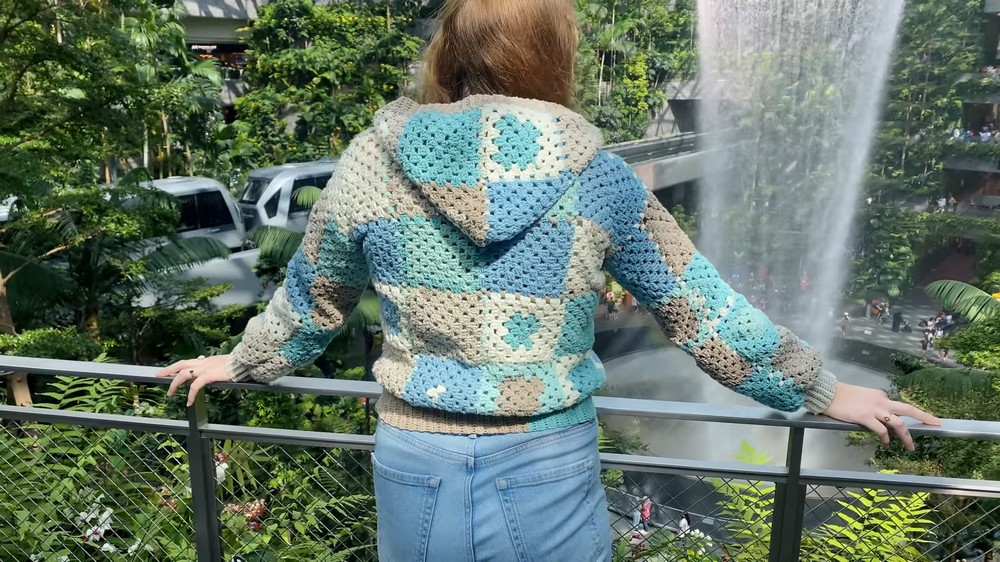
- Hood:
- A separate rectangle of 3×4 squares (12 squares).
- Skip this step if you decide to forgo the hood.
Step 4: Joining the Squares and Panels
Method – Single Crochet Join:
- Place two squares right sides facing each other (important!).
- Make a slip knot and attach yarn to the corner spaces of both squares. Pull yarn through both and chain 1.
- Insert the hook into the next chain spaces of both squares and work 3 single crochets into each space.
- When reaching the next corner: Chain 2, then continue the same method with new squares.
Tip for Perpendicular Joins:
- Chain 1 to navigate over the ridge created by joining multiple squares.
Step 5: Assembly
- Join Front and Back Panels:
- Place panels right sides facing each other.
- Join along the shoulder seams using the single crochet method.
- Attach the Sleeves:
- Place the sleeve rectangles so the center aligns with the shoulder seam. Join the panel using the same method.
- Ensure squares align for consistency in the pattern.
- Assemble Hood:
- Fold the hood rectangle in half, aligning the 3-square edges. Join along one short edge to form the hood point.
- Attach the hood to the neckline, aligning its edges with the front V-neck triangles and back panel. Use single crochet to seamlessly sew the hood to the sweater.
- Join Sides and Sleeves:
- Fold the garment, right sides facing each other. Join the sides of the body and the sleeves using single crochet.

Step 6: Add Ribbing
Cuff Ribbing:
- Attach yarn to the underarm join of the sleeve.
- Chain 10 (or desired cuff length) + 1 turning chain.
- Work sc down the chain, starting in the second chain from the hook.
- Make 3 slip stitches to secure the row to the sleeve, turn your work, and work sc into the BLO of each ribbing stitch.
- Continue this until you go around the cuff. Fasten off, leaving a long tail to sew the ribbing edges together.

Hood Ribbing:
- Begin at the side of the hood where the join is less visible.
- For a shorter ribbing, chain 5 + 1 turning chain and repeat the BLO ribbing technique used for the cuff.
- To create a tighter fit around the neckline, slip stitch 3 stitches along the hood on the neck area.

Bottom Ribbing: Follow the same method using chain 10 for a ribbed hem.
Final Words
Congratulations on creating your funky hooded granny square sweater! This crochet hoodie is stylish, cozy, and unique with plenty of room for customization. Whether you opt for variegated yarn, solid colors, or creative granny square patterns like daisies, this project offers ample room for creativity.
Tips for Pattern Success
- Blocking: Take time to block each square for uniform sizing. Pin to a towel, dampen slightly, and allow to dry flat.
- Assembly: Use stitch markers to align seams for perfect placement while joining.
- Color Placement: If using multiple colors, lay out all squares before joining to ensure an aesthetically pleasing design.
- Customization: Adjust square sizes or granny square types to fit your style. Feel free to experiment with lengths, width, or even sleeve style!
Leave a Reply