
Capture vibrant beauty with a free crochet red spider lily pattern, showcasing intricate details that brighten up any handmade collection.
Not every crochet pattern is easy to follow or results in something eye-catching. The crochet red spider lily pattern stands out by offering a straightforward way to make a beautiful flower with bold red petals and a unique shape. This design works well for beginners and experienced stitchers wanting to add a striking floral touch to accessories or home décor. The bright colors and detailed look bring life and charm to any project.

Easy Crochet Red Spider Lily Coasters to Brighten Your Table
This pattern is great for making decorative pieces that add personality to scarves, hats, bags, or wall hangings. Items featuring the red spider lily feel warm and inviting, perfect as thoughtful gifts or personal accents. The clear instructions help keep the process smooth and enjoyable, so frustration stays away. The finished flowers have an appealing texture and form that catch attention without extra effort.

There are many ways to style the crochet red spider lily elements. Attach a flower to a simple tote bag for a pop of color and interest. Use them sparingly on hats or headbands to brighten your outfit. Multiple flowers can be arranged into a lasting bouquet that brings a touch of nature indoors without any care needed. These versatile pieces add charm wherever they are placed.
This pattern delivers an easy and pleasant way to produce lovely floral designs that impress. It combines bold beauty with simplicity, making it a favorite for those wanting to add unique flair to their crochet projects.
Crochet Trendy Little Flower Pattern – Complete Step-by-Step Tutorial
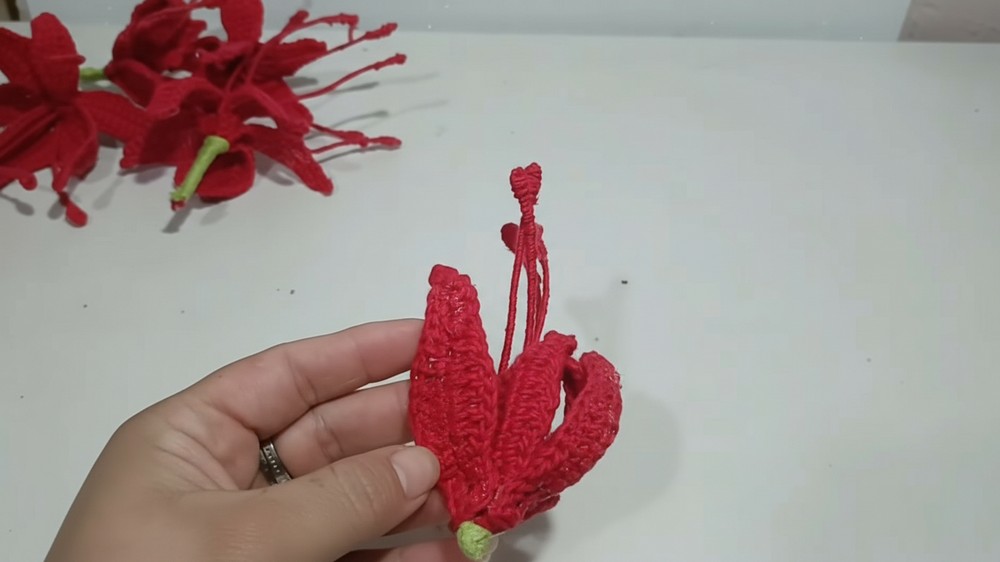
Add a touch of handmade charm to your home or gifts with these delicate, trendy little crochet flowers! Inspired by popular styles and made with simple half double crochet stitches, each flower features petals and a “pod” center wrapped around a wired stem for shaping. This tutorial covers two versions: one with wire in the center for firmness, and one without wire for a lighter look. Suitable for beginner-intermediate crocheters, this pattern includes complete instructions to bring your blooms to life.
Before You Get Started
- Use a fine, 2 mm yarn or thread such as granny yarn in your choice of colors—red for petals and green for accents.
- Crochet hook size: 2.5 mm recommended to maintain tight, neat stitches.
- You will need scissors, a yarn needle for weaving ends, and a wooden stick or similarly sized object to roll petals.
- Wire strips around 20 cm long (about 8 inches) are necessary for the “ears of corn” center pieces in the wired flower version.
- A hot glue or silicone gun helps to secure yarn to wire for stability.
- A patience and gentle hands during assembly ensure neat, professional results.
- Use stitch markers if preferred for counting and round transitions.
Important Pattern Details and Advice
- Working primarily in half double crochets (hdc) for a textured, durable fabric.
- Construction involves making two main components: the center “ears of corn” units wrapped with yarn onto wire, and the crochet petals formed separately.
- Assembly uses silicone or hot glue to attach petals and center pieces together.
- Wire is optional: adding wire creates structure but increases thickness—perfect for firm flower shapes. Without wire, flowers are softer and less bulky.
- Working in chains and half double crochet rows builds the petals.
- Finishing includes gently shaping petals and careful gluing for tight fits.
Brief Construction Summary
- Cut and wrap wire pieces with red yarn to form 24 center “ears of corn” elements.
- Crochet 36 petals individually—each consisting of a chain base and half double crochet rows, gathering in a tapered shape.
- For each flower, assemble four ears of corn and six petals using glue or silicone, arranging symmetrically.
- Optionally add a wooden stick wrapped with yarn to the flower center to create a stem.
- Allow glue to fully dry before shaping petals and finishing edges.
Recommended Skill Level
- Suitable for confident beginners comfortable with half double crochet stitches, basic shaping, working in rows, and simple hand assembly.
- Familiarity with working on wire and hot glue use will be helpful but easy to follow.
Size and Dimensions
- Finished flower measures approximately 12 cm (4.7 inches) diameter when assembled.
- Individual petals measure around 5–6 cm long by 2 cm wide after shaping.
- Center ears of corn wired sections are about 6–7 cm long.
- Stem length depends on wooden stick used; adjust to desired display height.
Suggested Gauge
- Not critical for this project due to decorative purpose.
- Approximate gauge: 3 hdc = 1 cm in width on 2.5 mm hook using 2 mm yarn.
Common Stitch Shorthand
- ch = chain
- hdc = half double crochet
- sl st = slip stitch
Special Techniques Explained
Wire Wrapping:
Red yarn is tightly and neatly wrapped around small pieces of wire to form textured center elements (“ears of corn”). Secured at ends and glued for durability.
Petal Shaping:
Petals are crocheted flat in rows, tapered by increases and decreases to create a natural curve. After assembly, gentle shaping gives volume and dimension.
Detailed Crochet Instructions
Part 1: Making the “Ears of Corn” Center Units (24 Pieces)
- Cut wire into 20 cm (approx. 8 in) pieces.
- Leave one end of the wire with a small yarn tail of a few centimeters.
- Wrap red yarn tightly around the wire from the tail end toward the opposite end, covering wire completely.
- Carefully fold the initial yarn tail over the wire and start rolling the wrapped wire onto itself from one end to create a small pod shape.
- Hold tightly as you roll to avoid gaps and secure shape.
- When the rolled pod is finished, secure the end of the yarn wrap with a drop of silicone or hot glue and trim excess yarn neatly.
- Repeat to make a total of 24 pods.

Beginner Tip: Wrapping and rolling tightly gives the pods their distinctive textured look. Use a hot glue gun carefully to avoid burns.
Part 2: Crafting Individual Petals (36 Pieces)
- Make a slip knot and chain 15.
- Starting in the 2nd chain from the hook, work 3 hdc.
- In the next stitch, hdc 3 more times.
- Work 4 hdc across the next 4 stitches.
- Then 2 hdc into each of the next two stitches (4 hdc).
- Work hdc into the next 2 stitches.
- At the last stitch, work 2 hdc into the same stitch to taper the edge.
- Chain 2 and turn to work the other side of the chain foundation, working hdc stitches mirroring the first side symmetrically.
- At the last stitch, sl st to join to the beginning hdc.
- Cut yarn, leaving a long tail for attachment.


Explanation: The petal shape forms by working along one side of the chain, increasing then mirroring. The chain 2 turn helps curve the petal neatly.
Part 3: Assembling the Flowers (Make 6 Flowers)
- Each flower consists of 6 petals and 4 ears of corn pods.
- On a flat surface, arrange the 4 pods clustered together.
- Use a drop of silicone to secure pods firmly to each other, letting glue dry slightly but not fully to allow some adjustment.
- Attach petals one by one around the pod cluster by gluing the petal bases to the seam between pods, spacing evenly around the cluster.
- Press gently to secure and hold until glue grabs.
- For the wired flower version, insert a wooden stick stem by hot gluing it to the pod base in the center before the petals are attached.
- For a softer flower without wire, omit the stick and use just glue to secure all parts.
Tip: Working slowly with glue and arranging petals before fully drying helps position flowers attractively.
Part 4: Final Flourishes and Shaping
- Once assembly is dry, gently shape petals by bending or curling tips for a natural floral appearance.
- Ensure petals are securely glued, adding more silicone if needed.
- Trim any loose yarn ends or glue strands carefully.
- Optionally, add decorative ribbons or small bows to stems for gift-quality finishes.

Finishing and Care Instructions
- Handle flowers gently to avoid deforming yarn or dislodging glue.
- Store in dry, cool places away from direct sunlight to maintain yarn colors and durability.
- Spot clean with light damp cloth if needed—avoid soaking or harsh chemicals.
Troubleshooting Common Challenges
- Pods unraveling or loose yarn wrap: Make sure to wrap yarn tightly and secure ends well with hot glue.
- Petals curling incorrectly: Adjust increases or crochet tension evenly; gentle steaming or finger shaping helps set curves.
- Glue messiness or burns: Use glue sparingly in well-ventilated areas; protect fingers with tools or heat-resistant gloves.
Creative Ways to Use This Pattern
- Create a bouquet of these flowers for unique décor or gifting.
- Add stems and pot bases for adorable faux potted plants.
- Combine petals and pods to form variations like rosebuds or daisies.
- Use the flower elements as applique on hats, bags, or clothing.
- Attach pins or magnets for wearable crochet flower accessories.
Leave a Reply