

Free Crochet Spiral Sweater with a Unique Design
This pattern is ideal for crocheters who know their way around double crochet stitches and increases. While it’s best suited for those with an intermediate skill level, ambitious beginners ready to learn will find it rewarding. Double crochet is the main stitch used, helping create fabric that’s both flexible and beautifully textured.
Whether you want to make a special gift, add a unique piece to your closet, or start a new crochet obsession, this free crochet spiral sweater pattern fit the bill perfectly. If you enjoy making stylish and comfortable garments that turn heads, this project is definitely worth trying.

Spiral Sweater Crochet Pattern
This spiral sweater crochet pattern is a relaxed, freehanded project that’s perfect for those who love experimenting with color and texture. Unlike rigid patterns, this design encourages creativity and allows you to customize the fit and style. The spiral effect of alternating colors creates a stunning visual appeal. Small changes in size and yarn color combinations make it adaptable for all seasons and wardrobes. This project is perfect if you’re looking to create a unique, cozy sweater with a distinct handmade charm.
Skill Level & Terminology
- Skill level: Intermediate. Basic crochet knowledge is necessary, and comfort with increasing stitches and circular crochet is helpful.
- Terminology: This pattern uses US crochet terms.
Materials & Tools
- Yarn: 4-weight acrylic yarn; specifically used here are Big Twist yarns in Ivory and Coral colors.
- Quantity: Approximately 1,400 yards total (2 skeins of each color if small skeins, or 1 large skein per color).
- Hook: 5.0 mm (H-8) crochet hook for the body; 5.25 mm (I-9) hook for sleeves.
- Additional tools: Stitch markers, tapestry needle for finishing, scissors.
Gauge
Make a swatch using the double crochet stitch in the round to ensure your tension aligns well with the pattern’s sizing. The sweater is very stretchy due to the acrylic yarn used, so adjust hook size or yarn if necessary to match your desired measurements.
Abbreviations List
- ch — chain
- sl st — slip stitch
- sc — single crochet
- hdc — half double crochet
- dc — double crochet
- inc — increase (2 dc in the same stitch)
- st(s) — stitch(es)
- rnd — round
- sp — space
Special Stitch Instructions
- Double Crochet Increase (dc inc): Work 2 double crochet stitches into the same stitch.
- Back Loop Single Crochet (blsc): Insert hook into the back loop only of the stitch and complete a single crochet.
- Magic Ring or Chain Loop Start: For this pattern, you may do a magic ring or chain 4 and sl st to form a loop for the starting round.
Finished Size
This pattern is adjustable in size. The sample is a large and weighs approximately 536 grams. The width should be measured across the sweater and adjusted by adding or subtracting rows.
Pattern Overview and Starting Instructions
You’ll begin by crocheting two color panels in rounds forming a spiral pattern. Each round alternates colors to achieve the spiral look. The first section builds a circular flat piece growing in size with increases; after 12 rows, corners are added to square it off into the sweater shape. Shoulders and sleeves are added later with ribbed cuffs and seamless joining.
The Pattern
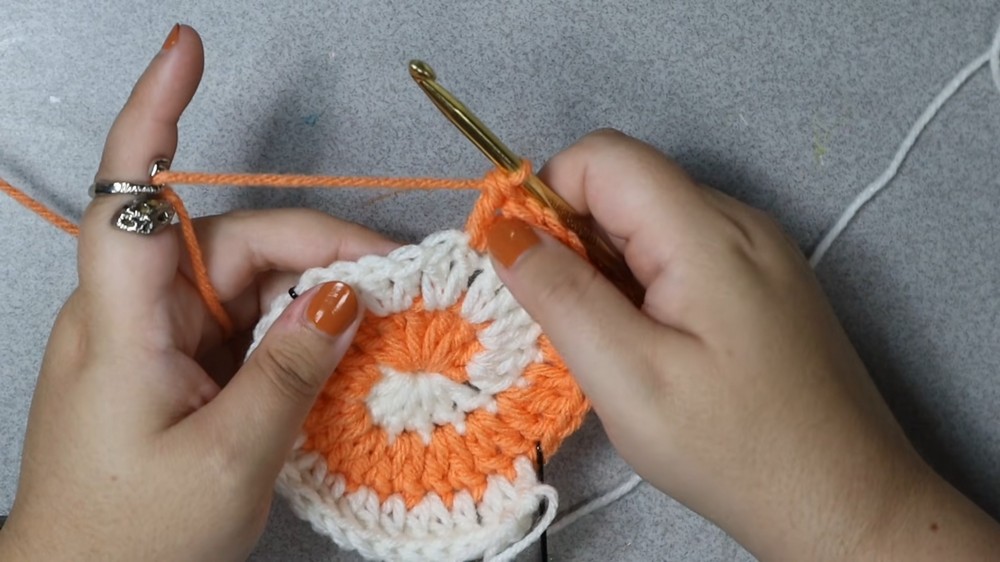
Starting the Spiral (Foundation Round)
- Choose your first color.
- Chain 4, sl st into the first chain to form a loop.
- Work 6 dc into the center of the loop. This is row 0.
- Pull the tail to close the center hole tightly.
For non-magic ring users, chaining 4 and slip stitching creates a central hole to crochet into.
Working Second Color in Foundation Round
- Attach second color to the center loop.
- Work 6 dc stitches into the center.
- Pull tail tight to close center hole.
- You now have 12 dc stitches in total (6 per color, alternating in the spiral).
Summary: The spiral begins with a small, tightly closed center made by working 6 double crochets in each color into a loop. Both colors are worked simultaneously to create the base spiral circle.
Row 1: Increasing Stitches (12 dc per color, total 24 stitches)
- Start with your first color:
- 2 dc in each stitch across the 6 stitches (increase each stitch), totaling 12 dc.
- Place a stitch marker in the first dc of this increase round.
- Switch to second color:
- Repeat the same: 2 dc in each stitch across, 12 dc total.
- Place stitch marker similarly.
Summary: Both colors are increased evenly by doubling stitches to expand the circle. Use stitch markers for tracking the start of rounds.
Row 2: Alternating Increases and Single Dc (18 stitches per color)
- For each color:
- Start with 2 dc in first stitch (increase).
- Then dc in next stitch.
- Repeat increase, dc pattern until end (total 18 stitches).
- Place stitch markers as before.
Summary: Increases are spaced with single double crochets to maintain gradual spiral growth.
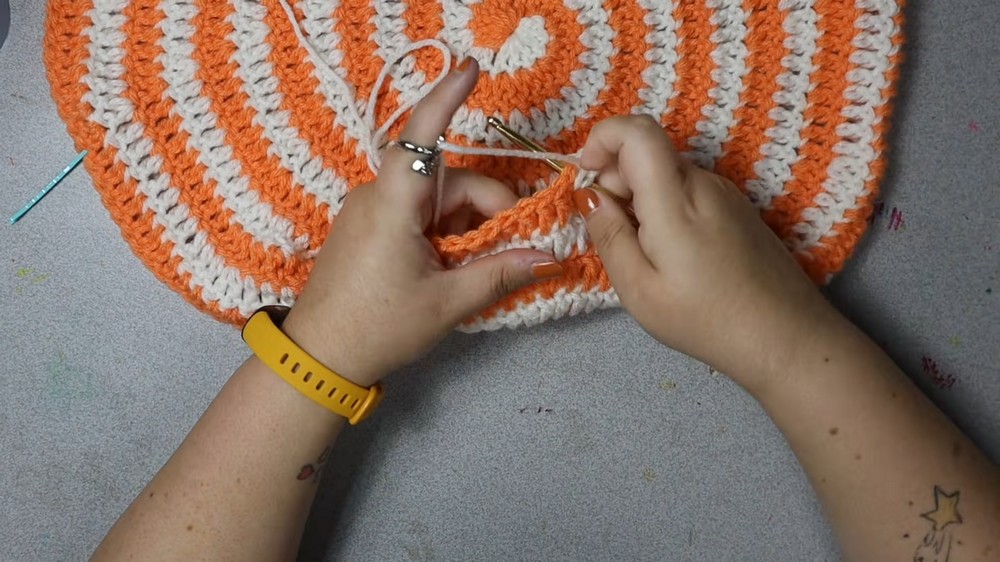
Row 3 and Following Rows: Increasing Space Between Increases
- Every new round, increase the number of single dc stitches between increases by 1.
- Example:
- Row 3: 1 increase, 2 dc, 1 increase, 2 dc …
- Row 4: 1 increase, 3 dc, 1 increase, 3 dc …
- Continue this pattern until Row 12.
Summary: This controlled increase shapes the spiral and keeps it flat and gradually widening.
Row 12: Completing the Round of 12 Increments
- Final increase round will have 11 dc between increases, with increase on the 12th stitch.
- From next row, the spiral will begin “squaring off,” adding corners essential to forming the sweater shape.

Row 13: Adding Corners for Squaring Off
- Mark the corner middle points:
- Find the 3rd increase in the sequence on both color panels.
- Replace the regular increase (2 dc in same st) with a corner: dc, ch 2, dc in same stitch to allow the fabric to bend.
- Continue normal increases on other locations.
Summary: Corners turn your growing circle into a square form necessary for a sweater body.

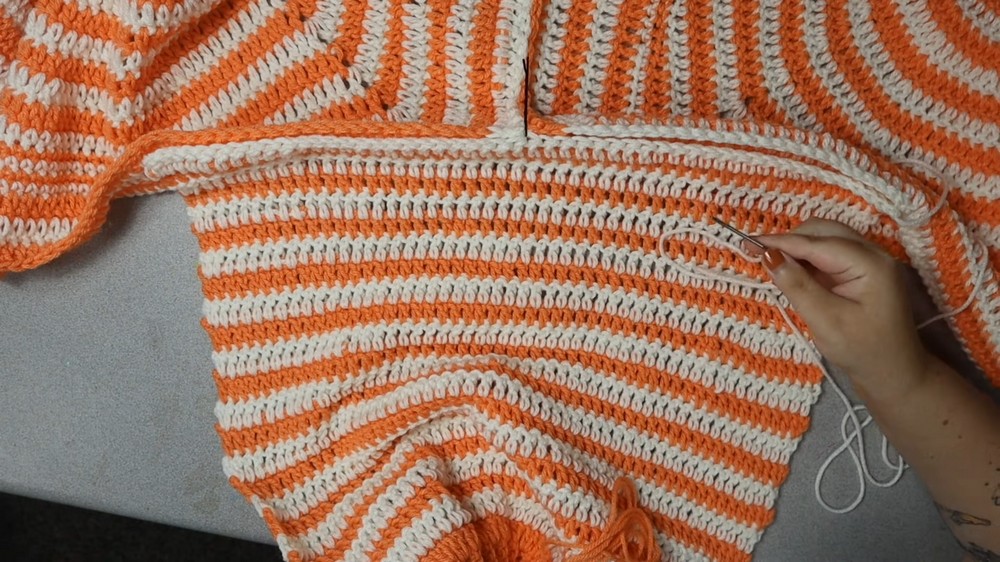
Rows 14-18: Following the Corner Pattern and Stitches
- Repeat corners at the same four points.
- At corners: dc, ch 2, dc.
- Between corners, maintain increasing dc stitches as before but start to reduce increases gradually by Row 14.
- Rows include combinations of dc, hdc, and single crochet stitches arranged to shape the body and add texture:
- Row 14 Example: hdc replaces some dc stitches between corners.
- By Row 18, many rows use hdc and sc to add softness and structure.
Summary: These rows define the sweater’s shape and texture, transitioning from spiral to a square body piece.
Body Size Adjustment
- For sizes larger than small:
- Add one full round of double crochet between increases per extra size.
- Measure width across panels; aim for size guide or compare to a sweater that fits well.
- Size small ends at Round 18.
- Medium to extra-large follow by adding more rounds of dc.
Ending the Spiral Panel
- At desired size, end spiral with:
- 2 hdc, 2 sc, 2 sl st near the corner.
- Slip stitch to secure and cut yarn.
Summary: The panels end with a neat finish preparing for the shoulder and sleeve attachment.
Shoulder Part
- Work two rows of double crochet along the edge after stopping the spiral.
- Define neckline by marking stitches at distance apart (~18 sts from each corner).
- Crochet shoulder sections separately on both panels using alternating colors to keep spiral effect.
- Leave long yarn tails for sewing later.
Summary: Shoulders are created in double crochet rows with stitch markers to measure neckline size accurately.
Sleeves — Ribbed Cuff
- Chain 10.
- Work 9 single crochets skipping the first chain.
- Turn and work back loop only single crochets on subsequent rows to create ribbing.
- Continue for 24 rows or until cuff fits comfortably.
- Finish by cutting yarn but keep long tail for sewing.

Sleeves — Main Sleeve
- Switch to larger hook (5.25 mm) for sleeve body.
- Increase stitches as you crochet around the side of cuff:
- Work 2 dc into designated ‘space’ stitches, skip others to keep shape consistent.
- After 24-26 rows, stop increasing.
- Continue dc stitches without increases to desired sleeve length.
- Finish with long tails.

Summary: Sleeves are worked up from ribbed cuffs, increasing gradually to fit comfortably.
Assembly & Finishing
- Sew shoulder seams using long yarn tails.
- Attach sleeves to body panels by matching stitch markers on sleeve center to shoulder seam.
- Sew sleeve seams from cuff to underarm.
- Sew side seams of sweater body.
- Weave in all yarn tails securely.
Neckline Ribbing
- Attach yarn at any point on neckline opening.
- Work single crochet stitches all around neckline.
- Chain 7, single crochet back along chain to create length and ribbing texture.
- Work in back loop only to create ribbed effect.
- Slip stitch ends to join and weave in.
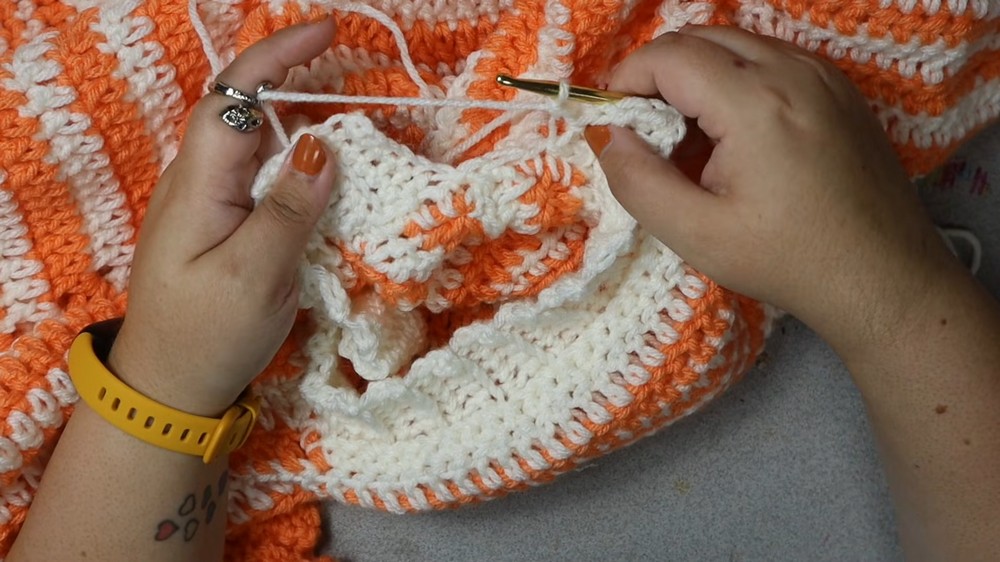
Summary: Sewing and finishing shape your project into a wearable sweater with neat seams and a comfortable neckline.
Final Notes
This pattern uses mainly double crochet (dc), single crochet (sc), and half double crochet (hdc) stitches along with chain stitches and slip stitches for structure and shaping. The increasing method builds the spiral body panels, while special corner stitches provide squares for fitting.
This intermediate pattern supports creativity through freehand shaping but benefits greatly from consistent stitch counting and use of stitch markers. If you enjoy modular crochet with color play and shaping challenges, this spiral sweater will be an enjoyable project.

Feel free to take your time with increases and shaping; the pattern allows for customization, so don’t hesitate to add rows or modify stitch counts to fit your size and style preferences.
Pattern Summary for Quick Beginners
- Start with a small circle and alternate 6 dc stitches of each color into the center.
- Increase stitches each round to expand the circle.
- Add corners at Row 13 to change circle into square.
- Add shoulder rows and ribbed sleeves.
- Sew all parts together for finishing.
- Main stitches are double crochet, half double crochet, and single crochet.
Leave a Reply