
Fill decorative corners with Free Crochet Carnation Flower Pattern, showcasing graceful blooms & beautiful texture for eye catching displays.
Tired of ordinary decor that fades away or needs constant care? A crochet carnation flower offers a lasting alternative, providing vibrant beauty without any maintenance. Soft petals, crocheted through simple loops, form a delicate bloom that feels comforting to the touch. Suitable for beginners, the pattern uses basic techniques while delivering an elegant and satisfying result.
Placing the flower in a small pot or securing it to clothing instantly brightens any space or accessory. Choosing colors to complement different moods or room styles adds a personal touch. Unlike fresh carnations, this flower remains fresh indefinitely, offering cheerful presence all year round.

Free Crochet Carnation Flower Pattern for Seasonal Home Décor
The soothing rhythm involved in crocheting each petal helps calm the mind and relax the hands. Observing the bloom take shape brings a subtle sense of achievement and satisfaction. Lightweight and flexible, the flower adapts easily to various uses, whether enhancing home decor or accessorizing personal items.
Arranging several flowers together creates charming bouquets that add warmth and color during any season. The pattern encourages creativity through diverse color combinations and styling choices. It also offers a mindful, focused activity amid busy routines.

Soft, charming, and enduring, the crochet carnation flower blends simplicity with elegance. Incorporating one into any space provides a gentle reminder of patience and care reflected in every loop. Each blossom embodies cozy comfort and handmade beauty that lasts.
Elegant Blossoming Carnation: A Complete Guide
Getting Started: Preparation and Tips
-
Yarn Preference: For best results, use a high-quality cotton yarn. Cotton provides the stitch definition and structural rigidity necessary for realistic-looking floral projects.
-
Workspace: Ensure you have adequate lighting. Because the stitches are small and tight, good visibility will prevent eye strain and mistakes.
-
Tension Consistency: Aim for a tight, even tension throughout the project. This is crucial for keeping the fiberfill hidden and ensuring the petals hold their shape.
-
Adhesive Choice: Both hot silicone glue and cold silicone adhesive work effectively to secure the stem and leaves. Ensure you are comfortable with your chosen adhesive before beginning.
-
Organization: Keep a pair of sharp scissors and a tapestry needle nearby for finishing.
-
Patience: Working with wire can be tricky for beginners. Take your time when bending the floral wire to match the curves of the leaves.
Fundamental Design Guidelines
-
Construction Approach: The flower head is constructed from the bottom up, starting with a base, then working the petal layers in the round. The leaves are worked around a wire core.
-
Terminology: This pattern uses standard U.S. crochet terminology.
-
Working Method: The flower base and petal tiers are worked in joined rounds. The leaves are worked around a wire frame, turning at the end of the chain to create an oval shape.
-
Stitch Placement: Pay close attention to the instructions regarding “front-facing branches” (front loops) versus working through both loops to ensure the flower petals stack correctly.
-
Stability: Fiberfill is used specifically to give the carnation its rounded, life-like volume at the center.
Overview of the Construction Process
-
The Floral Core: A small, rounded green base is created first to serve as the anchor for the petals and the stem.
-
Building the Petals: Multiple layers of petals are worked directly onto the green core, increasing the stitch count to achieve the ruffled, layered look of a true carnation.
-
Shaping: A gathering technique using the yarn tail and a needle is used to pull the petals together, creating the signature density of the flower.
-
Foliage: Two leaves are formed by crocheting single crochets around a central wire spine.
-
Final Assembly: The wire stem is attached to the base, and the leaves are secured to the stem using a wrapping technique with the green yarn.
Project Details
-
Skill Level: Intermediate (requires basic knowledge of working with wire and small-scale assembly).
-
Estimated Finished Size: Approximately 3 to 4 inches in diameter (depending on yarn weight and tension).
-
Materials Required:
-
Cotton yarn in petal color (e.g., Red) and stem/leaf color (e.g., Green).
-
Size 2 mm crochet hook.
-
Floral wire (0.3 mm or 0.4 mm for leaves/stems).
-
Small amount of polyester fiberfill.
-
Silicone glue (hot or cold).
-
Tapestry needle.
-
-
Gauge: 12 stitches = approx. 1 inch. Gauge is not critical for this project, but maintaining tight stitches is essential for a professional look.
Standard Crochet Abbreviations
-
ch: Chain
-
st(s): Stitch(es)
-
sl st: Slip stitch
-
sc: Single crochet
-
hdc: Half double crochet
-
dc: Double crochet
-
inc: Increase (two stitches in the same base stitch)
Unique Techniques for Floral Detailing
-
Magic Ring: A method of starting rounds by working stitches into an adjustable loop, allowing for a tight, hole-free center.
-
Working Through Front Loops Only: This creates a horizontal “shelf” or ridge, allowing you to attach new yarn layers while leaving the back loops available for further construction.
-
Wire-Core Crochet: Working stitches around a wire spine allows you to bend and pose the leaves into natural shapes without them flopping.
Floral Core and Stem Base Instructions
Round 1: Creating the Foundation
-
Make a magic ring.
-
Work 6 hdc into the ring.
-
Do not pull the ring completely closed; leave a small opening for the stem wire.
-
Join with a sl st to the first hdc.
-
Ch 1.
-
Total: 6 hdc.
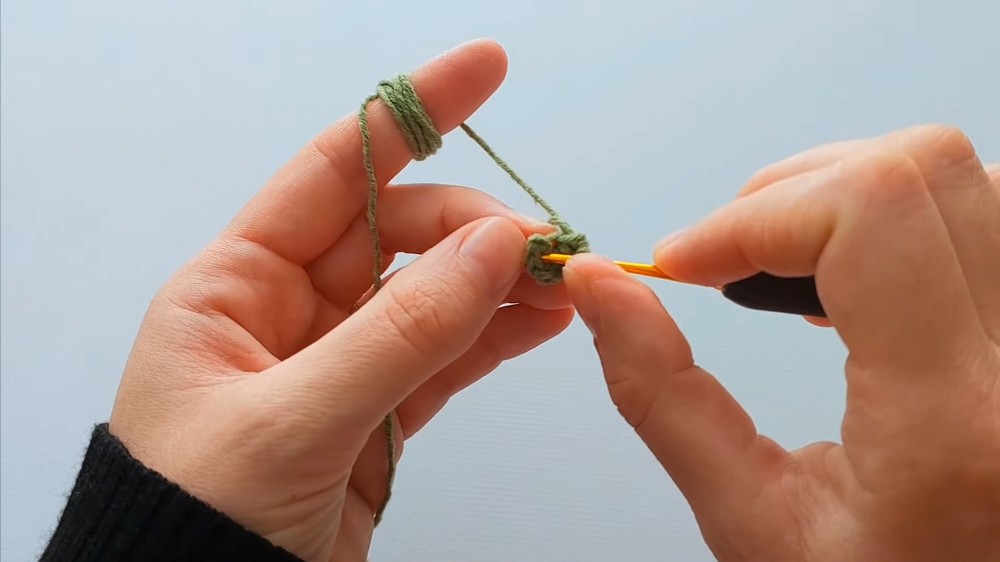
Beginner’s Tip: To make a half double crochet, yarn over your hook, insert it into the center of your ring, pull up a loop (you should have 3 loops on your hook), yarn over, and pull through all 3 loops at once.

Round 2: Expanding the Base
-
Work 2 hdc in each st around.
-
Join with a sl st to the first hdc.
-
Ch 1.
-
Total: 12 hdc.
Rounds 3–6: Creating Vertical Depth
-
Work 1 hdc in each st around for 4 consecutive rounds.
-
Join each round with a sl st and ch 1.
-
Total: 12 hdc per round.
Round 7: Increasing for Petal Volume
-
Pattern: (1 hdc in the next st, 2 hdc in the next st) repeat around.
-
Total: 18 hdc.
Beginner’s Tip: An increase means placing two stitches into the exact same hole. This naturally causes your work to get wider.

Round 8: Preparing for Petal Attachment
-
Work this round using only the front loops facing you. This leaves the back loops free for later, creating a defined edge.
-
Sl st in the front loop of each st.
-
Ch 1.
-
Total: 18 sl sts.
Cultivating the Petal Tiers
Petal Layer One: Initial Ruffling
-
Insert hook into the front loop of the first st.
-
Ch 1, 1 hdc in same st.
-
In the next st: 1 dc, ch 2, sl st in top of dc (picot), 1 dc.
-
In the next st: 1 hdc.
-
Continue this pattern (hdc, [dc-picot-dc], hdc) around the entire base.
-
Join with a sl st and fasten off the green yarn.

Petal Layer Two: Introducing the Flower Color
-
Join your red (or chosen flower color) yarn to the remaining back loops from the previous step.
-
Ch 2 (counts as first dc).
-
Work 3 dc into the same stitch.
-
Work 3 dc into every stitch around the entire row.
-
Join with a sl st to the top of the initial ch-2.
-
Total: 54 dc.

Petal Layer Three: Increasing Density
-
Ch 2.
-
Work 3 dc in each stitch around.
-
Join with a sl st.
-
Total: 162 dc.
Final Petal Edge: Adding Texture
-
Ch 3.
-
Pattern: 1 sc in the next st, ch 3, 1 sc in the next st.
-
Repeat this “ch-3, sc” pattern all the way around the edge of the petals.
-
Fasten off, leaving a long tail for gathering.
Beginner’s Tip: When you see a pattern ask for “chains,” simply yarn over and pull through the loop on your hook the specified number of times.

Shaping and Assembly
-
Internal Shaping: Thread your tapestry needle with the long red yarn tail. Weave the needle in and out of the base of the petals.
-
Adding Volume: Place a small amount of fiberfill into the center of the green base to create a rounded, plump look.
-
The Gather: Gently pull the red yarn tail to cinch the petals together. Secure with a double knot at the base.
-
Stem Attachment: Insert the floral wire into the center opening of the green base. Use extra silicone glue if necessary to ensure it remains stationary.
-
Finishing the Stem: Use your green yarn to wrap the wire stem tightly, beginning at the flower base and working downward.
Crafting the Foliage (Make 2)
-
Ch 16.
-
Working back along the chain: 14 sc, then work 3 sc in the final chain stitch.
-
Rotate your work and continue down the opposite side of the chain: 14 sc.
-
Fasten off, leaving a long tail for assembly.
-
Wire Insertion: Place a piece of wire along the back of the leaf. Use a dab of silicone glue at the tip to hold the wire in place, then wrap the wire with green yarn.
-
Final Attachment: Secure the leaves to the main stem at your desired height by wrapping the green yarn in a tight “S” shape.


Troubleshooting Guide
-
Problem: The petals look flat.
-
Solution: Ensure you have fully cinched the gathering thread at the base. Use your fingers to gently fluff the picots and chains outward.
-
-
Problem: The stem feels loose.
-
Solution: Use a stronger adhesive, or increase the amount of glue applied to the wire tip before inserting it into the green base.
-
-
Problem: Fiberfill is showing through.
-
Solution: Use the green yarn tail to weave through the gap and close the opening, or apply a tiny amount of matching glue to seal the gap.
-
Creative Applications
-
Home Decor: Arrange a bouquet of these in a ceramic vase for a low-maintenance, everlasting floral display.
-
Personalized Gifts: Attach these to a gift box lid for a sophisticated, handmade decorative touch.
-
Fashion Accessories: Use a smaller hook and thinner thread to create a brooch or a sophisticated hair accessory.
-
Event Decor: Craft these in various shades for weddings, anniversaries, or dinner party table centerpieces.
-
Seasonal Displays: Experiment with seasonal colors—such as soft pastels for spring or deep burgundies for autumn—to refresh your home throughout the year.
Leave a Reply