
Master the art of making DIY Cactus Cupcakes with this easy idea, combining creativity and flavor for unique and stunning desserts.
Add a dash of playful charm to your crafting adventures with this quirky and delightful DIY Polymer Clay Cactus Cupcake project! Combining the cuteness of cupcakes with the vibrant personality of miniature cacti, this craft lets you create a fun and colorful decoration that’s impossible not to love. Picture a realistic cupcake base—complete with swirled frosting—that’s topped with a variety of tiny sculpted cacti in all their spiky, vibrant shades of green. From prickly pears to classic round cactuses, the details are entirely up to you!
Quick and Easy DIY Polymer Clay Cactus Cupcake Tutorial
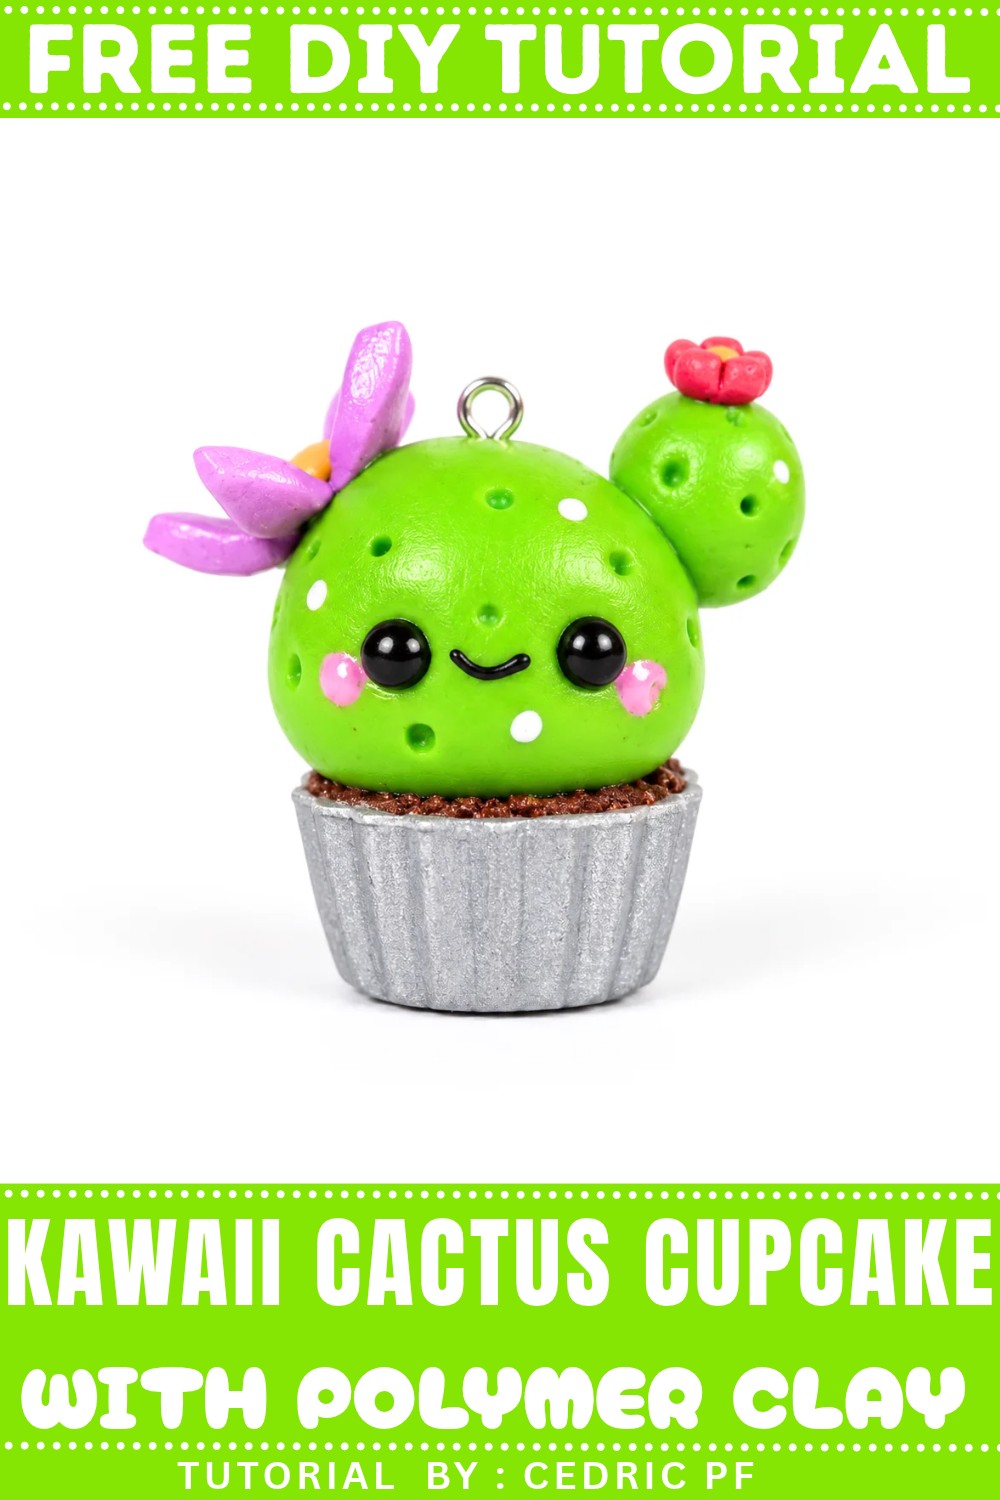
To make your cactus cupcake come to life, you’ll need polymer clay in various earthy and pastel colors, basic sculpting tools, and an oven for baking your creation. Texture techniques, like adding ridges to the “frosting” or fine spikes to the cactus, elevate the design and give the finished piece a lifelike touch. The compact size of this project is great for both beginners and experienced crafters who want to experiment with their style.
Your polymer clay cactus cupcake is more than just a fun art piece—it’s a unique decoration for your desk, a cute handmade gift, or even part of a larger desert-themed collection. Dive into this charming project and let your creativity bloom.

Kawaii Cactus Cupcake Polymer Clay Tutorial
Essential Materials & Tools
Materials
- Polymer clay (Fimo or similar):
- Silver (for cupcake base)
- Chocolate brown (for “soil” layer)
- Apple green (for cactus body)
- Lavender (for flower petals)
- Sunflower yellow (for flower center)
- Raspberry pink (for flower/pastel blush)
- Black (for eyes and mouth)
- Fimo liquid (or other polymer clay adhesive)
- Optional: 3D pink paint (for kawaii cheeks)
- Acrylic paint (white, optional for cactus dots)
- Varnish (for finishing shine or protection)
Tools
- Cupcake mold (or any small cupcake-shaped mold)
- Dotting tools (for making holes, shaping eyes, texturing)
- Silicone brush (for blending, placing details)
- Toothbrush (for cactus texture)
- Small rake tool or pointed tool (for “soil” texture)
- Small cutters or oval flower-shaped cutter (for petals)
- Blade or craft knife
- Ball-head pin or aluminum wire (for securing cactus arms/flower)
- Paintbrush (for acrylic paint)
- Wipe or cloth (for cleaning excess)
- Scissors (for trimming aluminum wire)
Step-by-Step Instructions
1. Make the Cupcake Base
a) Silver Layer
- Roll a ball of silver clay.
- Press it firmly into your cupcake mold, using your fingers to shape and flatten the sides.
- If needed, use a ball-headed tool to gently hollow the center and smooth the edges.
- Trim any excess clay around the mold with a blade.
b) “Soil” Layer
- Roll a ball of chocolate brown clay.
- Press this into the center of your cupcake base.
- Flatten lightly with fingers until it looks like soil over the silver base.
- Use a small rake or pointed tool to scratch and texture the soil. Don’t worry about being rough—it’s supposed to look crumbly and airy.
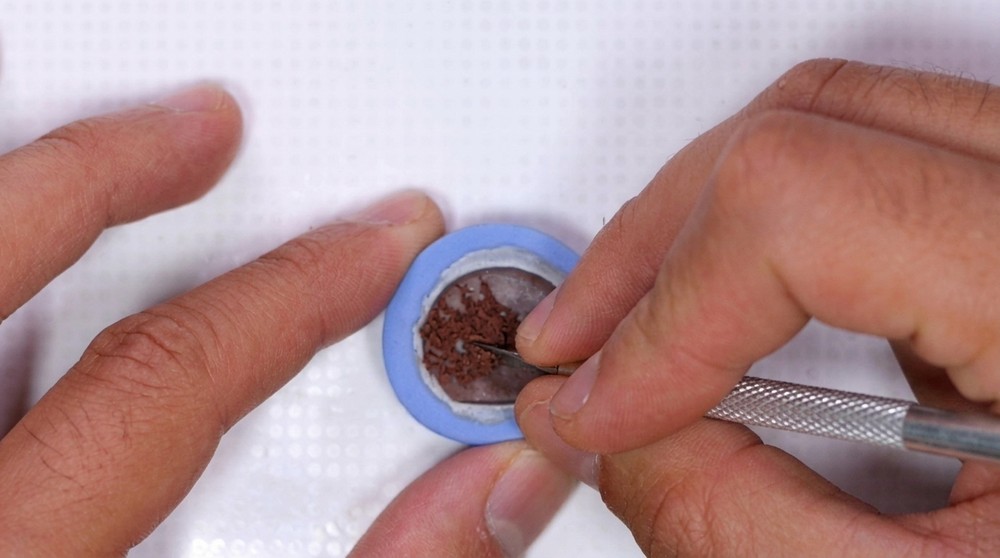
2. Make the Cactus Head
- Roll a large ball of apple green clay.
- Make the ball bigger and taller than the cupcake base; it should stand out clearly when you compare them.
- Put a dab of Fimo liquid on the soil part, then stick the green ball onto it.
- Use a toothbrush to lightly texture the whole cactus body for a natural look.

3. Give Your Cactus a Face
a) Eyes
- Use a small dotting tool to make marks for where the eyes will go.
- Enlarge these holes slightly with larger dotting tools if you want bigger eyes.
- Roll two small black balls and place them into the eye holes. Tap gently with your silicone brush or finger to press them in, but keep them round and shiny.
b) Mouth
- Roll a thin sausage of black clay for the mouth.
- Cut off the excess ends.
- Use a silicone brush to shape it into a cute smile and attach under the eyes.
c) Additional Texture
- Use dotting tools of varying sizes to gently poke holes for “cactus” texture all over your cactus (don’t overdo it; keep it balanced and cute).
4. Make a Cactus Arm/Bud
- Roll a small ball of apple green clay for the arm or bud.
- Texture it in your palm with a toothbrush.
- Stick a dab of Fimo liquid on a piece of aluminum wire or pin, and push it halfway into the bud.
- Prepare a hole in the cactus body and fill with a bit of Fimo liquid.
- Push the arm/bud into position.
- Texture with dotting tools as you did before.

5. Craft the Flower (Top of Cactus)
- Roll a ball of lavender clay, flatten it out.
- Use a small oval or flower-shaped cutter to cut out 5-6 petals.
- Remove extra clay and lay out petals.
- Roll a tiny ball of sunflower yellow clay for the flower’s pollen (center).
- Attach the petals one by one to the cactus top with Fimo liquid.
- Position and curve each petal upward for cuteness and volume.
- Use silicone brush to gently press and position petals.
- Optional: Add a line texture down the center of each petal with a dotting tool.
- Place the yellow pollen ball in the middle and texture with a dotting tool.


6. Bake Your Creation
- Stick a ball-head pin or wire into the cactus head for stability (especially if you want to turn the cactus into a charm or keychain).
- Bake all together for 30 minutes at 110°C (230°F) as per polymer clay instructions.
- Let cool completely.
7. Painting and Final Details
a) Add White “Cactus Dots”
- Use a fine brush and white acrylic paint to make cute cactus dots all over—keep them light and evenly spaced for kawaii look.
b) Make Kawaii Cheeks
- Use 3D pink paint (or acrylic paint) to make two rosy cheeks just below the eyes.
- Use a dotting tool to make perfect round dots.
- Let dry fully.
c) Varnish
- (Optional) Varnish the cactus head after cheeks have dried.
- Demold your cupcake and varnish the base if desired.

Tips for Beginners
- Texture is key for “soil” and cactus—don’t be afraid to experiment!
- Use silicone tools for gentle blending and placing small parts.
- Clean your hands and tools between colors to avoid unwanted smudges.
- Adjust your facial features and flower as you wish—each cactus can have its own personality.
Leave a Reply