
Hook a tiny feline friend using this Free crochet Kitten Keychain Pattern to adorn your bags with a handmade touch that everyone will admire.
Every stitch in this tiny crochet kitten is like adding a sprinkle of charm and personality to a little work of art. With soft, round shapes built using simple single crochet stitches and thoughtful color changes, this keychain pattern captures the sweet innocence of a kitten in a perfectly petite form. Its delicate embroidered whiskers, nose, and little bow detail bring it to life, making it a delightful accessory or a heartfelt handmade gift. Whether clipped to your bag or keys, this pattern adds a touch of warmth and whimsy wherever it goes.
What Else Can You Make?
The techniques you learn here can be applied to other small amigurumi projects like tiny animals, fruit keychains, or even miniature ornaments. Playing with color changes and embroidery lets you personalize any figure, while creating similar sized pieces like bows, hats, or scarves can add extra flair. These projects build on each other and add joyful, handmade touches to everyday life.
Tiny Crochet Kitten Keychain Pattern for handbag charms

The pattern is carefully designed to help beginners feel confident with the basics: starting from a magic ring, increasing and decreasing stitches to shape the head neatly, and switching yarn colors to create soft stripes. Creating the ears and bow separately allows you to practice small detail work, while the embroidery for facial features teaches you how to add expressive touches that make your kitten truly unique. Using safety eyes or tiny googly eyes gives options for even more character.
Crocheting this kitten keychain is not only fun but also a great way to improve your skills one step at a time. The step-by-step approach makes it easy to follow, and the changes in stitch count guide you to shape every cute curve and contour just right. After finishing, stuffing the kitten gives it a cuddly firmness that feels nice in your hand.
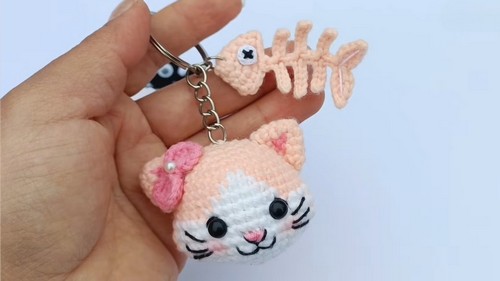
Crochet Kitten Keychain with Fish Skeleton
Introduction
This crochet kitten keychain paired with the adorable fish skeleton is both adorable and functional, perfect for personalizing your keys or gifting to loved ones. The pattern is crocheted with simple stitches, detailed embroidery, and optional color changes, allowing it to be customized in your favorite color combinations. The skeleton fish accessory adds a playful detail, making this project a unique and fun addition to your crocheting collection.
Uses of This Pattern
- Keychain: Attach to keys, backpacks, or purses for a cute personal touch.
- Decorative Piece: As a stand-alone decoration for shelves, desks, or gifting.
- Gift: A thoughtful handmade gift for cat lovers.
Skill Level & Terminology
- Skill Level: Intermediate
Ideal for those comfortable with basic stitches such as single crochet (sc), magic ring, and color changes. - Terminology: This tutorial uses US Crochet Terms.
Materials & Tools
- Yarn:
- Silvi Grumi Cotton Yarn
- Melon color: Primary for body and details.
- White: Color change for face and ears.
- Pink: Embroidery and bow details.
- Silvi Grumi Cotton Yarn
- Crochet Hooks:
- 1.8 mm hook for tight stitches.
- 0.8 mm hook for finer details.
- Notions:
- Black embroidery thread (for facial features).
- Keyring and connector for attachment.
- Pearl bead (optional for bow).
- Wool needle (for sewing parts).
- Stuffing.
- Cold silicone glue (optional for attaching details).
- Safety eyes or googly eyes (optional).
- Scissors.
Gauge
Gauge is not critical as this is an amigurumi project. However, stitches should be tight to ensure that the stuffing does not show through.
Finished Size
- Completed kitten measures approximately 6–7 cm (2.4–2.8 inches) tall.
Abbreviations
| Abbreviation | Meaning |
|---|---|
| ch | Chain |
| sc | Single Crochet |
| inc | Increase (two sc in the same stitch) |
| dec | Decrease (combine two stitches together) |
| sl st | Slip Stitch |
| st(s) | Stitch(es) |
Special Stitch Instructions
Magic Ring:
- Wrap the yarn around your fingers, creating a loop.
- Insert the hook through the loop, yarn over, and pull a loop through.
- Work the required number of stitches into the ring.
- Pull the tail tightly to close the center.
Invisible Decrease:
- Insert your hook into the front loop of the next two stitches.
- Yarn over and pull through both front loops.
- Yarn over again and pull through the remaining loops on the hook.
What You’ll Learn From This Pattern
- Amigurumi Construction: How to crochet shaped pieces like heads, ears, and small details.
- Embroidery Techniques: Add expressive features like eyes, nose, whiskers, and blush.
- Assembly: Securely sew and attach parts like keyrings, bows, and decorative elements.
Tutor’s Suggestions
-
Color Selection: The tutor recommends using a “Melon” color to help viewers see the stitches clearly, but encourages choosing any color combination you like.
-
Eye Security: If the keychain is for a small child, safety eyes are recommended over glue-on eyes for better durability and safety.
-
Alternative Methods: If sewing is difficult, the tutor suggests using silicone glue as an alternative for attaching the ears.
The Pattern
Part 1: Kitten Head
Round 1:
- Start with a magic ring using melon color yarn.
- Work 6 sc into the ring. (6 sts)
Round 2:
- Inc in each st around. (12 sts)
Round 3:
- Alternate 1 sc, 1 inc six times. (18 sts)

Round 4:
- Alternate 2 sc, 1 inc six times. (24 sts)
Round 5:
- Alternate 3 sc, 1 inc six times. (30 sts)
Round 6:
- Work 2 sc, 1 inc, 4 sc, 1 inc repeatedly around. (36 sts)
Rounds 7–10:
- Work 36 sc evenly for four rounds, adding color changes for white sections:
- Round 7: 17 sc in melon color, 2 sc in white, 17 sc in melon. (36 sts)
- Round 8: 16 sc in melon, 4 sc in white, 16 sc in melon. (36 sts)
- Round 9: 15 sc in melon, 6 sc in white, 15 sc in melon. (36 sts)
- Round 10: 14 sc in melon, 8 sc in white, 14 sc in melon. (36 sts)

Round 11:
- Work 7 sc, 3 inc, change to white, then work 3 inc in white, 10 sc. (48 sts)
Rounds 12–13:
- Continue knitting the melon and white color pattern as established, maintaining 48 sc total in each round.
Round 14:
- Work 7 sc, 3 dec in melon color, 3 dec in white, followed by remaining sc evenly. (36 sts)
Round 15:
- Work 4 sc, 1 dec by alternating melon and white where appropriate. (30 sts)

Rounds 16–18:
- Gradually decrease with:
- Round 16: 3 sc, 1 dec. (24 sts)
- Round 17: 2 sc, 1 dec. (18 sts)
- Round 18: 1 sc, 1 dec. (12 sts)
Fill the head with stuffing before closing.

Tip: Ensure the white section is positioned evenly to align with the face on the front.
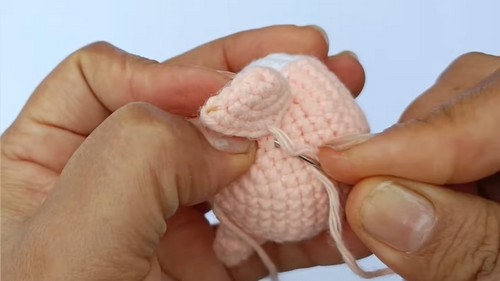
Part 2: Ears (Make 2)
Round 1:
- Within a magic ring, work 6 sc in melon color. (6 sts)
Round 2:
- Alternate 1 sc, 1 inc around while adding pink yarn for alternating color changes. (9 sts)
Round 3:
- Repeat 1 sc, 1 inc while continuing pink stripes. (13 sts)

Round 4:
- Work 2 sc, 1 inc four times in melon color. (18 sts)
Finish with 5 sl stitches along the top for shaping. Leave a long tail for sewing.
Note: Position ears symmetrically, slightly tilted backward.
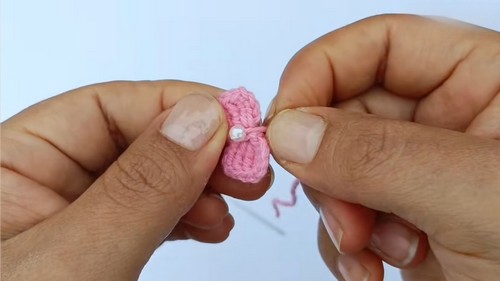
Part 3: Bow
- Create a magic ring with pink yarn.
- Work 4 chains and make 3 double treble crochets into the ring.
- Repeat the sequence: Ch 4, sl st, creating symmetrical loops.
- Attach a pearl bead to the center using thread.
Assembly & Embroidery
- Place safety eyes: Count ~5 rows down from the white section, leaving 5 sc of separation. Sew them securely.
- Embroider features:
- Use black thread for the nose, whiskers, and optional eyelashes.
- Pink embroidery adds detail to the nose and ears.
- Attach bow: Securely sew or glue to one ear.

Optional: Keychain Attachment
- Insert a keyring at the top through the center stitch. Secure with leftover yarn.
Assembly & Finishing
- Secure loose ends: Weave all yarn tails into the hidden body sections.
- Check proportions: Ensure symmetrical placement of earrings, whiskers, and bow details.
- Apply blush to cheeks using eyeshadow for added character.
Why We Love This Pattern
This kitten keychain is more than just a crochet project — it’s a compact, creative journey packed with details and delightful results. You’ll adore how all the embroidered features bring the kitten to life while letting your personal styling shine.
Leave a Reply