
Beautify your living space effortlessly with the Free Crochet Tissue Box Cover Pattern that brings charm and functionality to any room setting.
A crocheted tissue box cover can be just the thing to brighten up any room while keeping tissues within easy reach. Crocheted with care and creativity, this cover not only protect your tissue box but also serve as charming decorative accents. On the DIY Maycraft channel, you’ll find a delightful tutorial that brings this idea to life with warmth and simplicity. You can check out the step-by-step video guide here.
This free crochet tissue box cover pattern offers a perfect blend of style and functionality. With its neat rows of crochet stitches and playful color changes, it creates a snug little “sleeve” that fits perfectly around your box of tissues. The design’s combination of double and single crochet stitches gives it a textured and inviting look. Whether placed on your coffee table, desk, or bedside, it adds a touch of handmade charm to everyday essentials.

Free Tissue Box Cover Crochet Pattern for Gifts
Beyond its aesthetic appeal, this project makes a thoughtful gift. Handmade crochet items show effort and love, making them ideal presents for family, friends, or colleagues. Plus, the practical nature of a tissue box cover means your gift will be appreciated and useful. Its cheerful colors and soft structure can complement various décor styles—from rustic farmhouse to cozy modern interiors.
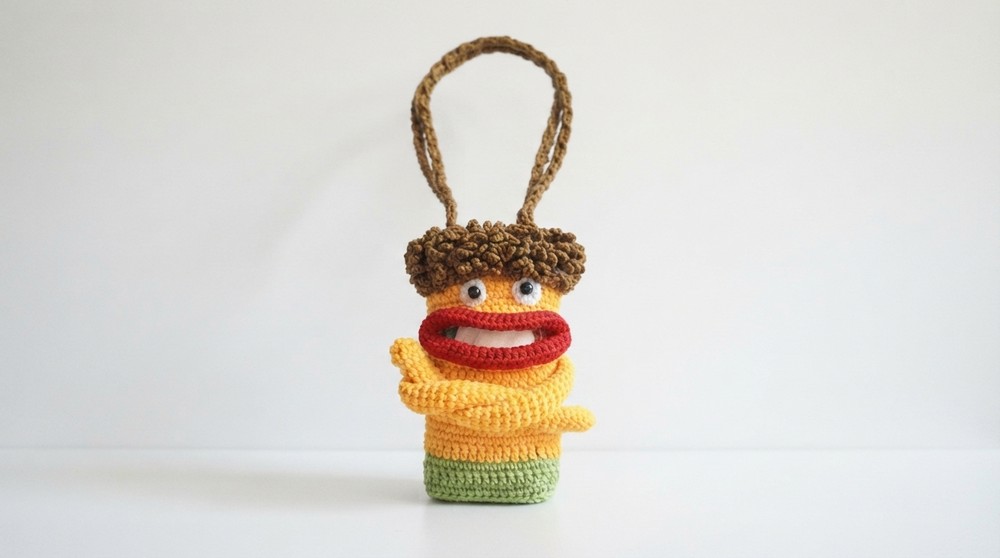
Whether you’re treating yourself or crocheting a heartfelt gift, this free crochet tissue box cover pattern is a delightful way to unwind and create something beautiful. It’s a simple yet satisfying project that brings both function and flair to your living space. And with the easy-to-follow video on DIY Maycraft, crocheting your own cover has never been more enjoyable!
Crochet Character-Themed Tissue Box Cover Pattern
This crochet pattern allows you to create a delightful character-themed tissue box cover using Poly Cherry yarn and a 4/0 Tulip crochet hook. The design includes a solid rectangular base, an alternating textured body with an opening for tissue dispensing, detailed mouth shaping, hair decoration, arms, and a functional strap with a button to hold the cover securely in place. Perfect for adding personality to any room, this tutorial guides you through each construction phase with precise stitch counts and finishing touches.
Pattern Highlights
- Rectangular base: forms a sturdy foundation using single crochets with corner increases.
- Textured body: alternating single crochet (SC) and double crochet (DC) rounds, worked primarily in back loops for subtle texture.
- Tissue opening: created by chaining and skipping stitches in one row to allow tissue access.
- Decorative mouth: attached with contrasting red yarn, shaped through increases and consistent single crochet rounds.
- Hair detailing: stylized loops crocheted in back loops to create a playful fringe effect.
- Amigurumi-style arms: cylindrical tubes crocheted in rounds and sewn firmly to the body.
- Functional strap: crocheted with triple crochets and chains, finished with a button for closure.
Notes
- Maintaining even tension across rows is essential for a neat rectangular shape and consistent texture.
- Working in back loops only (BLO) creates ridges which enhance the pattern definition.
- Marking the first stitch of each round can help track rows, especially with multiple stitch types.
- The tissue opening is created by chaining instead of full stitches to maintain fabric integrity.
- Use a tapestry needle to attach pieces securely and weave in ends for a clean finish.
- Fabric glue or a lighter may be used to secure yarn ends invisibly.
- Button placement on the strap ensures snug but easy closure of the cover over the tissue box.
Skill Level
Intermediate: Familiarity with basic stitches such as single crochet and double crochet, chaining, back loop working, increasing, attaching contrasting yarn for motifs, and simple amigurumi assembly techniques is recommended.

Materials
- Poly Cherry yarn (main color of choice)
- Red yarn (for mouth detailing)
- Crochet hook 4/0 Tulip
- Tapestry needle for sewing and finishing
- Lighter to secure yarn ends
- Buttons for strap closure
Measurements / Sizing (Optional Schematic)
- Base dimensions approximately 15 chains long by 5 rows wide in foundation stage.
- Body height built over 21 rows alternating single crochet and double crochet stitches.
- Arms approximately 13 cm long.
- Strap length varies according to final box fit.
Gauge (and Stitch Pattern if applicable)
- Gauge is based on chain and single/double crochet stitches with yarn and 4/0 hook, ensuring a compact, closely woven fabric suitable for a functional tissue box cover.
- Stitch pattern alternates single crochet and double crochet rounds mainly worked in back loop only for texture.
Stitch Abbreviations
- ch = chain
- sc = single crochet
- dc = double crochet
- slst = slip stitch
- BLO = back loops only
- MR = magic ring
Special Stitches
- Back Loop Only (BLO): In certain rounds, work stitches into the back loop of each stitch to create a raised ridge that adds structural texture.
- Magic Ring (MR): Starting circle method to crochet the arms in rounds without a hole.
- Increasing at corners: Adding 2 single crochet stitches in the same corner stitch to expand corners while maintaining rectangular shape.
The Crochet Pattern!
1. The Base
- Begin with a slip knot.
- Chain 15.
- Work 14 single crochet (sc) stitches back across the chain foundation.
- Repeat this row for a total of 5 rows, maintaining stitch count for rectangular height.
- For the four edges (corners):
- Work 4 sc,
- 2 sc in the corner stitch (increase),
- 12 sc,
- 2 sc in the next corner (increase),
- 4 sc,
- 2 sc in corner stitch (increase),
- 12 sc,
- ending with an increase and join round with a slip stitch (slst) to close.
- This constructs a rectangular base with reinforced corners.

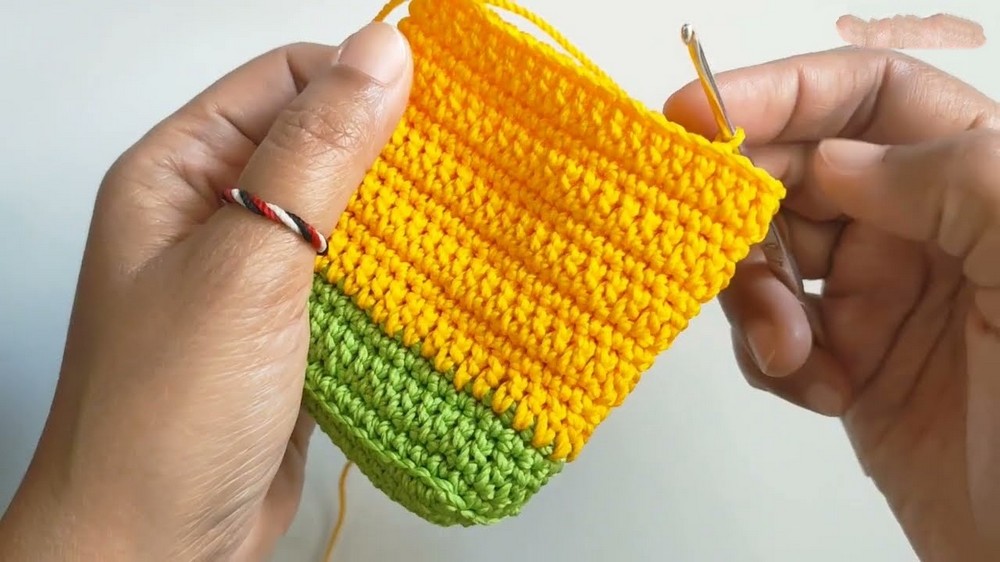
2. Body Construction
- Work one round of 40 single crochet (sc) stitches exclusively into the back loops only (BLO).
- Next, work a round of 40 double crochet (dc) stitches using a starting chain of 3 for height.
- Alternate rows of single crochet (sc) and double crochet (dc), continuing this pattern until 11 rows total are reached, forming a textured fabric surrounding the base.
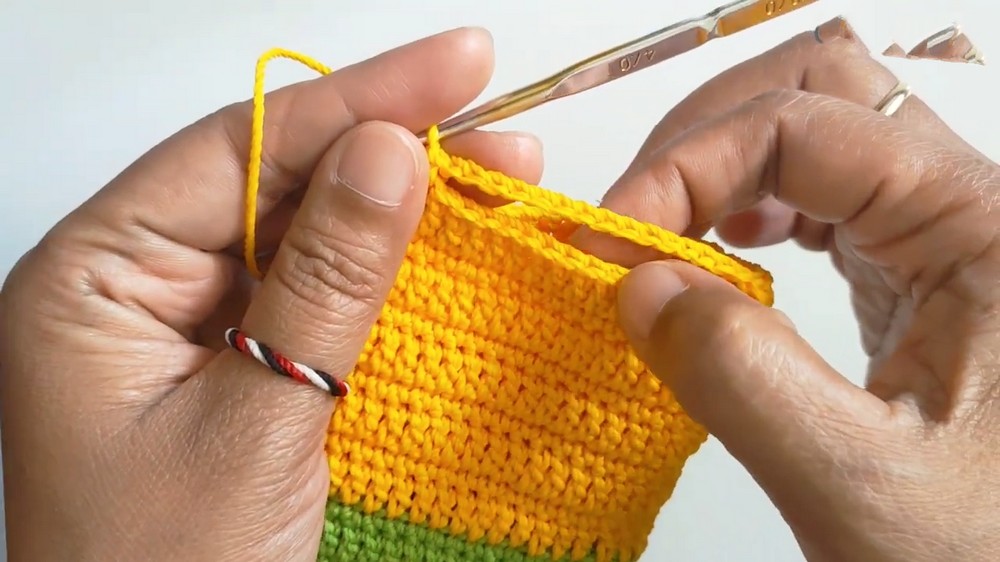
- At row 12, work a tissue opening by chaining 11 and skipping 11 stitches directly on the row (instead of crochet stitches), maintaining the stitch count’s integrity.
- Resume alternating double crochet (dc) and single crochet (sc) rounds until reaching row 21.
- For the last rounds, continue working in back loops only (BLO) to finalize structural texture.
3. Mouth Pattern
- Attach red yarn at row 11 on the body.
- Round 1: Work 11 single crochet (sc) stitches,
- 2 sc stitches in the corner (increase),
- 11 sc stitches,
- 2 sc stitches in the corner (increase), totaling 26 stitches.
- Round 2: Implement increases alternately paired with single crochet (sc) to expand to 39 stitches following this pattern — increase, 1 sc — repeated.
- Rounds 3 and 4: Work 39 single crochet (sc) stitches evenly without increasing to stabilize the shape.
4. Hair/Detailing
- Attach yarn to the back loops of the second row from the bottom of the body.
- Chain 7, then slip stitch (slst) into the very next back loop.
- Repeat this chain 7 plus slip stitch sequence around the body for 4 rows.
- This creates playful hair-like loops around the lower portion of the tissue box cover.

5. Arms
- Create a magic ring (MR).
- Work 8 single crochet (sc) stitches inside the ring.
- Continue working in rounds of 8 sc stitches until the arm reaches approximately 13 cm in height.
- Make two arms following this method.
- Use a tapestry needle to sew the arms firmly onto the sides of the body.
6. Strap
- Chain 4 and join to form a ring.
- Work triple crochets (trc) into the center of the motif, separated by chains to create an airy strap design.
- Continue this triple crochet with chain motif until achieving the desired strap length suitable to wrap over the tissue box.
- Fasten off and attach a button to the strap end as a closure.
- This functional strap will secure the tissue box cover snugly in place.

Assembly & Finished Size
This character-themed tissue box cover measures proportionally to standard rectangular tissue boxes, with overall height defined by 21 rows of crochet fabric combining single crochet and double crochet stitches, textured with back-loop work. The arms, sewn solidly to the body, add charming three-dimensionality. Hair loops encircle the bottom creating playful detailing. The strap, finished with a button, allows for easy fitting and removal while maintaining a snug fit. The piece completes as a functional yet decorative cover ideal for everyday use or gifting.
Conclusion
This crochet tutorial offers a comprehensive yet accessible approach to crafting a character-inspired tissue box cover. The integration of structural techniques such as working in back loops, strategically placed increases, and stitch pattern alternations elevate the design beyond a simple cover into a charming decorative statement. Contrast color application for the mouth adds personality, while the playful hair loops and amigurumi-style arms introduce movement and texture. The inclusion of a triple crochet strap with a functional button closure combines practical design with handcrafted aesthetics.
Leave a Reply