
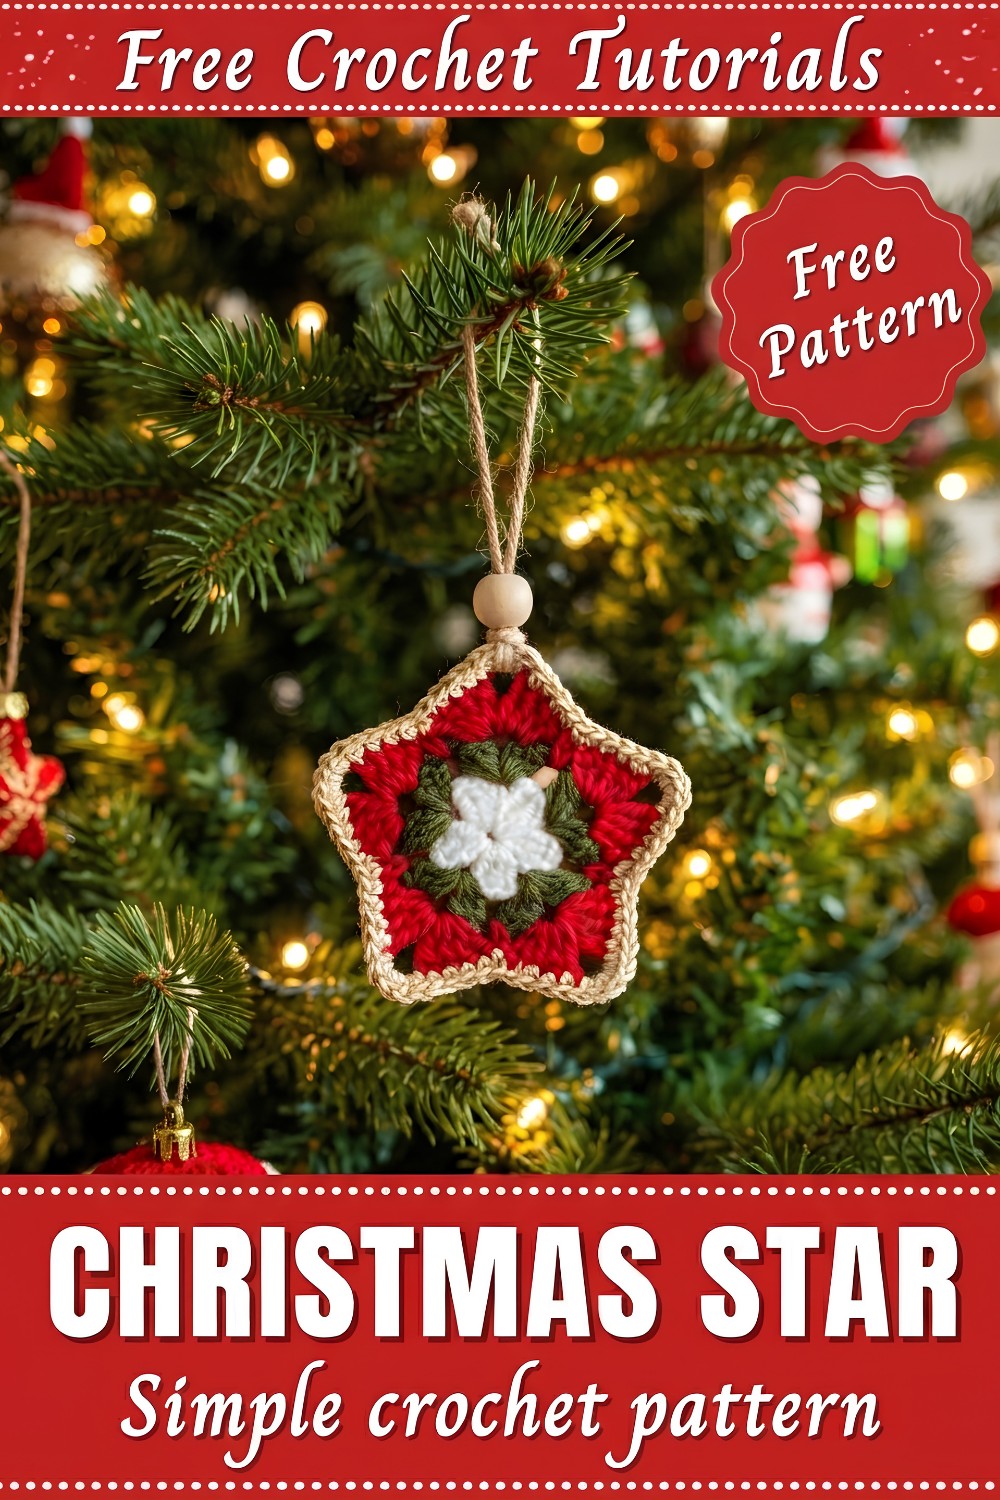
Shine bright this season with this Free Crochet Christmas Star Holiday Pattern for creating sparkling décor and joyful festive accents.
Crocheting holiday-themed items is always a special experience, and recently I worked on a festive star that quickly became one of my favorite projects. This delightful piece comes from a Free Crochet Christmas Star Pattern that’s simple enough to finish quickly yet versatile enough to inspire creativity. With just minor adjustments, you can transform this star into ornaments, decorative coasters, or charming appliqués to personalize gifts and home décor.
The star’s appeal is in its elegant simplicity and balanced design. It features a well-defined shape that captures the essence of the season, perfect for hanging on a tree or adding a festive touch anywhere around the home. Its texture offers a pleasing combination of softness and structure, resulting in a piece that feels both delicate and sturdy. The style strikes a great balance, blending traditional holiday charm with a fresh, handmade look that complements a wide range of decorative themes.
Adorable Crochet Christmas Star Pattern That Shines Bright
This pattern is perfect for those who are newer to crochet and want a project that is manageable but rewarding. Its clear construction means you can focus on the joy of making without feeling overwhelmed. The star is a wonderful way to build confidence while creating something beautiful and functional.

As a gift, this crochet star carries warmth and personality, making it a meaningful present or a cherished collectible. It’s also an eye-catching decorative accent that brightens any space during the holiday season. Whether you’re crocheting for yourself or planning to give handmade touches to friends and family, this project offers a joyful way to celebrate the season. It’s inviting and satisfying—an excellent choice for those looking to add handmade magic to their holidays!
Free Crochet Ornament Pattern with Detailed Steps
Summary
This charming crochet ornament is a quick and simple project, perfect for holiday decorations or gifting. Featuring a delicate fan stitch pattern in multiple colors, it can be customized to suit your favorite color scheme or decor style. The ornament is designed to be lightweight and rustic, thanks to the choice of cotton and acrylic yarns combined with a textured stitch pattern. It includes a hanging loop and an optional wooden bead for added charm. This project uses basic crochet techniques with helpful step-by-step instructions, making it accessible for crocheters looking for a festive and enjoyable quick make.
Pattern Notes
- This ornament is worked in rounds with color changes to create stripes or blocks of color.
- A double strand of thinner yarn is used for one color to match the thickness of other yarns.
- The fan stitch creates a beautiful openwork texture with a mix of double crochet clusters and chain spaces.
- All ends are woven in during the process to keep the piece tidy.
- The ornament can be made in just a small amount of yarn, ideal for using scraps.
- Hanging loop and bead embellishment are optional but recommended for a finished look.
Skill Level
Beginner to Intermediate
Basic knowledge of crochet stitches like chain (ch), slip stitch (sl st), single crochet (sc), and double crochet (dc) is required. The fan or cluster stitch offers a slight challenge but is easy to master with practice.
Materials
- Crochet hook size: 2.5 mm
- Yarn: Cotton and acrylic blend in various colors (approx. 2.5 mm thickness)
- Scissors
- Wool needle for weaving in ends
- Optional: Small wooden bead and rustic cotton thread for hanging loop
Stitch Abbreviations
- ch = chain
- sl st = slip stitch
- sc = single crochet
- dc = double crochet
- sp = space
- st = stitch
Special Stitches
Fan Stitch Cluster: 3 double crochets worked into the same stitch or space, separated into groups with chains.
The Crochet Pattern!
Preparation
- Choose your yarn colors. For the thinner gold yarn, use double strands to match the thickness of your other yarns.
- Begin by making a slip knot on the hook.
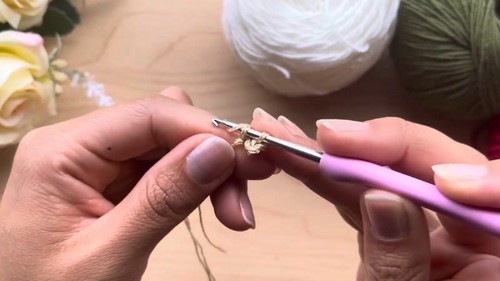
Round 1
- Using the gold color (or your chosen first color), make a foundation chain of 5 ch.
- Join with a sl st to form a ring.
- Ch 3 (counts as the first dc).
- Create 5 groups of 3 dc clusters inside the ring. Each group is separated by 2 chains.
- For each group: work 3 dc into the ring, ch 2, 3 dc, repeat until you have 5 groups.
- After the 5th group, ch 2 again and join with a sl st to the third ch of the initial ch 3.
- Ch 1 and fasten off, leaving a tail for weaving.

Round 2
- Attach the red color yarn anywhere in the chain spaces of the previous cluster round.
- Ch 3 (counts as first dc).
- Create 5 groups of 3 dc clusters again, but this time separate by 1 ch between each cluster, with 4 ch between groups to form spaces.
- For each cluster: 3 dc together in a space, ch 1, repeat across round.
- Join with a sl st to the third chain of the starting ch 3.
- Fasten off and weave in ends.
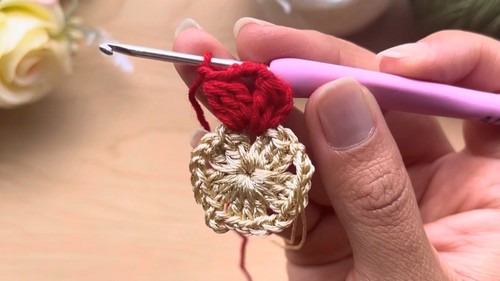

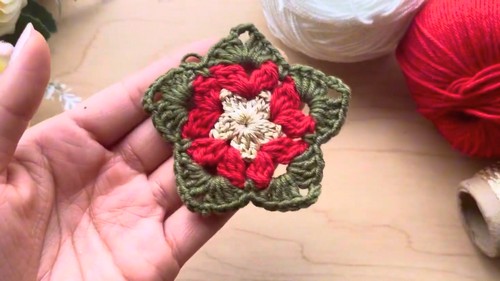
Round 3
- Attach the green color yarn in any of the larger chain spaces from Round 2.
- Ch 3 (counts as first dc).
- Make 4 dc in each group space. Between each group, separate with 4 ch.
- Between groups, add a single crochet (sc) in the space between.
- Repeat this pattern around until 5 groups of 4 dc, separated by 4 ch and sc stitches, are completed.
- Join with a sl st to the third ch of the first ch 3.
- Fasten off and weave ends.

Round 4 (Final Round)
- With your gold (cream) color yarn again, attach at any point along the edge.
- Work single crochet (sc) stitches evenly around the entire piece to provide a neat edge and stabilize the ornament.
- In the spaces between clusters, continue to make 4 sc to fill gaps evenly.
- Join with a sl st to the first sc.
- Finish off, leaving a long end for assembly.
Assembly & Finishing Touches
- Using a wool needle, sew the edges closed as needed to shape the ornament.
- Hide and weave all loose ends securely inside the fabric.
- To make a hanging loop, use a piece of rustic cotton thread: thread it through one of the holes near the top of the ornament, knot securely.
- Add a wooden bead above the knot for decoration and trim the ends neatly.
- The ornament is now ready to hang on a Christmas tree or to be packaged as a handmade gift.

Gauge & Swatch Tips
- This project does not require a strict gauge, but a small swatch of fan stitches helps ensure your yarn strands and hook size achieve a consistent texture and fabric openness.
- Adjust hook sizes or yarn thickness if needed to maintain even tension and desired size.
Optional Measurements / Sizing
- Finished ornament diameter approximately 4 inches (10 cm), depending on yarn thickness and tension.
Conclusion & Additional Tips
- This crochet ornament is a quick and satisfying project suitable for holiday decorations or as charming handmade gifts.
- It uses minimal yarn, making it perfect for using scraps or small color portions.
- The fan stitch pattern adds texture and visual interest while keeping the work light and airy.
- The practical hanging loop with a wooden bead creates a polished finish suitable for gift-giving or personal use.
- Beginners will find this project manageable, and intermediate crocheters can enjoy experimenting with different colors or yarn types.
- Try varying the color order or combining yarn textures for different looks.
- This pattern is a great opportunity to practice cluster stitches and color changes with a simple but stunning outcome.
Leave a Reply