
Make an outdoor table that does more than just hold your snacks and drinks by following this project. This innovative DIY project lets you create a convertible outdoor table that not only enhances your patio decor but also offers versatile functionalities. With a built-in feature that can either be a fire pit for those chilly evenings or a cooler option for your summer parties, this table is perfect for any season and occasion. So be ready to improve your outdoor living space with a piece that’s as practical as it is charming and surely thank me later for some fun oriented moments.
DIY Outdoor Table Project

Materials List
- Bag of Concrete
- (5) 1 x 4 x 8′ Cedar Boards
- (6) 2 x 4 x 8′ Cedar Boards
- (1) Sheet of ¾” Melamine
- Remesh (concrete reinforcement mesh)
- 1 ½” Wood Screws
- 2 ½” Decking Screws
- 1 ½” Stainless Steel Brad Nails
- Wood Glue
- Silicone Caulking
- Outdoor Finish (e.g., polyurethane)
- Concrete Sealer
- 9 x 13″ High Heat Pan
Tools Used
- Miter Saw
- Table Saw/Circular Saw
- Drill/Driver
- Brad Nailer
- Concrete Mixing Tub
- Shovel
- Sander & Sandpaper
- Paint & Staining Supplies
- Wood Clamps
- Carpenter’s Square
- Tape Measure
- Safety Goggles
- Gloves
Step-by-Step Making Process
Preparing the Mold
- Cut the melamine sheet into pieces that will form a 24 x 36″ box – this will be your table top mold.
- Assemble the melamine pieces into the box shape using wood screws to secure.
Carving Out the Center
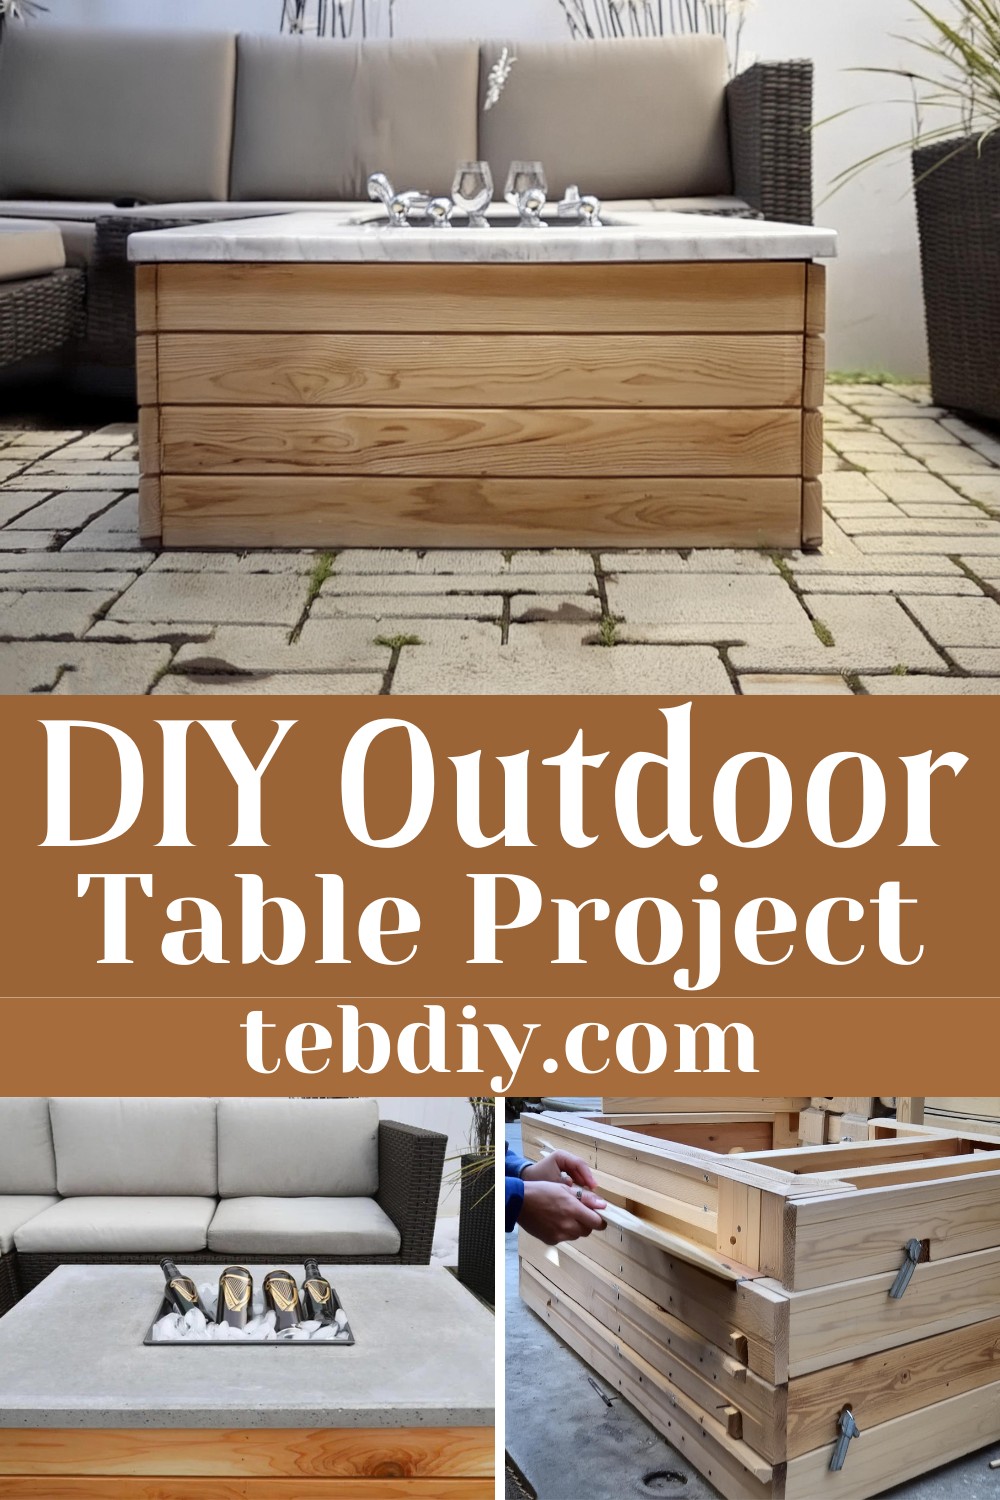
- Frame the center opening with 1 ¼” tall melamine strips, using the high heat pan for size reference. The intention is to create a snug fit for the pan, not to house it within the frame.
Finalizing the Mold
- Thoroughly vacuum the inside of the mold to remove any debris.
- Seal all interior edges with silicone caulking, making sure to remove any excess. Allow this to dry.
Mixing and Pouring Concrete
- Once the caulking is dry, mix the concrete to achieve a peanut butter-like texture.
- Shovel the mixed concrete into the mold, pressing down to fill all corners.
- Introduce the wire remesh into the wet concrete for additional stability.
- Jostle the mold gently to release air bubbles and use the sander along the sides to help this process.

Crafting the Table Base
- Begin constructing the table base while the concrete sets. Create the legs by joining two 2 x 4 cedar boards for each leg using wood glue and decking screws.
- Connect smaller stretcher pieces between each leg set, then join the pairs with longer stretchers.
Support Structures
- Introduce additional supports at the legs and center for reinforced stability.
Adding Aesthetic Touches
- Attach decorative cedar slats around the exterior of the base, using wood glue and brad nails. Utilize scrap pieces as spacers to ensure even gaps.
Protecting the Wood
- Apply an outdoor-grade polyurethane finish to seal and protect the cedar base from the elements.
Finalizing the Concrete Top
- Once cured, release the concrete slab from the mold, sanding the edges for a smooth finish.
- Seal the concrete with appropriate concrete sealer to protect against outdoor conditions.
Assembly and Final Touches
- Combine the concrete top with the wood base.
- Insert the high heat pan into the designated opening. If desired, drill drainage holes for functionality when using as a cooler.
Ready to Enjoy
- When using as a cooler, fill the pan with ice. To enjoy as a fire pit, add lava rocks and wood for a cozy flame.
- Celebrate your creation with friends and family, and relish the dual convenience your new table offers!
Conclusion
With the project now complete, what awaits is an indulgence in the comfort of your craft. Whether filled with ice to preserve drinks on a balmy afternoon or ablaze with fiery logs when dusk settles in, this stylish outdoor table promises to elevate your hosting prowess to new heights.
Leave a Reply