
Let’s experience the fun of manipulating air itself, or shaping it into rings that dance through space. It’s not just wind; it’s a visible force, made so by the clever integration of a fog machine. This DIY Automated Air Cannon project, an Automated Air Cannon, transforms the simple joy found in the children’s toy, Airzooka, into a spectacular display of engineering and creativity. Whether for the sheer joy of seeing air made visible or to delve into the world of mechanical automation, this project promises both fun and challenge. So, put your hands on this project and enjoy the construction of your very own Automated Air Cannon to bring out the potential of air in ways you never thought possible.

DIY Automated Air Cannon Project

Tools:
- Angular Grinder
- Drill
- Screw Drivers
- Hand Saw
- Fog Machine (not just a tool, but an integral part of the project!)
Materials:
- Circular trash can (plastic or metal)
- Windshield wiper motor (used)
- DC motor speed controller
- One Large heavy-duty trash bag
- Duct tape (lots!)
- EZ-FLO 1/4-in ID Latex Hose
- Scrap 1/2 inch plywood
- Various sizes of screws and bolts
- 5/8-in dia Coarse Steel Threaded Rod (longer than the diameter of the trash can)
- Eye hook screws
- Aluminum Solid Angle bar stock
- PVC pipe
- Multiple sizes of gears (at least one large and one small; sourced from eBay)
Step-by-Step Guide to Making an Automated Air Cannon
Understanding the Airzooka
The Airzooka toy creates donut-shaped air vortices that are fascinating in their ability to travel distances with tangible force. This project amplifies that concept into a larger, automated version.
Preparing Your Trash Can
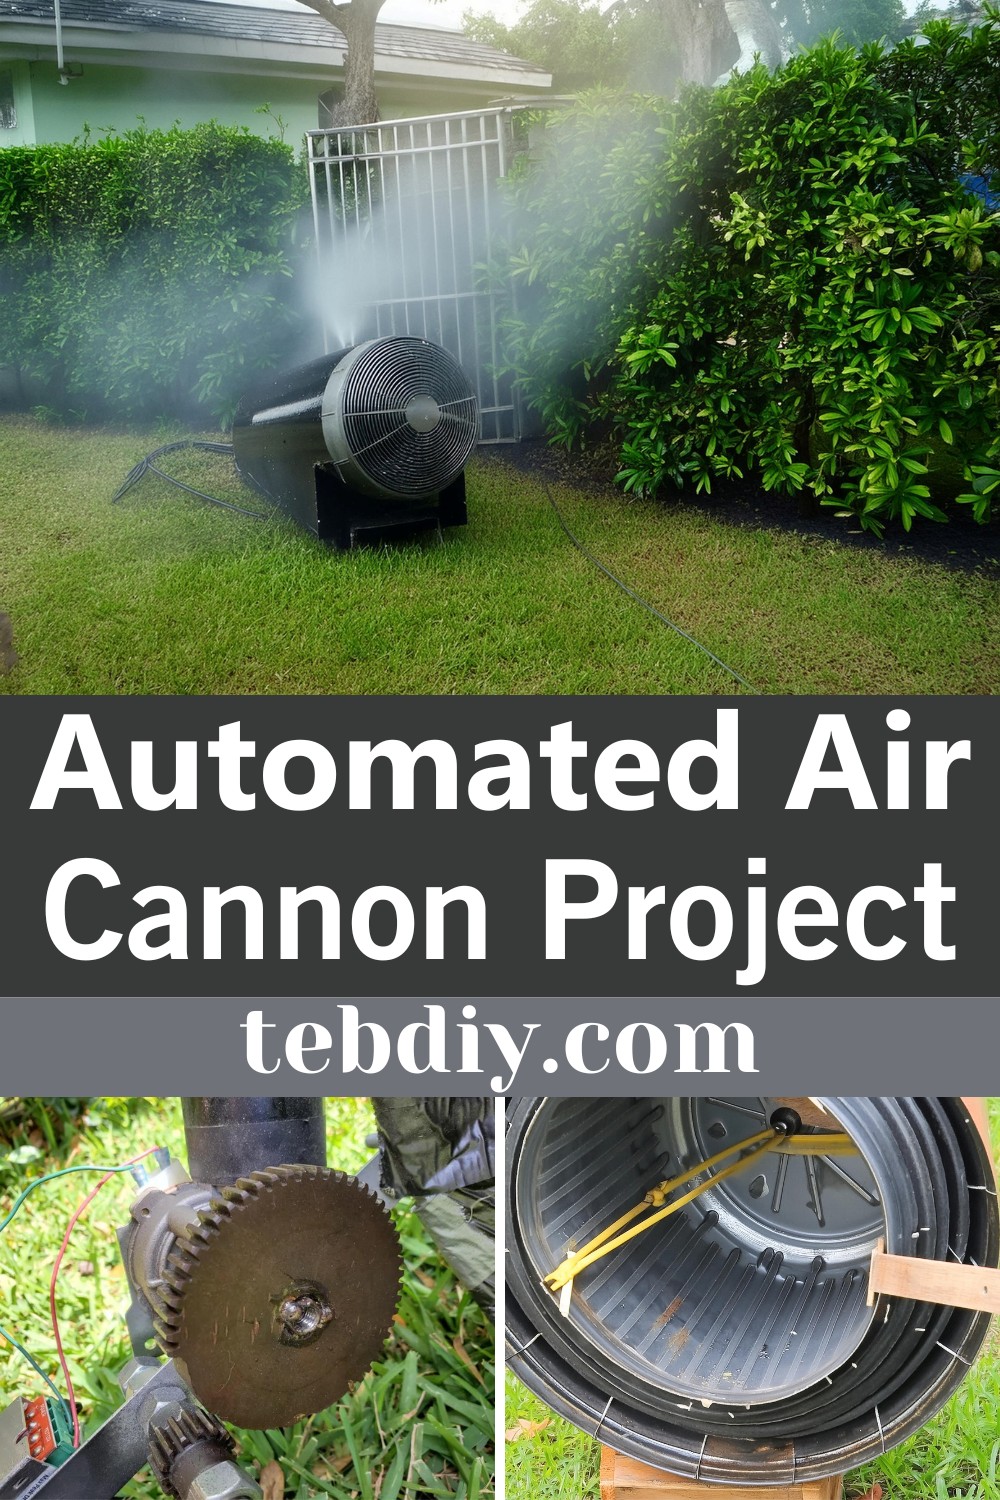
Transform a simple trash can into the project’s main structure by removing a circle from the bottom, leaving an edge around 3 inches wide. A jigsaw is perfect for this task, cutting out the circle drawn with a 3-inch margin from the can’s wall.

Crafting the Diaphragm and Connecting the Elastic Band
Cover the open end of the can with a heavy-duty trash bag for the diaphragm, securing it with an abundance of duct tape for durability. Attach scrap plywood pieces on either side of this diaphragm setup using bolts. These scraps provide anchor points for eye-hook screws, which in turn connect to the latex hose, setting the stage for the air cannon’s basic functionality.
The Fun of Automation
Creating a repeater mechanism brings the project to life. Start by attaching aluminum angle bar stock as a frame extension on each side of the can, ensuring stability for the automation components. Insert a 5/8-in threaded rod through drilled holes in this frame, securing it with nuts. The addition of gears to this rod, aligned with a gear on the windshield wiper motor, lays the groundwork for a mechanism that can draw back and release the diaphragm automatically.
Adding the Wiper Motor and DC Speed Controller
Integrate the small gear onto the threaded rod and the larger gear to the windshield wiper motor, ensuring they mesh well. By mounting the motor to the frame and positioning the DC speed controller nearby, you establish the system’s automated pulling mechanism. Adjust the gear system for the correct timing of release, ensuring the air cannon fires consistently.
Incorporating a Fog Machine
Drill a hole in the side of the trash can to accommodate a section of PVC pipe, connecting the fog machine. This addition enables the visual spectacle of fog rings, elevating the project’s wow factor.
Concluding Video Demonstration
The final touch is a demonstration through videos, showcasing the mesmerizing fog rings and the intricate workings of the gears. It’s not only a testament to the project’s success but an inspiring call to explore the realms of creativity and engineering.
Leave a Reply