
Enjoy the charm of a crochet ribbed beanie pattern with stretchy texture and playful style, offering cozy comfort and personality for chilly days.

Looking for the perfect mix of style and practicality? A crochet ribbed beanie pattern offers a stretchy, textured finish that keeps things snug while looking effortlessly chic. With its knit-like ribbing, this cozy accessory works for everyone and is easy to size.
Vibrant Crochet Ribbed Beanie Pattern to Stand Out
Go bold with striking colors, top it with a pom-pom, or keep it simple for a timeless look. It’s the ultimate cool-weather essential that pairs functionality with personality, and it’s endlessly customizable. Whether it’s for a gift or your own go-to wardrobe piece, the ribbing’s flexibility ensures comfort and style for every chilly moment.

Crochet Hat Pattern
Materials Required
- Yarn:
- Double Knitting Yarn in two colors:
- Dark color (main color)
- Light color (accent color)
- Each ball: 100 grams = 300 meters.
- Approximately 50 grams of each color will be needed.
- Double Knitting Yarn in two colors:
- Crochet Hooks:
- 3.5 mm hook (for 6 years + and 8 years + sizes)
- 4 mm hook (for adult size)
- Pom-Pom Maker (Optional, 7 cm size or your preferred size)
- Tapestry Needle (for weaving and sewing)
- Scissors
Techniques Used
Abbreviations:
- ch: Chain
- dc: Double Crochet
- sc: Single Crochet
- sl st: Slip Stitch
- fpdc: Front Post Double Crochet
- bpdc: Back Post Double Crochet
- V-stitch: (1 dc, ch 1, 1 dc) in the same stitch
- Shell Stitch: Multiple dc into one space
Notes:
- The pattern is worked in multiples of 6 + 2 chains.
- Gauge is important for sizing; check your finished chain length against measurements provided.
Pattern Instructions
Step 1: Foundation Chain
- Using the dark yarn, create a slipknot and chain:
- 96 chains for 8 years+ using a 3.5 mm hook (20.5 inches / 52 cm).
- 98 chains (96 + 2) to meet the multiple of 6 + 2.
- For 6 years+, chain 90 + 2 (92 total).
- If making the adult size, use the same chain count (98) but a 4 mm hook for a slightly larger fit.
- Ensure the chain is not twisted. Join the first chain and last chain using a slip stitch to form a ring.
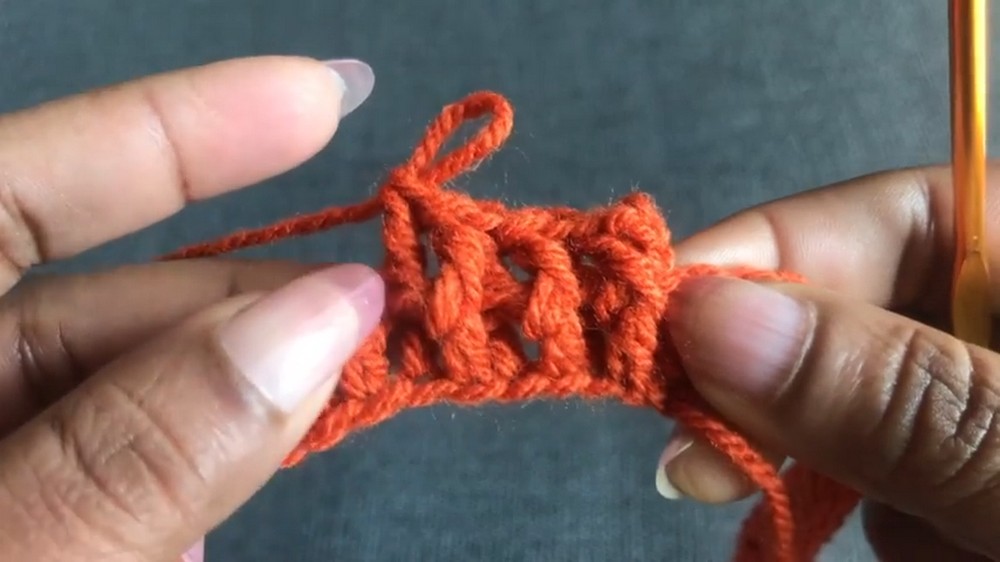
Step 2: Row 1 (Double Crochet Base Row)
- Turn the chain to work into the back loops for a cleaner, neater edge.
- Skip the first 3 chains; in the 4th chain:
- Work 1 dc.
- Continue working 1 dc in each chain, ensuring you work into the back loops only.
- At the end, join the first and last dc with a sl st at the top of the starting chain.
- Stitch count should be 96 (or the number of chains you started with).
Step 3: Rows 2–4 (Ribbing)

To create a ribbed pattern for the hat band:
- Begin by chaining 3 (counts as the first dc).
- Work the round using fpdc (Front Post Double Crochet) and bpdc (Back Post Double Crochet):
- Start the first st in front post of the previous row’s dc.
- Move to the next st and work back post double crochet.
- Repeat the sequence: 1 fpdc, 1 bpdc around.
- Join with a sl st to the top of the starting chain.
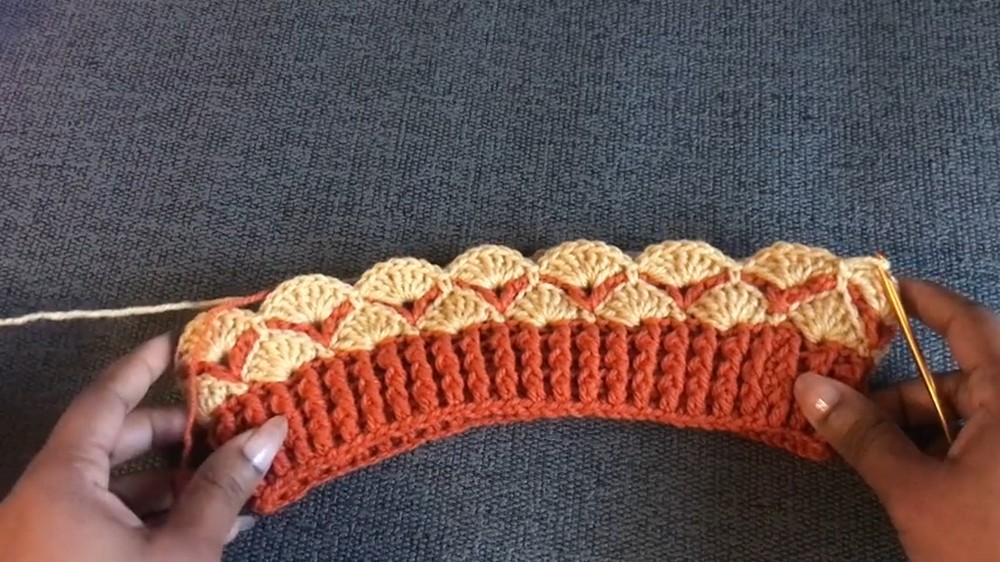
Repeat this process for Rows 3 and Row 4, maintaining the alternating fpdc and bpdc for a textured ribbing.
Step 4: Row 5 Onward (Pattern Repeats)
Round 1 (Shell Stitch Base Row):
- Join the light yarn. Do not cut the dark yarn; it will be carried along the back of the work.
- Start with a ch 1. In the third stitch after your starting chain:
- Work 7 dc into the same space (this creates the first shell).
- Skip the next 2 stitches, then in the following stitch:
- Sc to anchor the shell.
- Skip another 2 stitches, then work another shell (7 dc) in the next stitch.
- Repeat this pattern: Shell, skip 2, sc, skip 2 around the entire row.
- At the end of the round, you will have 16 shells. Join with a sl st.
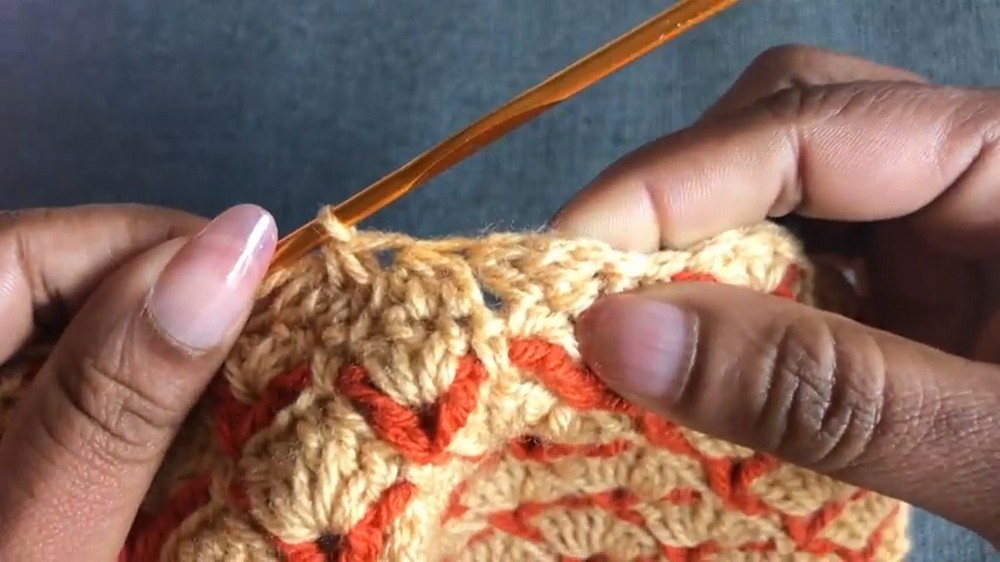
Round 2 (V-Stitch with Chain Loops):
- Pull the dark yarn up and ch 4.
- This counts as your first V-stitch.
- Into the previous round’s sc, work a V-stitch (dc, ch 1, dc).
- Chain 5, skip the shell, and go to the next sc to work a V-stitch (dc, ch 1, dc).
- Repeat this process: ch 5, V-stitch in sc all the way around, ending with a sl st.
Round 3 (Shell Stitch in V-Stitch Spaces):
- Pull up the light yarn and ch 3 (counts as the first dc).
- In each V-stitch space, work 7 dc to create a shell.
- At the end of the round, join with a sl st.
Repeats:
- Continue alternating Round 2 (V-stitch) and Round 3 (Shell Stitch) until the length of the hat reaches 15 rounds total.
- 6 Years Plus: 13 rounds.
- 8 Years Plus (or Adult Size): 15 rounds.
Step 5: Decreasing Rounds (Top Shaping)
- Round 16 (Decrease V-Stitch and Chain Loops):
- Replace the ch-5 spaces with ch-4, and into the sc, make a V-stitch (dc, ch 1, dc).
- Round 17 (Shell Decrease):
- Pull up the light yarn. Work 5 dc in each V-stitch instead of 7.
- Anchor the shell using the 4th dc of the previous shell as usual.
- Round 18 (Decrease V-Stitch and Chain Loops):
- Work V-stitches separated by ch 2 spaces.
- Round 19:
- Replace shell stitches with smaller ones of 3 dc per V-stitch.
- Anchor using the middle dc of the previous shell.
- Round 20:
- Work a round of combined 3 dc together (dc3tog) for each shell. This closes up the top of the hat.
- Round 21:
- Work 1 sc in each stitch around.
- For 6 years +, you should have 15 sc.
- For other sizes, adjust stitch count as required.
- Round 22:
- Complete the final round using sc2tog to close the opening tightly.
Step 6: Finishing
- Close the Top Hole:
- Use a tapestry needle to sew through the top stitches of Round 22.
- Pull tight and secure with a knot.
- Add a Pom-Pom (Optional):
- Use a 7 cm Pom-Pom Maker or create your own.
- Attach a pom-pom securely to the top of the hat.
- Weave in Loose Ends:
- Use the tapestry needle to hide and secure all threads.
Final Words
Congratulations! Your crochet hat is complete! Pair it with the matching poncho for a cozy, stylish set. This two-round repeat pattern is versatile and easy for beginners, and you can customize the size by adjusting the number of chains and rounds.
Tips for Success:
- Use stitch markers to help keep track of rounds.
- Carry unused yarn colors neatly along the back to maintain clean edges.
- Steam block or wet block your finished hat for the best shape and texture.
Leave a Reply