
Create lightweight, stylish earrings and jewellery with polymer clay! This guide has all the tips to create professional-looking pieces from home.
When I first discovered the joy of creating jewelry, I was amazed at the versatility of polymer clay. It all started from a simple idea: a desire to craft something meaningful, functional, and beautiful with my own hands. The purpose was clear—pieces that are as unique as the individuals who wear them, all while keeping costs low and creativity high. That’s when I ventured into making Polymer Clay Earrings & Jewellery and found myself immersed in a world of endless possibilities.
Polymer Clay Earrings & Jewellery: Everything You Need to Know
Polymer clay isn’t just a material; it’s a canvas for your imagination. With its vibrant colors, mixable hues, and ability to mimic everything from stone to marble and even leather, it’s perfect for crafting earrings, necklaces, bracelets, or even keepsakes. You can shape it into bold statement pieces or delicate, minimalistic designs that match any style or occasion. Best of all, working with polymer clay doesn’t require expensive equipment—just your creativity, a few simple tools, and an oven to bring your ideas to life.

The benefits go beyond aesthetics. Polymer clay is lightweight, making it comfortable to wear all day, especially for earrings. It’s durable when baked correctly, ensuring your creations last for years. Plus, its versatility encourages you to explore techniques like marbling, color blending, and surface texturing. Whether you’re adding sophistication to a casual outfit or crafting a meaningful gift for someone you love, Polymer Clay Earrings & Jewellery lets you design accessories that are truly one-of-a-kind.
Start your own creative journey today and experience the joy of turning a simple block of clay into stunning works of wearable art. With polymer clay, the only limit is your imagination!
Polymer Clay Earrings & Jewellery
Complete Step‑By‑Step Beginner’s Guide
This guide will walk you through everything:
- Materials and tools
- Preparing your workspace and clay
- Making and baking your pieces
- Drilling, assembling, and attaching studs
- Optional sealing, finishing, and decorative ideas
1. Materials & Tools You’ll Need
A. Polymer Clay (Baking Clay, Not Air Dry)
For earrings and jewellery, you need a clay that is strong and slightly flexible after baking.
Recommended polymer clay brands:
- Sculpey Premo
- Sculpey Soufflé
- Cernit
- Fimo Professional
These brands are ideal for thin, flat jewellery pieces because they cure strong yet flexible.
Avoid (for earrings/jewellery):
- Sculpey III and similar softer craft clays
- They can be brittle once baked and snap more easily in thin pieces.
B. Basic Tools
Start with simple tools before investing in more advanced equipment.
1. Work Surface
Options:
- Gloss ceramic tile (highly recommended)
- Inexpensive, smooth
- You can work directly on it and put it straight into the oven
- Glass sheet
- Acrylic sheet
- Baking/parchment paper
Choose a surface that is:
- Smooth
- Easy to clean
- Heat‑safe if you want to bake directly on it
2. Roller
Used to roll clay into even slabs.
- Acrylic roller or any smooth, solid rolling pin
- A bit of weight helps get an even, flat slab without too much effort
3. Tissue Blade
A tissue blade is:
- A very thin, sharp metal blade
- Used to cut, trim, and lift clay pieces from the surface
Important:
- Hold the blade at about a 45° angle
- Slide under the piece in one smooth motion to lift it cleanly without warping
4. Craft Knife
Not essential but very useful:
- For detailed cutting
- For trimming and shaping
- For cutting around paper templates if you don’t have cutters
C. Shape Cutters (Optional but Highly Recommended)
You can:
- Use paper templates and a craft knife
- Or use clay cutters (plastic or metal) designed for polymer clay
Benefits of cutters:
- Consistent shapes every time
- Access to many shapes and styles
- Cleaner edges and more detailed designs
- Faster and easier when making multiple pairs
D. Oven & Temperature Tools
Polymer clay must be baked to cure.
Oven options:
- Your regular kitchen oven
- A small tabletop/toaster oven dedicated to clay
Important:
- Follow the manufacturer’s baking instructions on your clay packet.
- Typical baking temp (for Premo, Soufflé, Cernit, Fimo Professional): about 130°C / 266°F
- Baking time for thin slabs: around 30–40 minutes
Oven Thermometer (highly recommended):
- Many ovens do not heat at the temperature shown on the dial.
- An inexpensive oven thermometer (about $10–15) helps:
- Confirm your oven temperature
- Maintain consistency
- Avoid underbaking (brittle clay) and overbaking (burning/discoloration)
E. Findings & Assembly Tools
Findings are the metal components that turn clay pieces into wearable jewellery.
Common findings:
- Earring stud posts
- Earring hooks (fish hooks, lever backs, etc.)
- Jump rings
- Connectors and charms
- Chain segments
- Bails or other connectors
Tools for assembly:
- 2 pairs of jewellery pliers
- Flat nose or chain nose pliers are typical
- Jump ring opener (optional)
- A small ring you wear on a finger to help twist jump rings
- Super glue (for stud posts)
- Loctite superglue gel
- Gorilla super glue gel
F. Optional Extras for Making & Finishing
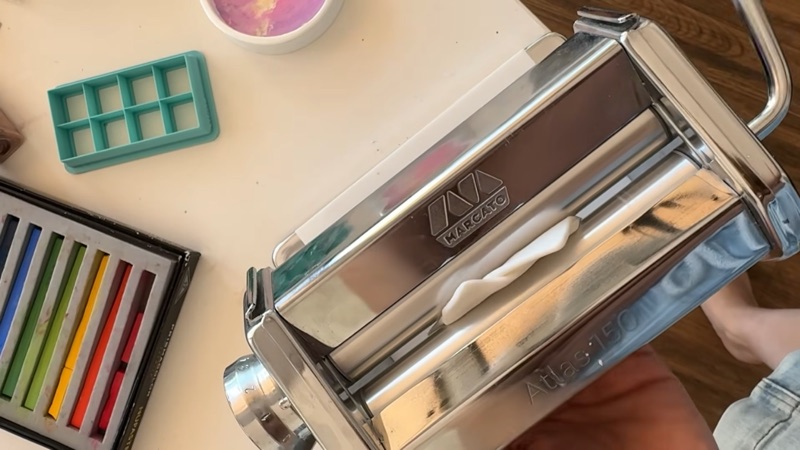
- Pasta machine
- Helps condition clay and create perfectly even slabs
- Depth guides/spacers
- Wooden or silicone sticks/panels of a set thickness to guide rolling
- Hand drill or pin vise
- For drilling holes after baking
- Rotary tool/electric drill (e.g., Dremel, multi‑function rotary tool)
- Faster drilling
- Often can sand and buff as well
- Sandpaper or sanding sponges
- Various grits (start medium, move to fine)
- UV resin (optional)
- For glossy coatings or attaching posts (if you tolerate resin)
- Liquid clay or clay adhesive
- For embedding posts securely
- Glazes/varnishes (for special finishes)
- Sculpey glaze
- Cernit varnish
- Pearl Ex varnish
2. Preparing Your Workspace
- Clean your work surface
- Wipe the ceramic tile/glass/acrylic with a lint‑free cloth.
- Remove dust, glitter, fibres—polymer clay picks up everything.
- Wash your hands
- Oils and dust can mark clay.
- Light‑coloured clay shows dirt easily, so clean hands are important.
- Set up tools within reach
- Roller, blade, craft knife, cutters, depth guides if using.
- Preheat your oven
- Set to the recommended temperature on your clay packet (often 130°C / 266°F).
- Place the oven thermometer inside and allow the oven to stabilize.
3. Conditioning the Polymer Clay
Conditioning means making your clay workable, flexible, and ready to use.
It also ensures the plasticizers in the clay are evenly distributed.
Step‑By‑Step Conditioning
- Cut or break off the amount of clay you need.
- Warm it with your hands.
- Knead, fold, and press repeatedly.
- Roll into a snake, fold, press flat, repeat.
- Observe the texture.
- If the clay is crumbly or stiff: keep working it.
- If your hands get tired, use tools like a roller or pasta machine.
- Using a pasta machine (optional but very helpful):
- Flatten the clay slightly by hand.
- Pass it through the pasta machine on a wider setting.
- Fold it and pass it through again.
- Repeat several times until the clay becomes smooth, flexible, and even.

You know the clay is conditioned when:
- It no longer cracks or crumbles at the edges
- It is easy to bend and shape
- It feels smooth and consistent
4. Forming Clay Slabs for Earrings & Jewellery
A. Rolling to the Right Thickness
For flat slab style earrings and jewellery:
- Aim for around 2–3 mm thickness.
Steps:
- Place conditioned clay on your work surface.
- Position depth guides on each side if you have them (2–3 mm high).
- Roll the clay with your roller:
- Roll evenly in multiple directions.
- Aim for a smooth, even slab with no bumps.
If you don’t have depth guides:
- Roll gently and visually check thickness.
- Try to be consistent so all pieces look professional and bake evenly.

Note:
- Thin pieces are fine with the right clay; they should be flexible, not brittle, after proper baking.
B. Creating Designs & Patterns (Optional)
Before cutting shapes, you can:
- Mix colours for marbling
- Make terrazzo by mixing small chips of coloured clay into a base colour
- Add mica powder, pigment powder, or gold leaf to the surface
- Layer different coloured slabs for stripes or geometric designs
Keep the surface clean and flat as you design.
5. Cutting Shapes for Earrings & Jewellery
A. Using Cutters
- Decide the shapes: circles, ovals, arches, rectangles, flowers, etc.
- Press the cutter straight down into the slab.
- Wiggle very slightly if needed for a clean cut.
- Lift the cutter and remove the excess clay around the shape.
- Use the tissue blade at an angle to slide under and lift the piece.
Tips:
- Cut as many shapes as you can from a slab before re‑rolling.
- Clean cutter edges occasionally for crisp shapes.
B. Using Craft Knife & Templates (Without Cutters)
- Draw your shape on paper or use printed templates.
- Place the paper template on the clay slab.
- Use a sharp craft knife to cut around the template.
- Smooth any rough edges with your fingers or a tool.
6. Making Holes for Jump Rings & Hooks
You can make holes before baking or after baking.
Option 1: Holes Before Baking
Tools:
- Needle tool
- Toothpick
- Small round clay cutters
Steps:
- Decide where the holes will go (top, bottom, or center depending on your design).
- Press the needle/toothpick straight through the clay.
- Twist gently to enlarge the hole if needed.
- Make sure the hole is clean and not too close to the edge (to avoid cracking later).
Note:
- This is simple and good for beginners, but holes might be slightly less clean than drilled holes.
Option 2: Drilling Holes After Baking
Tools:
- Hand drill (pin vise)
- Or electric rotary tool (e.g., Dremel)
Steps:
- Bake your pieces fully and let them cool.
- Mark hole positions lightly with a pen or tool.
- Use a small drill bit matching your jump ring gauge.
- Drill slowly and straight through the piece.
- Clean any dust from the hole.
Hand drills:
- Affordable and effective, ideal if making small quantities.
Electric drills:
- Faster and great for larger volumes or a jewellery business.
- Can also be used with sanding and buffing attachments.
7. Baking Your Polymer Clay Earrings & Jewellery
General Baking Guidelines
- Preheat the oven to the temperature recommended on your clay packet.
- Premo, Soufflé, Cernit, Fimo Professional: usually 130°C / 266°F
- Place clay pieces on:
- The same ceramic tile you worked on
- Or a baking tray lined with baking paper
- Bake time:
- For 2–3 mm flat pieces: 30–40 minutes
- For thicker pieces: follow pack guidelines and add time as needed
- Monitor the temperature with an oven thermometer.
- Adjust oven settings if it runs too hot or too cool.
After Baking
- Let pieces cool completely before handling, drilling, or assembling.
- Properly baked clay should:
- Be slightly flexible when bent gently
- Not snap easily
- Not look chalky or undercooked
If you are testing:
- Gently bend an off‑cut or test piece to check flexibility.
- A properly cured piece should bend a little and not break immediately.
8. Sanding, Smoothing & Finishing the Clay (Optional but Recommended)
For a more professional look:
- Use fine‑grit sandpaper or sanding sponges.
- Lightly sand edges and surfaces to remove tiny imperfections.
- Rinse pieces if needed and dry thoroughly.
If you have a rotary tool:
- Attach sanding or buffing heads for faster finishing.
9. Sealing or Varnishing (Optional)
You do not need to seal polymer clay earrings and jewellery for strength.
Finished polymer clay is already durable.
You might choose to seal when:
- You used gold leaf, mica powder, pigment powders, or other surface mediums and want them to stay in place.
- You want a glossy or high‑shine finish on the surface.
Suitable sealers:
- Sculpey glaze
- Cernit varnish
- Pearl Ex varnish
- UV resin (for a very hard, glass‑like gloss, if you tolerate resin)
Important:
- Polymer clay can react with some sealers, causing stickiness.
- Use sealers known to work well with polymer clay and follow instructions.
10. Assembling Polymer Clay Earrings & Jewellery
A. Planning Your Design
Before drilling or attaching:
- Lay your baked clay pieces out on your table.
- Arrange them with:
- Jump rings
- Hooks
- Charms
- Wooden or metal components
- Test different combinations until you’re happy with the design.
Remember:
- You can mix polymer clay with other materials: metal charms, wood, beads, etc.
B. Working with Jump Rings
Jump rings connect pieces and attach them to hooks or chains.
Choosing the right jump ring size:
- Large dangle earrings: medium‑to‑larger jump rings (e.g., 7–10 mm)
- Small or dainty designs: smaller jump rings (e.g., 4–6 mm)
A good versatile size to start with:
- 7 mm jump rings – suitable for many designs
Opening and closing jump rings correctly:
Never pull the ring apart sideways (outwards).
Instead:
- Hold the jump ring with two pliers, one on each side of the gap.
- Twist one side forward and the other backward.
- Slide the ring through your hole and any other component.
- Close by twisting the ring back so both sides meet again.
This keeps the ring round and strong.
Ensure:
- The hole in the clay piece is big enough for the jump ring wire.
- The piece can move and dangle freely once assembled.
C. Attaching Stud Posts to Polymer Clay Earrings
For stud earrings, you must attach posts securely.
Method 1: Super Glue (Most Common & Simple)
Tools:
- Stud posts
- Super glue (Loctite gel, Gorilla glue gel)
- Sandpaper
Steps:
- Sand the back of the baked clay piece lightly to roughen it.
- Sand the pad (flat part) of the stud post as well.
- Rough surfaces help glue grip better.
- Place a small drop of super glue on the pad or the back of the clay piece.
- Press the stud post firmly onto the clay where you want it.
- Hold in place for a few seconds or according to glue instructions.
- Let cure completely (check glue curing time—often several hours).
Notes:
- This is not 100% fail‑proof, but with good prep it holds extremely well.
- Many makers use super glue successfully for years.
Method 2: Embedding Posts in Clay (Very Secure)
This is more advanced and done before baking.
Tools:
- Stud posts
- Liquid clay or clay adhesive
- Extra polymer clay
Steps:
- Place your stud post pad on the back of your unbaked clay piece.
- Apply a small amount of liquid clay or clay adhesive to the pad to help it stick.
- Cover the pad with a thin layer of polymer clay.
- Smooth and blend this layer into the base piece so the pad is fully embedded.
- Bake the entire piece as normal.
Result:
- The post is locked inside the baked clay and is extremely secure.
- Requires practice but is the most durable method.
Method 3: UV Resin
Tools:
- UV resin
- UV lamp
- Stud posts
Steps:
- Sand the back of the clay and the stud pad.
- Position the stud post on the clay.
- Apply a small amount of UV resin over the pad and surrounding area.
- Cure under a UV lamp according to resin instructions.
Note:
- Effective, but UV resin can irritate skin and some people are allergically sensitive.
- Use with proper safety precautions.
11. Final Finishing & Decorating
Once assembled:
A. Surface Finishing
Depending on your design:
- Leave pieces matte (natural baked clay finish)
- Buff them with a soft cloth for a soft sheen
- Add gloss glaze or UV resin for a shiny, glass‑like finish
- Add metallic accents (paint, leaf, or powders, sealed appropriately)
B. Extra Decorations
You can:
- Add small charms (stars, hearts, leaves, crystals) with jump rings
- Mix clay and wood elements for contrast
- Use different metal tones: gold, silver, rose gold, gunmetal
- Layer multiple clay pieces into one statement earring or necklace pendant
12. Features of Well‑Made Polymer Clay Earrings & Jewellery
Well‑finished polymer clay jewellery should:
- Be lightweight and comfortable to wear
- Feel smooth in your hands, with neat edges
- Have secure posts and findings that do not wobble
- Be flexible and not brittle (especially for thin pieces)
- Show clean, intentional design and colour choices
With proper clay selection, conditioning, even rolling, correct baking and careful assembly, your pieces will look professional and last for years.
Leave a Reply