
Add playful charm with this Crochet Carrot & Radish Pattern full of bright colors fun shapes and a cheerful creation that brings joy to your home or gifts.

Polished Crochet Carrot & Radish Pattern to Try for Seasonal Decor
Get ready to create two super charming little friends that will brighten up any space! These adorable carrot and white radish figures are soft, colorful, and full of personality. With their sweet little hats and bright eyes, they bring a touch of happy garden vibes right into your home. They are made with soft cotton yarn, giving them a cozy feel that’s perfect to hold or display.

Whether you want a cute keychain, a cheerful decoration for your kitchen, or a playful gift for someone special, these lively veggies fit right in. Their bright orange and white colors catch the eye, while the green leafy tops add a fresh, natural touch. They are not just cute but also light and small, making them easy to carry around or place on your shelves. These friendly veggies will bring a smile to anyone who sees them simple, fun, and full of warmth!

Crochet Cute Carrot and White Radish Characters
Uses:
Keychains, gifts, decoration, or collectibles
Special features:
- Magic circle start for seamless amigurumi parts
- Combining crocheted limbs directly into the body
- Creating 3D hats with leaf embellishments
- Adding facial details with safety eyelets and simple embroidery
Materials Needed
- Lan Mil cotton yarn (50g) in orange, white, brown, green
- 2.5 mm crochet hook
- Stuffing cotton
- 4mm safety eyes
- Yarn needle for sewing
- Glue (optional, for hat attachment)
- Bent wire for optional glasses accessory
Abbreviations
- ch – chain
- sc – single crochet
- inc – increase (2 sc in one stitch)
- dec – decrease (crochet two stitches together)
- sl st – slip stitch
- magic circle – ring to start crocheting in the round
Pattern Instructions
Hands (Make 2)
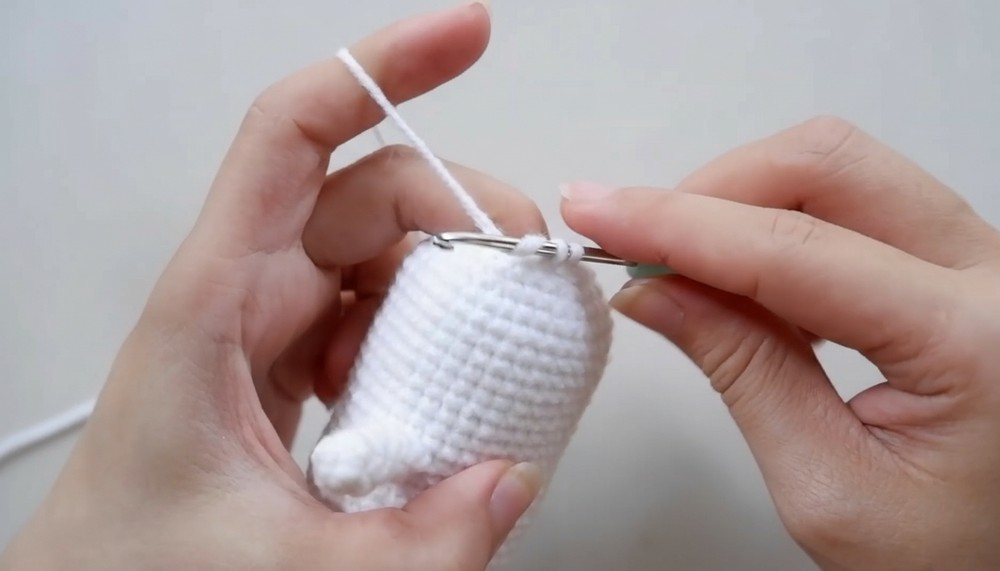
- Create a magic circle, work 5 sc into the circle. Pull tight and join with a sl st.
- Row 2: Crochet increase in first stitch (2 sc), then 1 sc in the next stitch, repeat increases as guided, ending 7 stitches total.
- Rows 3-5: Crochet 1 sc per stitch (no increases or decreases), maintaining stitch count (7).
- Row 6: Start with 3 sc, perform an increase stitch on the 4th stitch, then continue with 3 sc. Slip stitch to end.
- Row 7-8: Crochet 1 sc per stitch (8 stitches total).
- Fasten off, leaving a tail for sewing. Hide ends inside.
Legs (Make 2)
- Begin with a magic circle, crochet 7 sc. Join with a sl st.
- Row 2: Crochet 3 sc, increase stitch, 3 sc, slip stitch to finish (9 stitches).
- Rows 3-5: Crochet 1 sc per stitch (9 stitches).
- Fasten off and hide ends after stuffing.

Body
- Magic circle, 8 sc into ring, join with a sl st.
- Row 2: Increase in every stitch (16 sc total).
- Row 3: 1 sc, inc repeat 8 times (24 sc total).
- Rows 4-5: Crochet as shown in pattern, combining legs and torso by crocheting through both leg and body stitches to join seamlessly. Total stitches increase to 30, then 36.
- Rows 6-14: Crochet 36 sc evenly without increases or decreases to shape the torso.
- Attach hands: Crochet 7 sc around arm openings.
- Rows 15-24: Continue 36 sc in each round.
- Rows 25-28: Decrease evenly as per pattern to close torso shape.
- Stuff body firmly, sew hole closed with yarn needle.


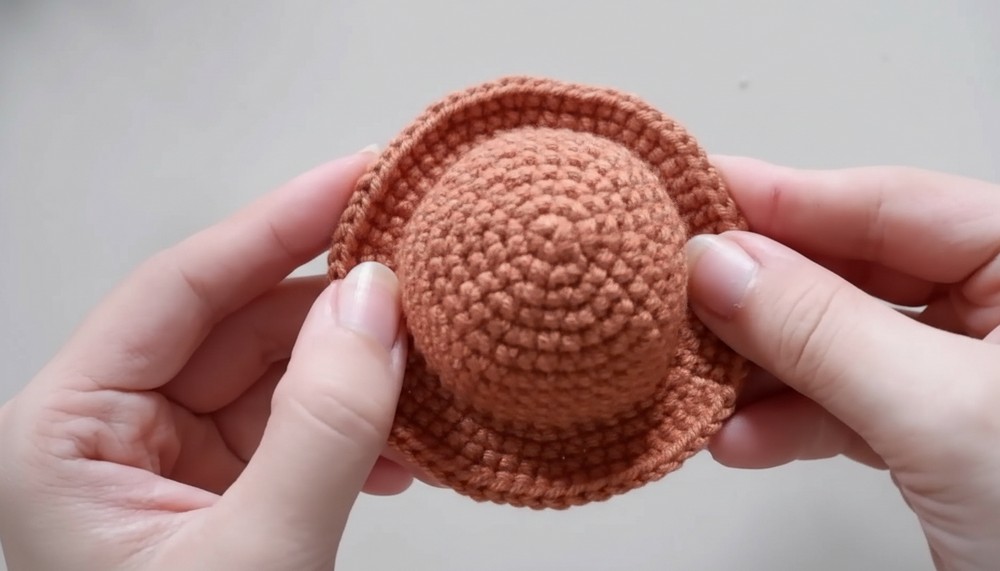
Hat (Make for Each Character)
- Starting with a magic circle, crochet 6 sc.
- Row 2: Increase in each stitch around (12 sc).
- Row 3: (1 sc, inc) repeat 6 times (18 sc).
- Row 4: (2 sc, inc) repeat 6 times (24 sc).
- Continue increasing in pattern to desired hat size (up to 70 sc).
- Fasten off, leave yarn tail for sewing and shaping.
Leaves (Make 2)
- Chain 11 stitches.
- Crochet down the chain with a combination of single crochets, half-double crochets, and double crochets as per stitch count given.
- Finish leaf with a slip stitch and leave yarn tail for attaching.

Assembly
- Sew leaves inside the hat’s top for decorative detail.
- Attach safety eyes between rows 17 and 18 of the body, 6 stitches apart.
- Sew hat onto the body and attach the leaves.
- Embroider a mouth; customize with a crooked smile or any style you want.
- Add subtle blush to the cheeks for a finished look (optional).
- Attach keychain or use as a cute home decoration.


Tutor’s Suggestions
- Take your time with color changes to ensure a neat finish.
- Weave in ends securely to avoid unraveling.
- Customize facial expressions to personalize your characters.
- Use firm stuffing for a sturdy amigurumi figure.
Tip
To keep your shaping accurate, count your stitches carefully at the end of each row before moving on, especially when increasing or decreasing. Use stitch markers if needed!
Conclusion
This project combines basic and intermediate crochet techniques to produce charming carrot and white radish amigurumi figures. These characters make delightful handmade gifts and can be personalized with small accessories like wire glasses.
Leave a Reply