
Take the joy of a pizza slice everywhere with this crochet keychain pattern perfect for adding fun to your style or gifting to loved ones.

Who doesn’t love a tiny slice of fun that you can carry everywhere? A pizza-shaped keychain made with soft crochet is not just adorable but also a touch of creativity you can show off daily. It’s colorful, cheerful, and looks mouth-wateringly cute with its detailed toppings and crust-like texture, all made from yarn! This little charm isn’t only perfect for holding your keys but makes a wonderful accessory for your bags, pouches, or even as a decorative item.
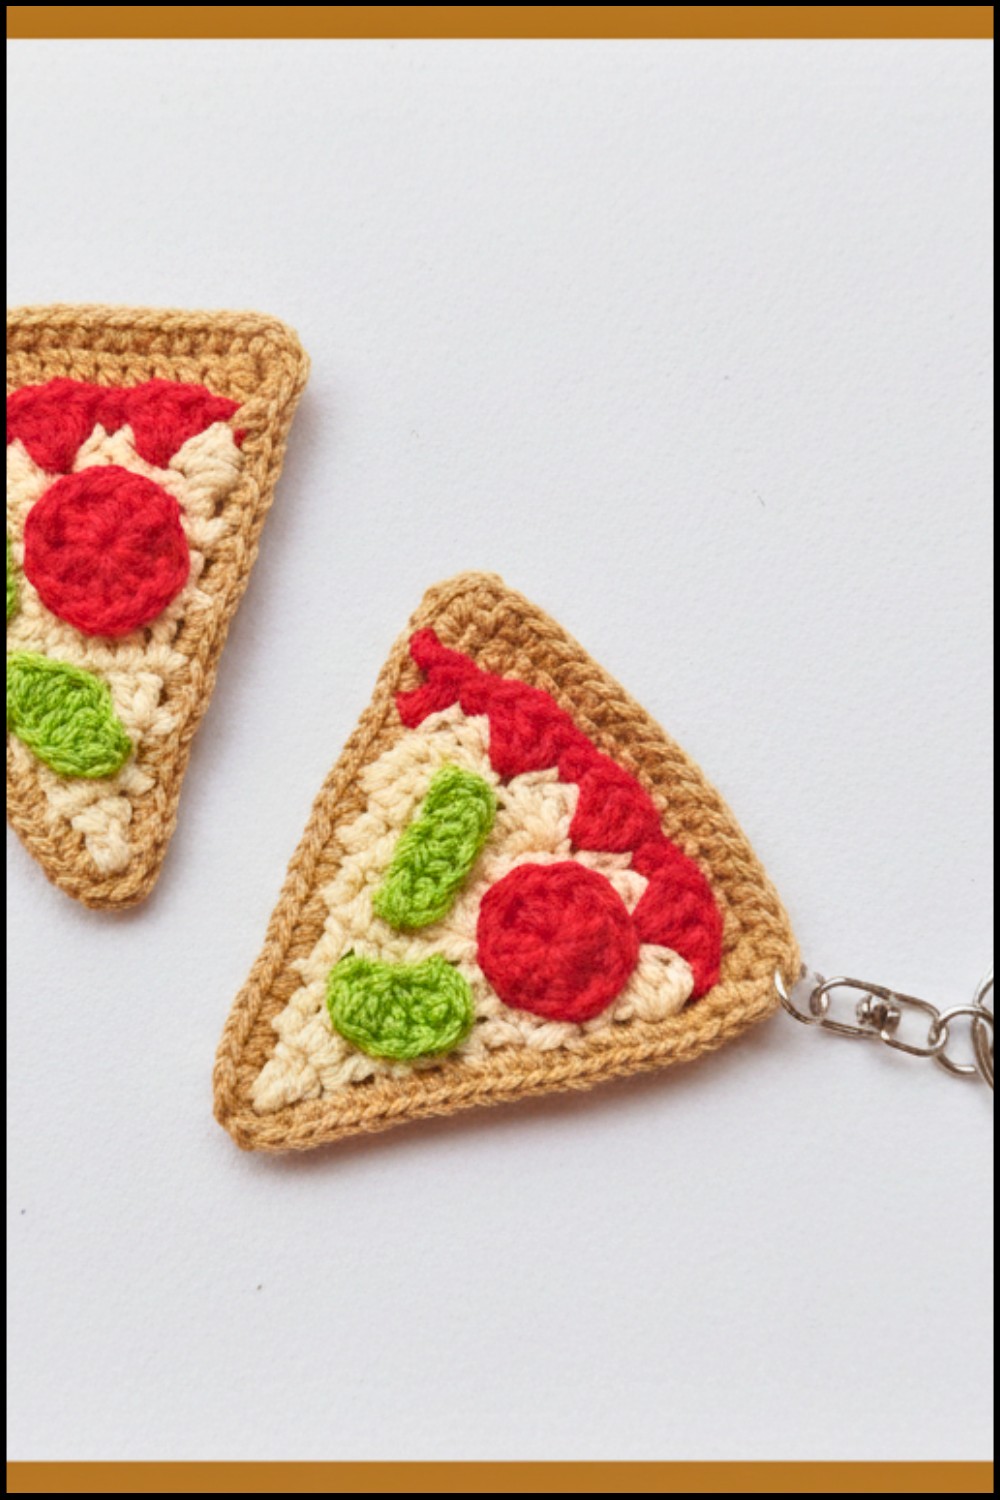
Cute Crochet Pizza Keychain Pattern Step By Step Guide
Plus, it can be a thoughtful handmade gift for loved ones, spreading joy with its delightful design. Whether you’re a beginner in crocheting or an experienced crocheter, making this charming keepsake is simple and fun. A little slice, filled with warmth and creativity, it reminds us how small things can brighten up our everyday lives. It’s a mix of functionality and fun that’ll leave everyone smiling!

Materials List
- Yarn (Polyester Thread):
- Yellow (for the cheese)
- Red (for the sauce)
- Green (for the vegetables)
- Brown/Beige (for the pizza crust/”bread”)
- Crochet Hook: Tulip 3.0 mm
- Tapestry Needle: For sewing and weaving yarn ends.
- Scissors: For cutting yarn.
- Lighter: Optional for tidying yarn edges (used for polyester thread).
- Keyring Hook: To complete the keychain.
Skill Level
Intermediate
Key Abbreviations (US Terminology)
- ch: Chain
- sc: Single Crochet
- hdc: Half Double Crochet
- dc: Double Crochet
- sl st: Slip Stitch
- MR: Magic Ring
- st: Stitch
Special Notes
- This pattern requires color changes for different sections. Ensure to weave in ends after changing colors for a neater finish.
- Adjust your tension if the stitches appear too tight or loose.
- The project involves assembling separate parts, so stitch placement is crucial for neatness.
Pattern Instructions
Part 1: Creating the Cheese Base (Yellow)
Step 1: Starting with a Magic Ring
- Create a Magic Ring (MR) and chain 3 (ch 3) – this counts as your first dc.
- Make 11 dc inside the magic ring (12 total, including the beginning chain-3).
- Pull the Magic Ring tight and sl st into the top of ch 3 to close the round.

Step 2: Increasing the Rounds (to create a triangular pizza slice shape)
- Round 1:
- Ch 3 (first dc).
- Add 2 dc into the first st.
- In the next st, make 1 dc.
- Repeat this pattern: [2 dc, 1 dc].
- Total stitches: 18. Sl st to join.
- Round 2:
- Ch 3.
- In the next st, make 1 dc.
- In the next st, add 2 dc.
- Repeat this pattern: [1 dc, 1 dc, 2 dc].
- Total stitches: 24. Sl st to join.
- Continue increasing following the same formula until the slice grows to the desired size. Each round should increase by 6 stitches. Example of increases:
- Round 3: [1 dc, 1 dc, 1 dc, 2 dc] – Total 30.
- Round 4: [1 dc, 1 dc, 1 dc, 1 dc, 2 dc] – Total 36.
- Once the triangular slice is complete (approx. 6-8 rounds), fasten off the yarn, leaving a tail.


Part 2: Adding the Sauce (Red Yarn)
- Attach red yarn to the widest edge of the cheese (triangle base) using a slip knot.
- Begin your sauce edge with ch 3, working across the base edge as follows:
- Place 3 dc into the holes along the base edge evenly.
- Sl st into the next st after each cluster of 3 dc.
- Repeat the process to create “drips” of sauce over the edge.
- Fasten off and tidy up loose ends.

Part 3: Adding Sausage Toppings (Red Yarn)
- Sausage Piece:
- Create an MR and make 12 dc.
- Pull the ring tightly and sl st into the first dc to form a circle.
- Fasten off, leaving a yarn tail for attaching.
- Create as many sausages as desired (e.g., 3-5) and sew them onto the cheese using a tapestry needle and red yarn.
Part 4: Adding Vegetables (Green Yarn)
- Veggie Strip:
- Chain 6.
- Work the following into each chain:
- 1 sc in the second chain from the hook.
- 1 dc in the next 3 chains.
- 1 hdc in the final chain.
- Leave a yarn tail for attaching.
- Make multiple strips as needed (e.g., 2 or 3 strips) and sew them onto the pizza in various spots.

Part 5: Creating the Pizza Crust (Brown Yarn)
- Attach brown yarn to the narrow tip of the triangular cheese slice, working in the opposite direction.
- Round 1: Single Crochet Edge
- Ch 1 and work 1 sc into each st along the slice edge.
- For the two outer corners, work 2-3 sc to round off the edges.
- Sl st to join and fasten off.
- Tidy loose ends by sewing them in securely or using a lighter for polyester thread.

Part 6: Finishing Touch – Keychain Assembly
- Attach a keyring to the narrow tip of the pizza slice using leftover yarn or a jump ring.
- Optionally, add a decorative loop or ribbon to hang your pizza.

Conclusion
Your pizza keychain is complete! It’s perfect as a quirky and creative addition to your bags or keys. Feel free to experiment with other “topping” ideas and color combinations to customize your pizza slice!
Pattern Corrections
- Ensure stitch counts increase evenly in subsequent rounds to keep the “cheese” triangular slice flat.
- Double-check simmering points in the “sauce” for uniform patterns.
Tips for Success
- Use stitch markers for tracking increases along the rows.
- If your slice begins to curl, gently block the piece to relax the tension.
- Weave in ends carefully for a professional finish.
Leave a Reply