
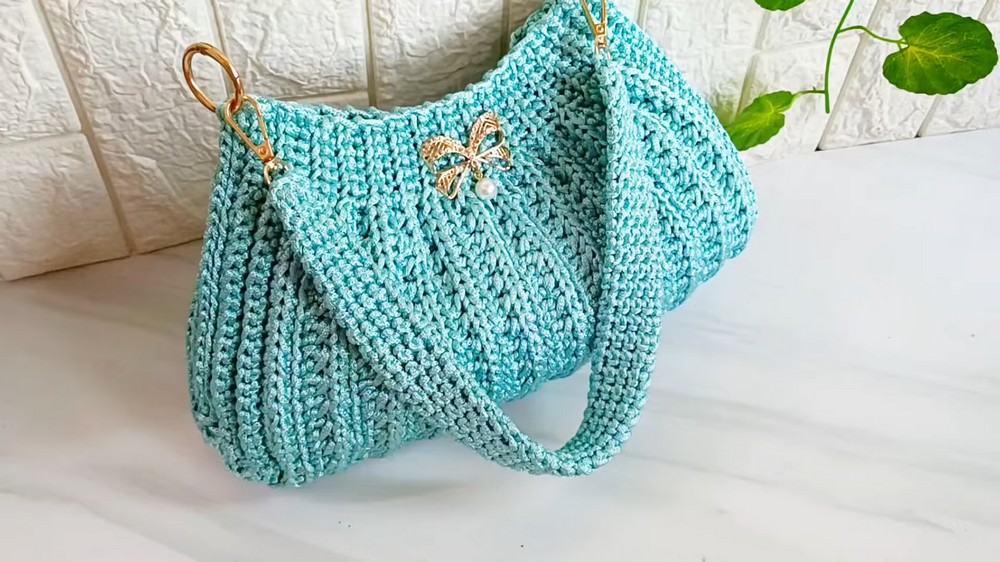
Experience the joy of making stylish crochet bag pattern with easy instructions suitable for beginners and those with advanced skills alike.

A handmade accessory carries a unique charm and tells a story of creativity. A beautifully crocheted bag stands out as a timeless piece that combines style and practicality. Perfect for enhancing any outfit, it’s an ideal companion whether you’re heading to a casual outing, running errands, or attending a social gathering. With an intricate design and a customizable crochet bag pattern, you can crochet something truly personal and unique.
Elegant Crochet Bag Pattern to Add Style to Your Wardrobe
It offers not only functionality but also an artistic touch, making it perfect for storing essentials or as a thoughtful handmade gift. Its versatility means it can suit any occasion, from a vibrant market tote to a delicate evening clutch. The true beauty lies in its handmade nature, which adds warmth and individuality to every piece. Easy to make and endlessly creative, it transforms a simple look into something extraordinary and helps you stand out wherever you go.
Materials List
Required Items:
- Yarn:
- 550 grams polyester yarn, 3 mm thickness (or yarn of similar thickness and durability).
- Choose yarn in your desired color.
- Crochet Hook:
- 4.5 mm hook.
- Stitch Markers (optional): To track specific parts of the bag.
- Magnetic Closure (optional): To secure the bag opening.
- Accessories (optional): Rings, chain handles, or personalized charms to decorate the bag.
- Scissors: For cutting yarn.
- Tapestry Needle: To weave in ends and secure.
Key Abbreviations (US Terms):
- Ch – Chain
- Sl st – Slip Stitch
- Sc – Single Crochet
- Hdc – Half Double Crochet
- Dc – Double Crochet
- Rep – Repeat
Special Notes
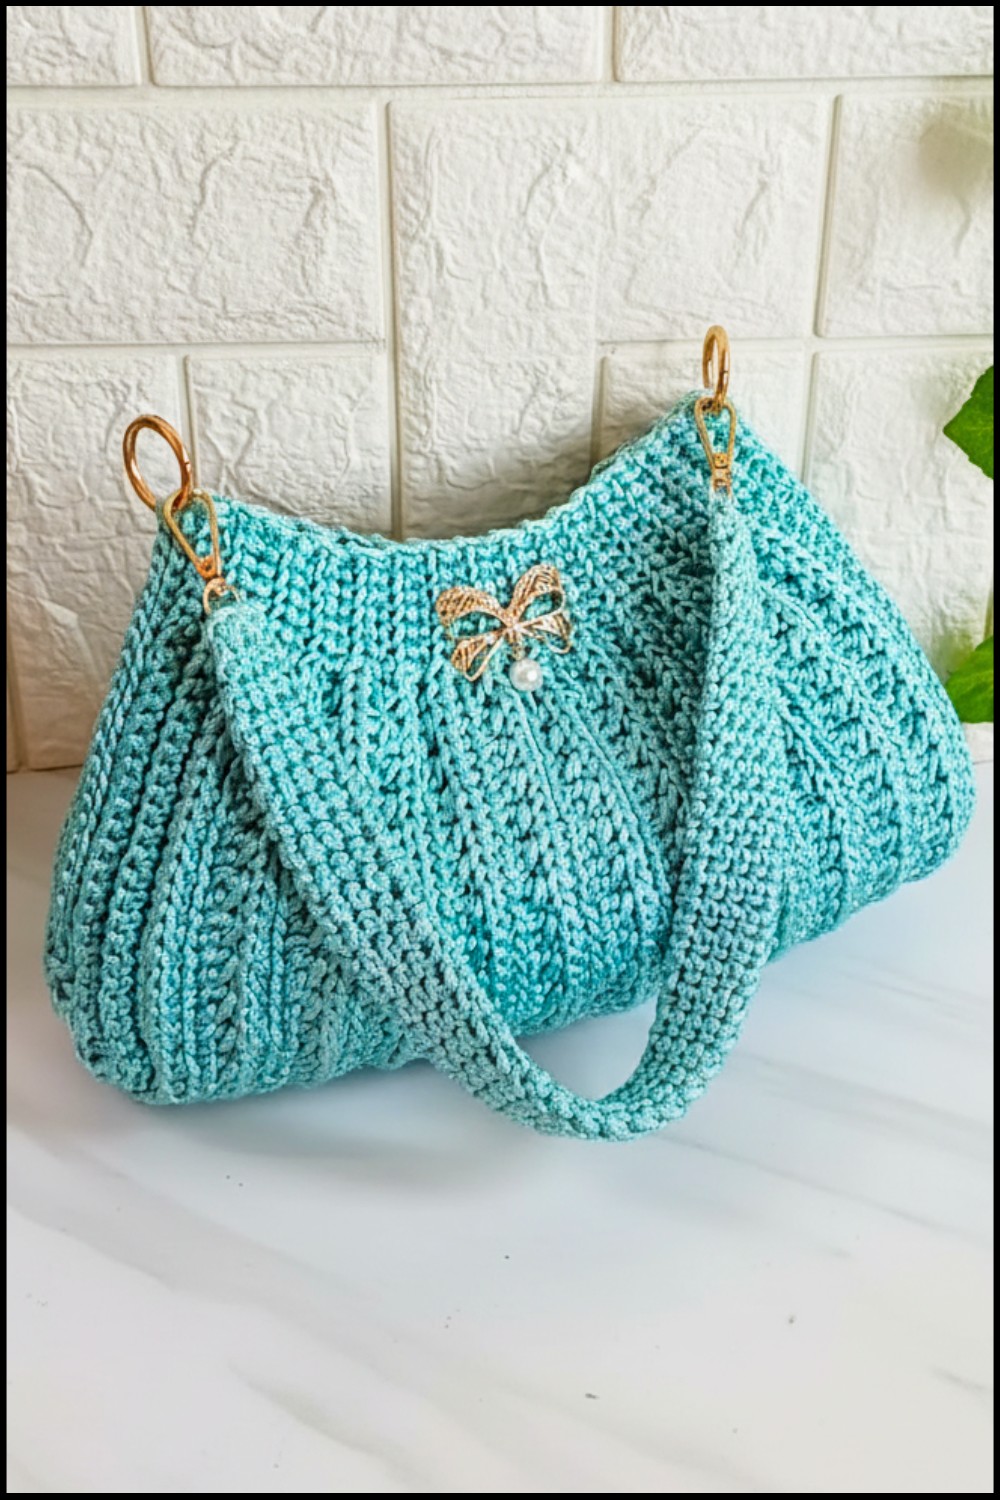
- Bag Dimensions: Final measurement is 18 cm long, 33 cm wide, and 9 cm deep.
- Flat Bottom Construction: The bag features a flat bottom, created by careful stitching along the two rows of seven special stitches on either side.
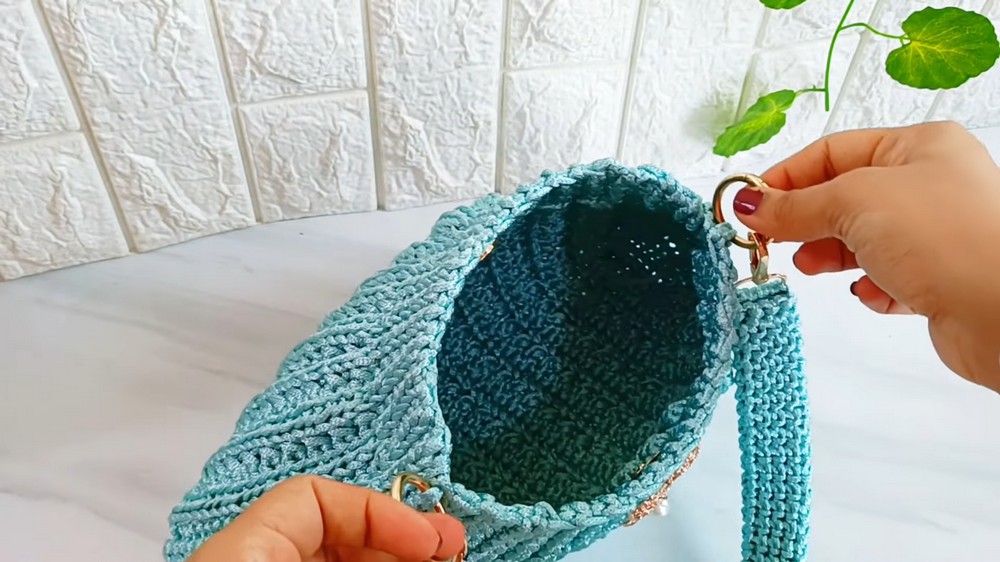
- Handle Options: Attach a ring for a metal chain handle, or crochet your own handle. A video tutorial for the handle can offer step-by-step guidance.
- Flexible Adjustments: You can modify the width or length of the bag by adding/subtracting chains in the foundation row or increasing the total number of rows.
Pattern Instructions
Step 1: Foundation Row
- Create an initial slip knot with the yarn.
- Ch 71.
- Ensure you crochet the chain loosely to avoid tightening the base.
Step 2: First Row
- Turn the chain over and work into the back loops (the ridge loops on the underside of the chain).
- Skip the first chain. Starting from the second chain, work half double crochet stitches closed with a slip stitch (Hdc-sl st) for 7 stitches.
- Mark the 7th stitch with a stitch marker.
- Continue working 66 Sc along the row. Work single crochet stitches in the back loops until you reach the final 7 chains of the row.
- In the final 7 stitches, work Hdc-sl st (half double crochet closed with a slip stitch).
- Turn your work and begin the next row.
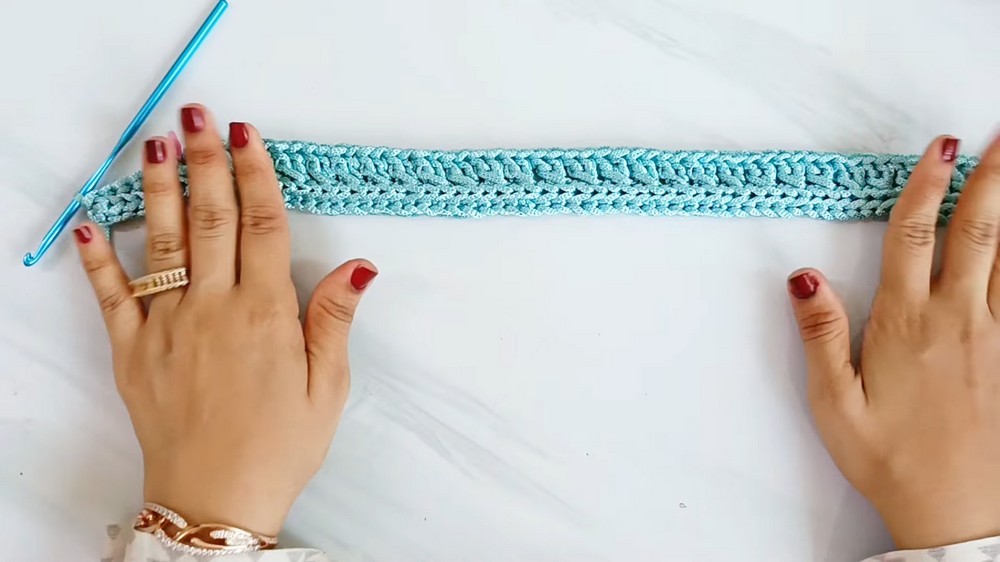
Step 3: Second Row
- Ch 1 (to begin the new row).
- Work in the back loops throughout.
- Work the first 7 stitches as Hdc-sl st stitches. Mark the first stitch with a stitch marker.
- Cross Stitch Section:
- Skip one stitch, then work 1 Dc into the next stitch.
- Go back to the skipped stitch and work 1 Dc into its back loop. This creates a cross-stitch effect.
- Rep this pattern (skip 1, Dc in the next, then Dc in the skipped stitch) across the row until only 7 stitches remain.
- In the final 7 stitches, work Hdc-sl st in the back loops.
- Turn your work and begin the next row.
Step 4: Third Row
- Ch 1 (to begin the new row). Work the first 7 stitches as Hdc-sl st stitches. Mark the first stitch.
- Work single crochet stitches into the front loops of the previous row.
- Continue in this manner across the row until 7 stitches remain.
- Work the final 7 stitches as Hdc-sl st in the back loops.
- Turn your work and repeat rows 2 (cross stitch row) and 3 (single crochet row).
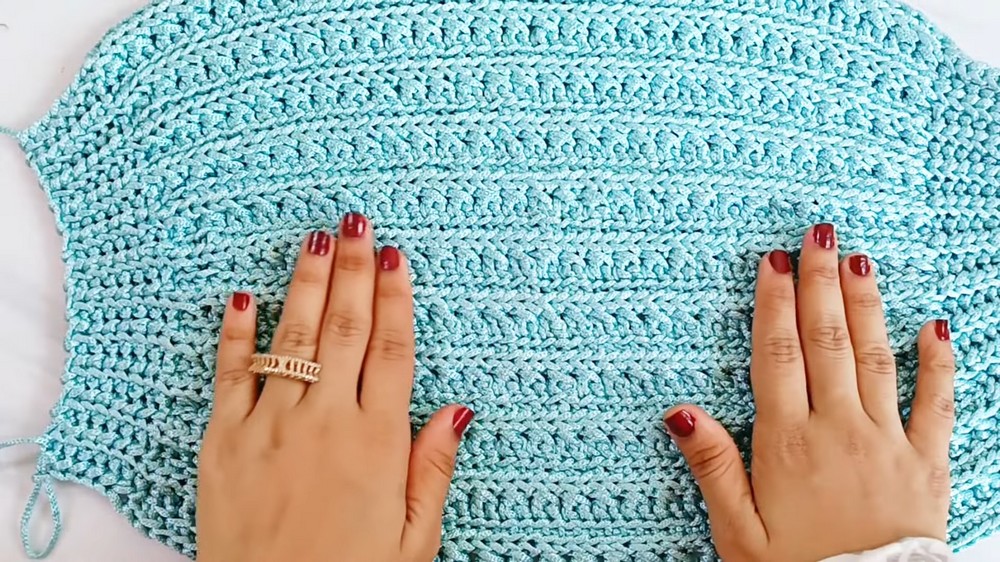
Step 5: Bag Body Repetition
- Alternate between Row 2 (cross stitch row) and Row 3 (single crochet row) until the bag body measures 41 cm (16 inches) in length and 30 cm (12 inches) in width.
- Ensure your stitch count is consistent throughout the bag.
Step 6: Adding Depth (Bag Sides)
Prepare for Sides:
- Divide the bag sides with markers:
- Place a marker at the 30th stitch from one edge.
- Place another marker 10 stitches after the 30th stitch. The side section will have 30 stitches total.
Working the Sides:
- Attach yarn to the back loop of the first side stitch.
- Work 7 Hdc-sl st stitches to begin the side.
- Mark the first stitch of the side stitches.
- Continue working Sc in the back loops along the side until one stitch before the marker.
- Work a decrease over 3 stitches (3 Sc into one stitch). Mark this new decrease stitch for future reference.
- Continue working Sc along the side, decrementing as you encounter side markers, until you reach only 7 stitches at the edge.
- Work 7 Hdc-sl st stitches to finish.
Repeat Sides for Symmetry
- Turn your bag and complete the same stitching process on the opposite side for symmetrical depth.
- Use the same decrease method across rows to taper the sides into a clean, sharp bottom.
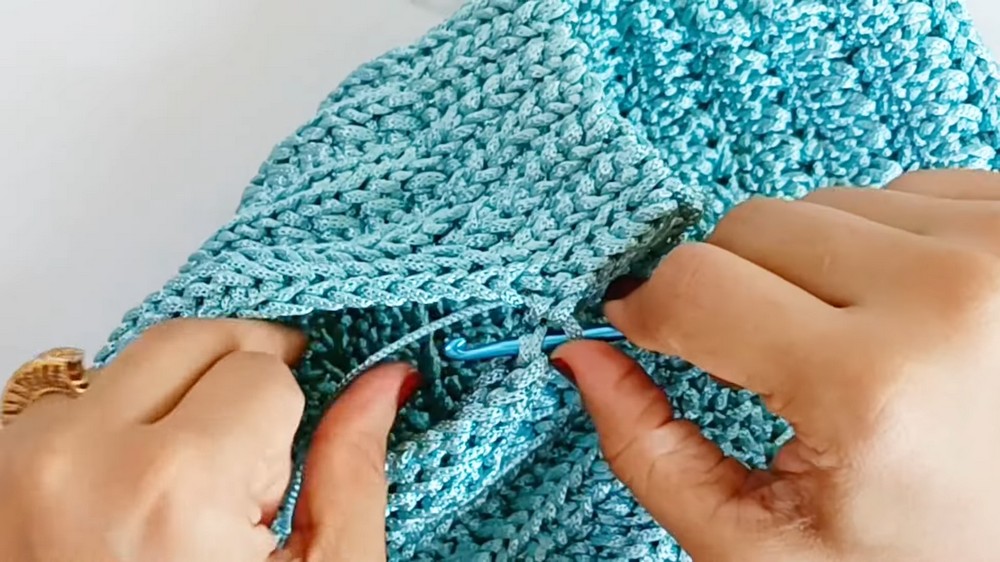
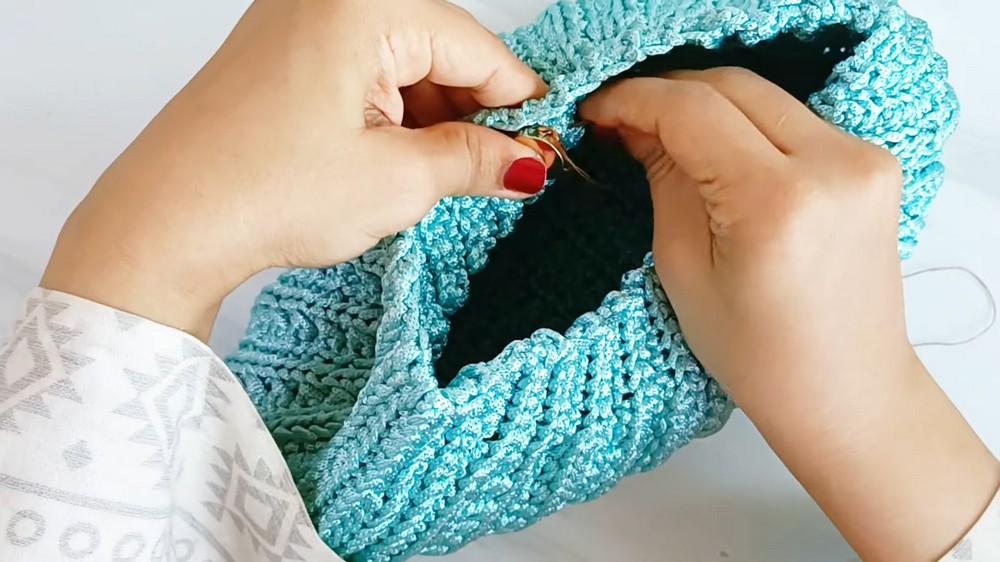
Step 7: Closing the Bag
- After tapering both sides, fold the bag in half, aligning the sides.
- Use a slip stitch method, working into the back loops of both sides to sew them together neatly.
- Once all edges are closed, fasten off and weave in loose ends using a tapestry needle.
Step 8: Handle and Final Touches
Attaching a Crochet Handle
- Crochet a strip for the handle:
- Ch 100 (or desired length).
- Work Sc or Hdc stitches across the strip for as many rows as needed for proper thickness.
- Attach the handle to the top corners of the bag using a tapestry needle or yarn.
Optional Accessories
- Add a magnetic closure to secure the bag.
- Attach rings or metal fasteners to incorporate a detachable chain handle.
Conclusion
Congratulations! Your crochet bag is complete. This sturdy yet stylish bag is ideal for both personal use and as a gift. Its customizable length and width make it versatile for all needs.
Pattern Correction and Notes
- Even Stitch Count in the Middle: Ensure the stitch count in the middle section is even for the cross-stitch rows to align properly.
- Avoid Tight Stitches: Keep your tension consistent to avoid a scrunched or uneven texture.
Tips for Beginners
- Use Stitch Markers: Always mark the beginning of each row or key stitches to avoid losing track of your pattern.
- Practice Cross-Stitch Rows: Work the cross-stitch pattern separately to master its rhythm before incorporating it into the bag.
- Handle Options: The bag looks great with either a crochet handle or a metal chain handle—choose whatever suits your style!
Leave a Reply