
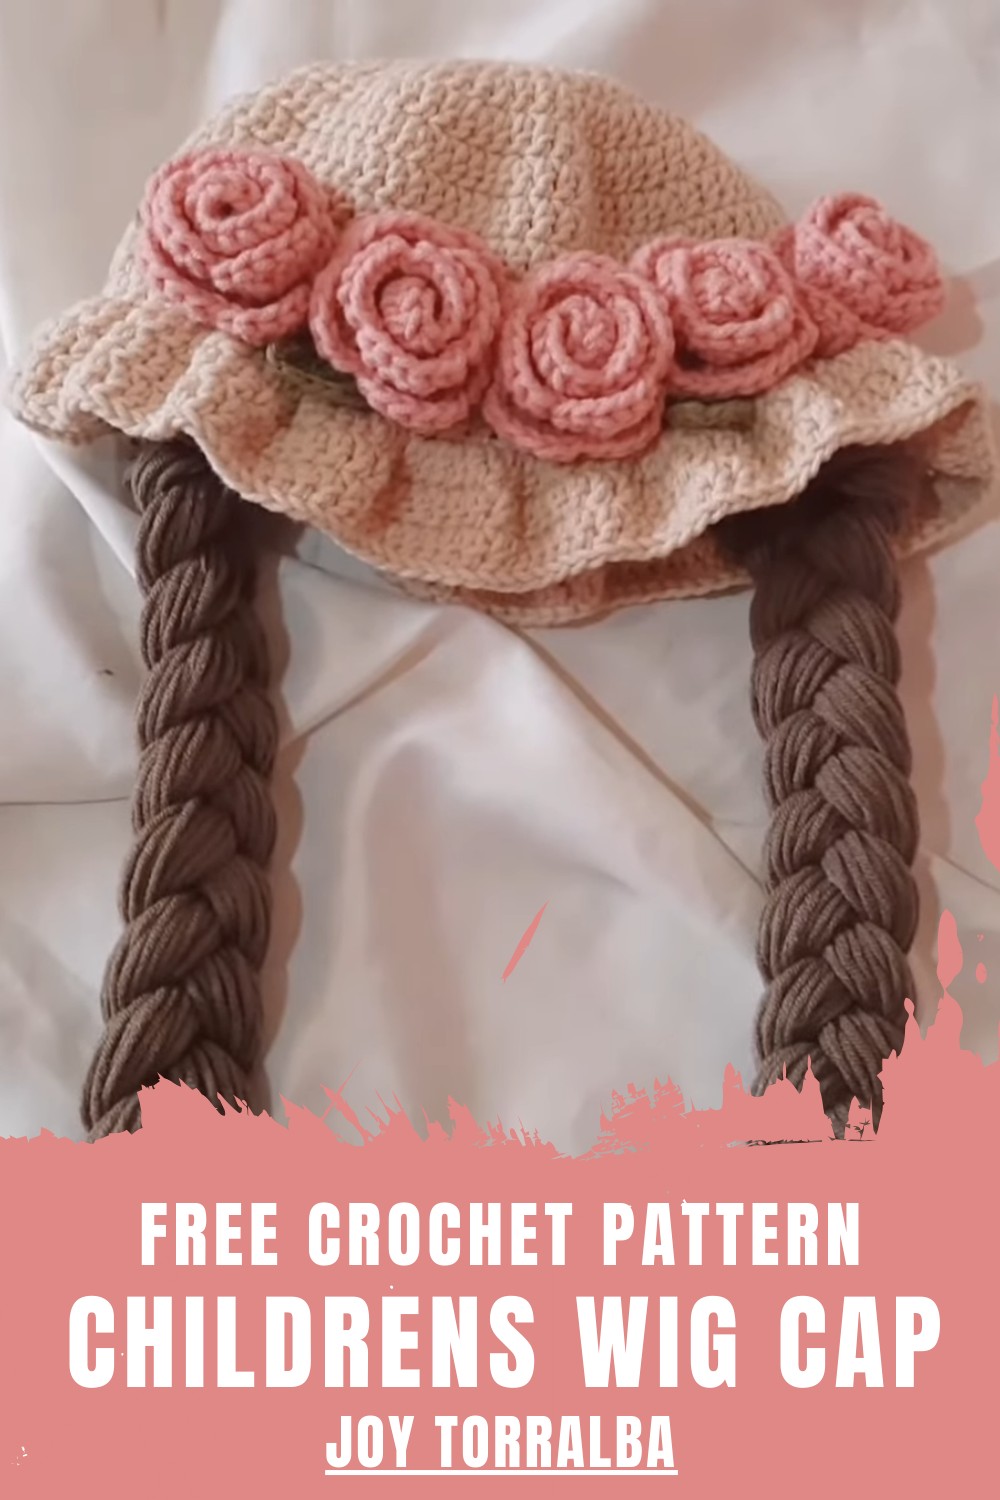
Take inspiration from this free crochet children wig cap pattern, perfect for creating cute, comfy, and fun accessories that kids will absolutely adore.
Fun starts with creativity and a touch of yarn magic. The Free Crochet Children Wig Cap pattern turns simple stitches into colorful and cheerful headwear that looks like playful wigs. Its unique design brings a burst of personality to little ones, blending warmth and whimsy in one adorable accessory. Perfect for costumes, themed events, or just everyday fun, it lets kids step into their imaginations while staying cozy.
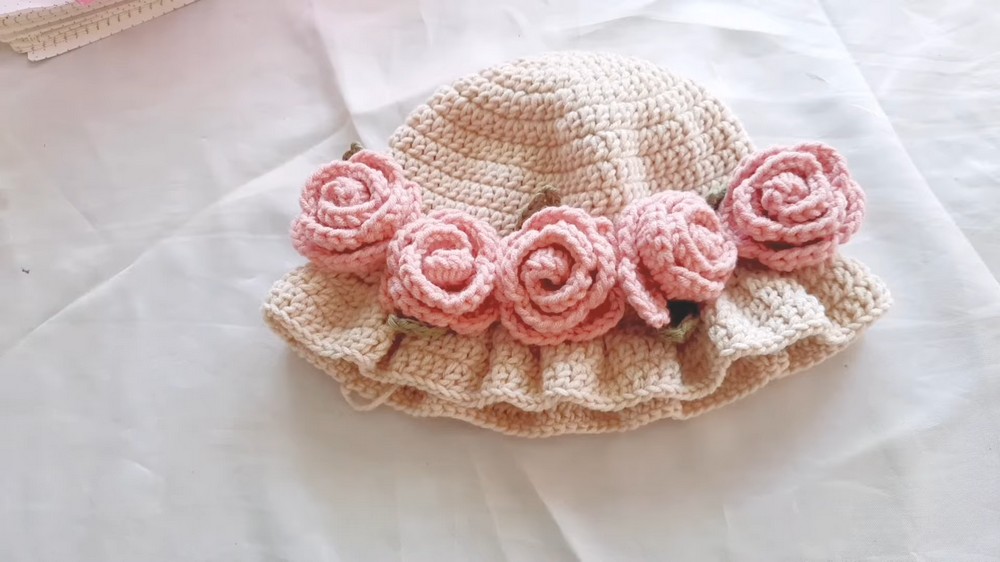
Free Crochet Children Wig Cap Pattern Keep Little Heads Warm
Bright yarns add vibrancy, while loops, curls, or bows make each wig cap one-of-a-kind. Easy to make and delightful in appearance, it’s a charming project that spreads smiles and adds character to any outfit. Whether worn for dress-up games or chilly outings, this cap becomes a lovable treasure that’s equal parts cute, functional, and heartwarming.
Crochet Childrens Wig Cap Pattern with Braided Hair
Skill Level
Intermediate – Suitable for crocheters familiar with working in the round, basic stitches, increasing, and assembly. Some simple finishing techniques are included.
Finished Size
- Below 1 Year Old: Circumference approximately 16 inches (40.5 cm), Height approximately 6.5 inches (16.5 cm).
- 1 to 2 Years Old: Circumference approximately 18 inches (45.5 cm), Height approximately 7 inches (18 cm).
Materials
Yarn
- 5-ply Milk Cotton (Light Worsted/DK weight):
- Main Color: Khaki (for the base hat).
- Accent Colors: White, Medium Coffee, Rose Pink, and Green (for the roses, leaves, and decorations).
Tools
- Crochet Hook: 3.5 mm.
- Stitch Marker: To mark the beginning of rounds.
- Tapestry Needle: For weaving in ends and sewing parts together.
- Scissors: For trimming yarn.
Optional Materials
- Measuring Tape: For braids and hat dimensions.
Gauge
14 double crochets (DC) x 8 rows = 4 inches (10 cm)
Adjust your hook size if needed to meet gauge.
Customization Ideas
- Color Variations: Use different combinations of accent colors for a personalized touch.
- Add More Flowers: Include more roses in different colors to make a vibrant appearance.
- Braided Hair Length: Adjust the length of the braided hair to suit different ages or preferences.
- Make Adult Sizes: Extend the increasing rounds to create a larger hat for older children or adults.
Pattern Instructions
Hat Base
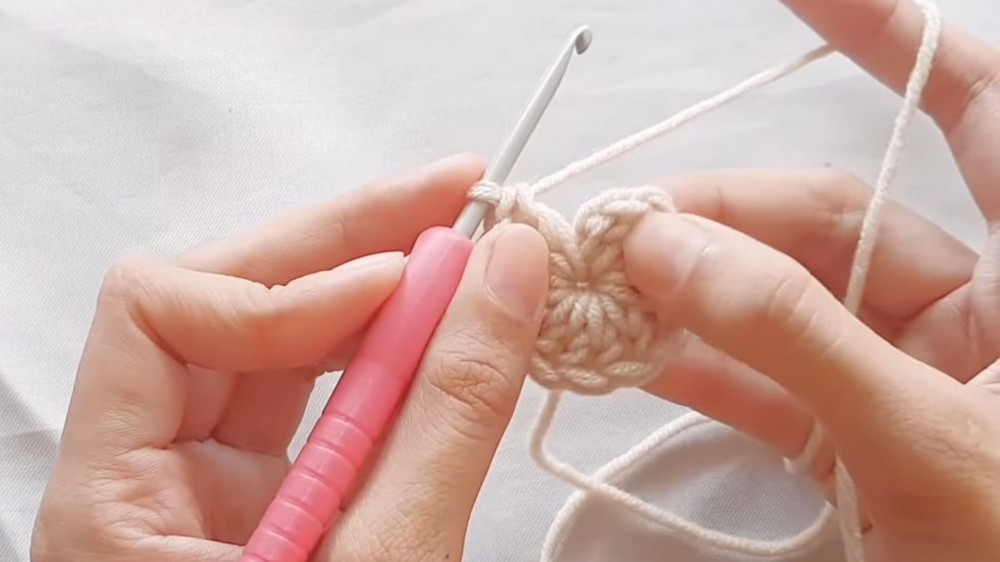
Step 1: Start with a Magic Ring (Round 1)
- Make a magic ring with the khaki yarn.
- Chain 2 (this does not count as a stitch).
- Work 12 double crochets (DC) into the magic ring.
- Pull the ring closed tightly.
- Slip Stitch (SL ST) into the first DC to join. (12 stitches)
Round 2: Increase
- Chain 2 (turning chain; not counted as a stitch).
- Work 2 DC into each stitch around.
- SL ST into the first DC to join. (24 stitches)
Round 3: Increase
- Chain 2.
- Work 1 DC into the first stitch, then 2 DC into the next stitch.
- Repeat 1 DC, 2 DC around.
- SL ST into the first DC to join. (36 stitches)
Round 4: Increase
- Chain 2.
- Work 1 DC into each of the first 2 stitches, then 2 DC into the next stitch.
- Repeat 1 DC in next 2 stitches, 2 DC in next stitch around.
- SL ST into the first DC to join. (48 stitches)
Round 5: Increase
- Chain 2.
- Work 1 DC into each of the first 3 stitches, then 2 DC into the next stitch.
- Repeat 1 DC in next 3 stitches, 2 DC in next stitch around.
- SL ST into the first DC to join. (60 stitches)
Round 6 (for 1-2 Years Old Only): Increase
- Chain 2.
- Work 1 DC into each of the first 4 stitches, then 2 DC into the next stitch.
- Repeat 1 DC in next 4 stitches, 2 DC in next stitch around.
- SL ST into the first DC to join. (72 stitches)
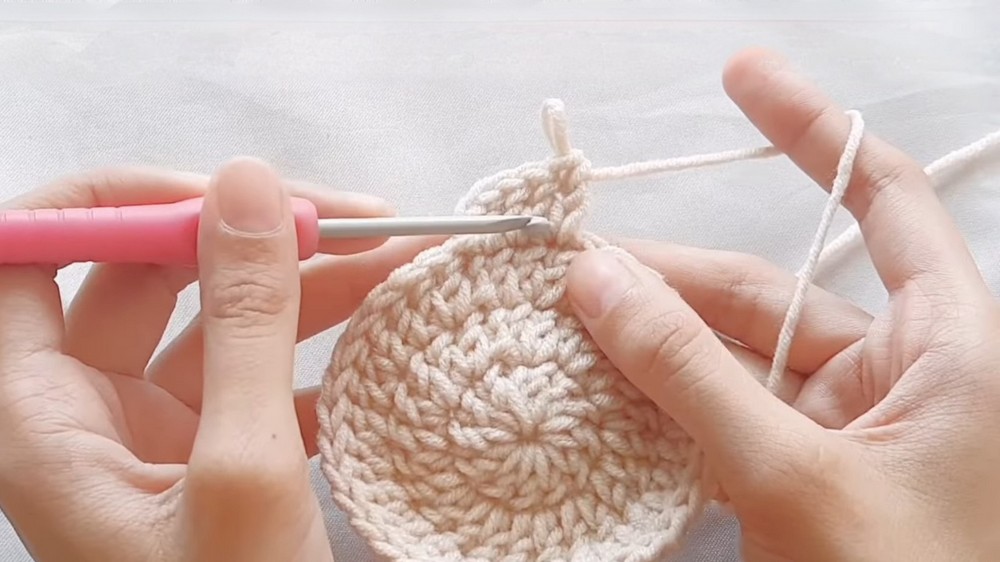
Rounds 7–12 or 13: Build-Up
- For below 1 year old, work 12 rounds total.
- For 1–2 years old, work 13 rounds total.
- In each round, work 1 DC into every stitch.
- SL ST into the first DC to join at the end of each round.
Brim
Row 1: Increase & Work on Front Loop Only
- Chain 2.
- Work 2 DC into the front loop of each stitch around.
- SL ST into the first DC to join.
Rows 2 & 3: Build-Up
- Chain 2.
- Work 1 DC into each stitch in both loops.
- SL ST into the first DC to join.
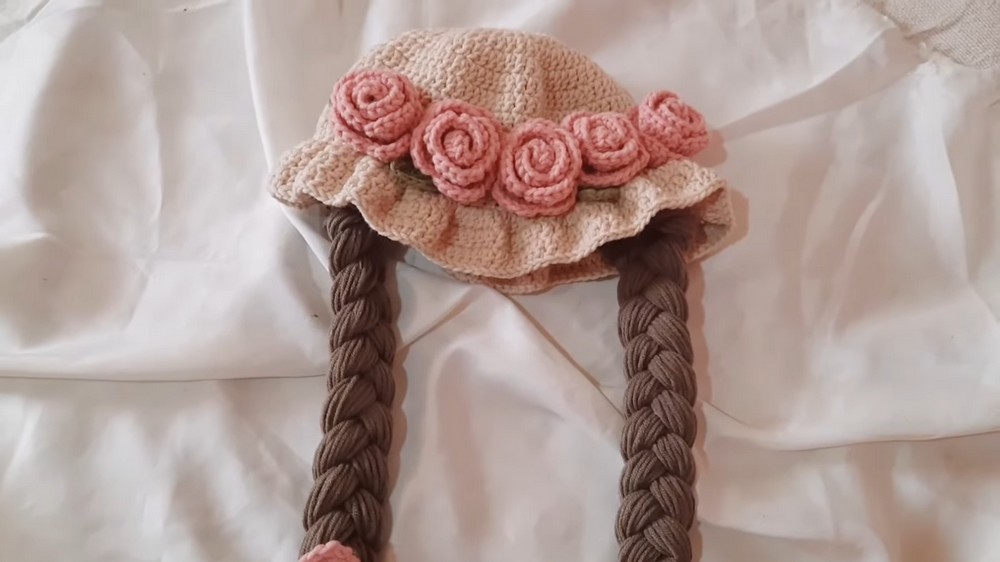
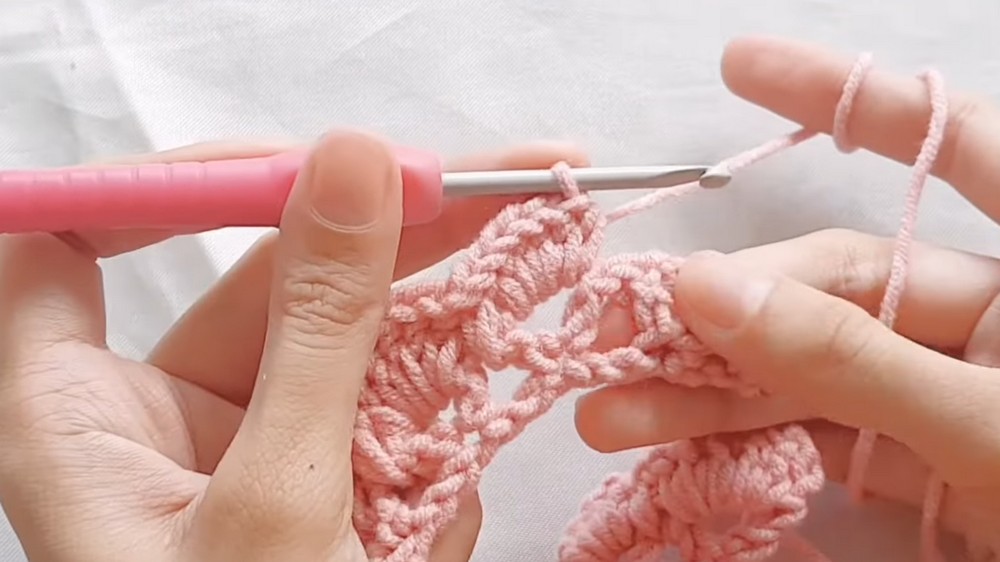
Rose Flowers
Step 1: Create the Base
- With rose pink yarn, chain 36.
- Work 1 DC into the 6th chain from the hook, chain 2, and 1 DC (this forms a V-stitch).
- Skip 2 chains, then repeat (1 DC, chain 2, 1 DC) into the next stitch across. (11 V-stitches total)
Step 2: Add Petals
- Chain 3 and turn your work.
- Work 6 DC into the first chain space (this forms a petal).
- Slip stitch (SL ST) into the space between the V-stitches.
- Repeat 6 DC into chain space, SL ST into the next space until all petals are complete.
Step 3: Assemble the Flower
- Roll the crocheted strip into a spiral shape, starting from one end.
- Sew the layers together using the yarn tail and a tapestry needle, securing the spiral shape.
Leaves
- With green yarn, chain 8.
- Work the following into the chains:
- Slip stitch into the second chain from the hook.
- Single crochet (SC) into the next chain.
- Half double crochet (HDC) into the next chain.
- Double crochet (DC) into the remaining 4 chains.
- Chain 2, slip stitch into the last chain; rotate the work.
- Repeat the same pattern (in reverse) on the other side of the chain to form a full leaf.
Braided Hair
- For 1–2 years old: Cut 108 pieces of yarn at 39.5 inches (100 cm).
- For below 1 year old: Cut 90 pieces of yarn.
- Attach two folded strands of yarn to the front loop of each stitch in the final row of the hat (alternate between attaching two strands and one strand in successive loops).
- Braid the yarn strands into three sections and finish with a knot to secure. Trim the ends evenly.
Assembly
- Sew the roses and leaves onto the hat, arranging them in a cluster for an elegant look.
- Attach the braided hair to the back loops of the final row. If necessary, secure with extra stitches for durability.
Special Techniques
- Crochet in Front Loop Only: Used for creating the brim to add a decorative edge.
- Petal Formation: Utilize shell stitches (6 DC in one space) for dimensional flower petals.
- Braiding: Neatly divide yarn strands for an even and elegant finish.
Finishing
- Weave in all loose ends using the tapestry needle.
- Trim any excess yarn or uneven braid ends.
- Ensure all flowers, leaves, and the braid are securely attached to withstand wear and tear.
Conclusion
Congratulations on completing your Blossom Bucket Hat with Braided Hair! This stunning hat makes a perfect gift for children and is an ideal project for those looking to create something both functional and decorative. With endless color possibilities and customization options, you can recreate this pattern for people of all ages.
https://youtu.be/pXDYmzFEwOg
Leave a Reply