
Style any space with this free crochet rose pattern that shows refined detail offers soft appeal & decor accents, gifts & special moments.
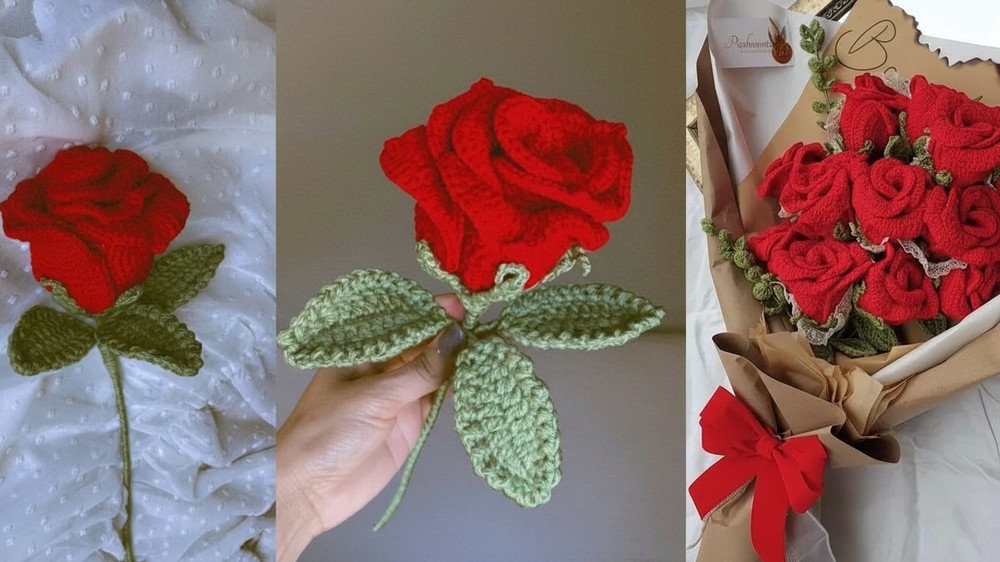
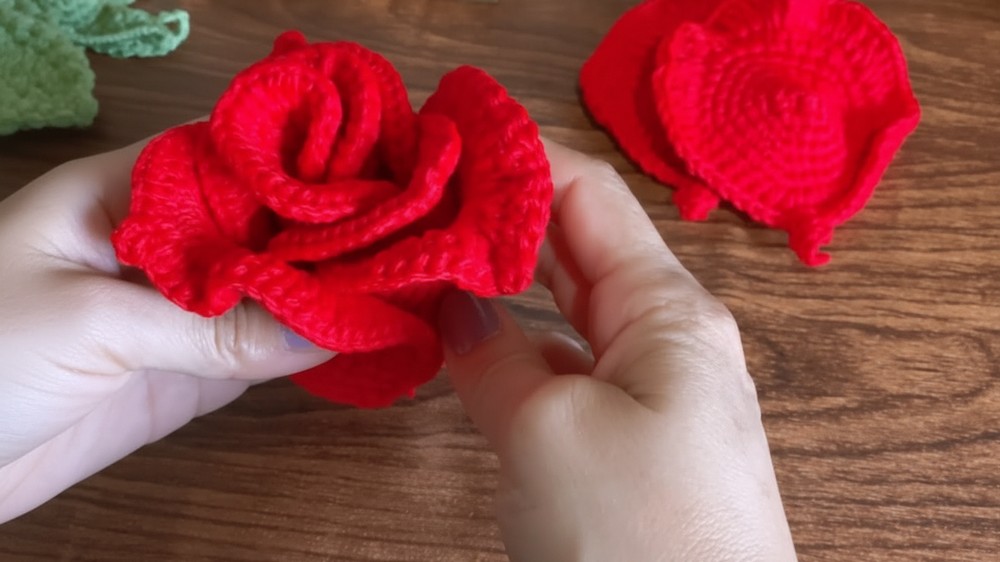
From tiny loops emerges a blooming form with layered petals arranged in a graceful and pleasing style. The Crochet Rose pattern shapes a classic flower that appears neat, balanced, and naturally attractive. Its curved structure and smooth finish give it a refined look that suits many decorative ideas. It works well for decorating accessories, placing on surfaces, or enhancing items like clips and bags with a floral touch.
Free Crochet Rose Pattern, Perfect for Bouquets
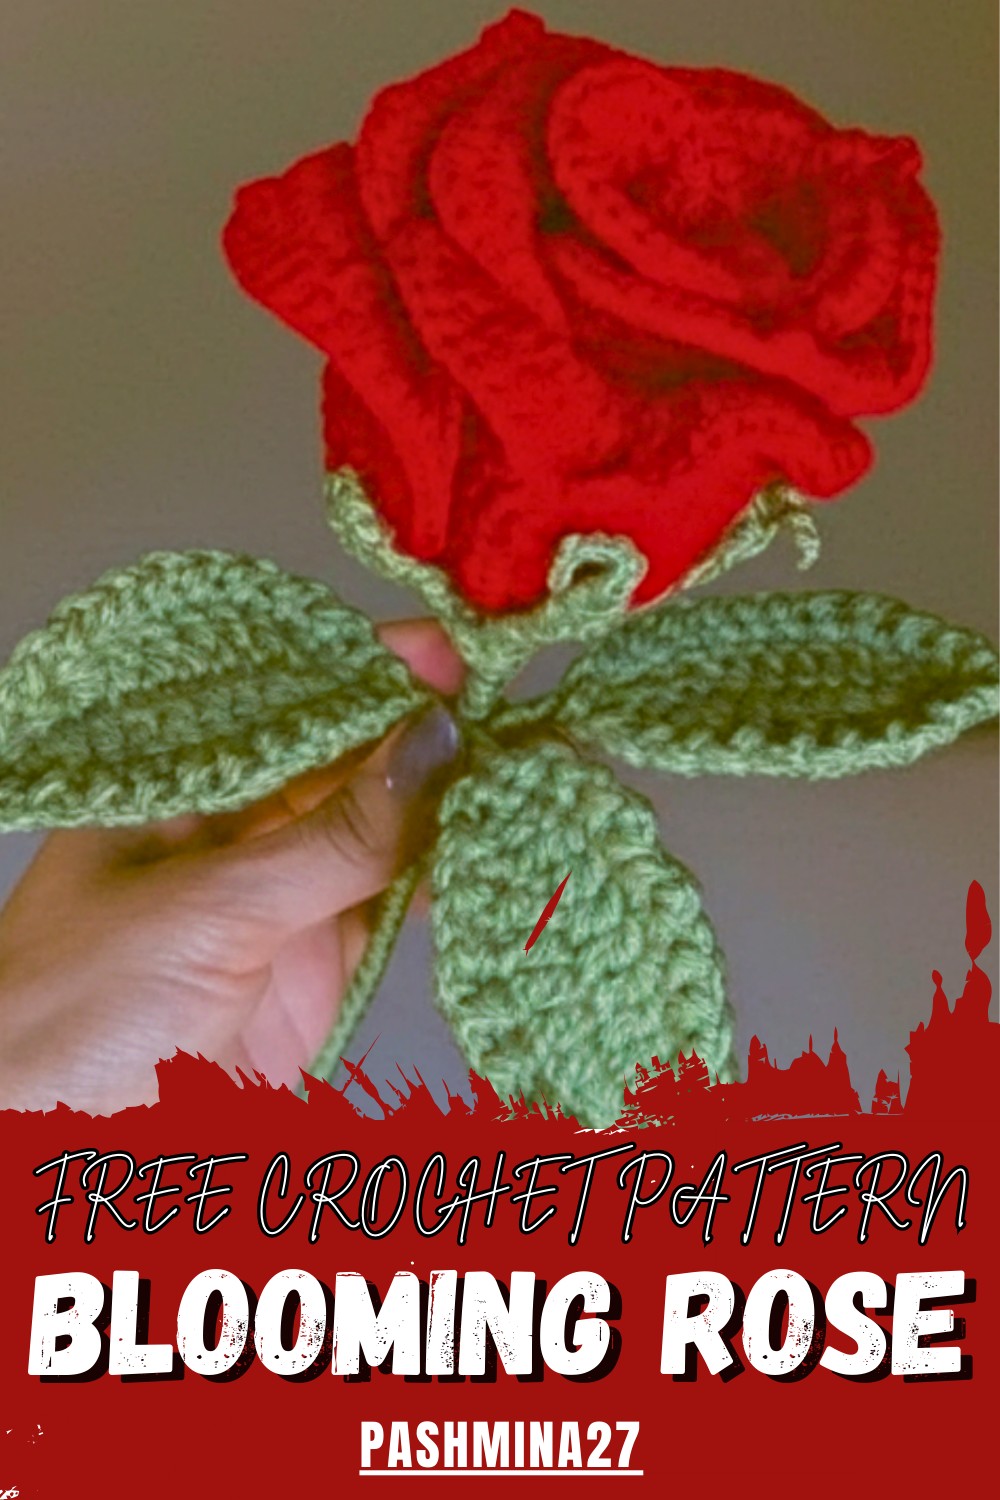
The steps are clear and easy to understand, allowing anyone to complete it with confidence. The finished rose appears elegant and fresh, offering a calm and charming presence. It provides beauty, inspiration, and satisfaction, turning basic material into a lovely floral piece that adds grace and a soft decorative feel to everyday surroundings.
Medium/Large Crochet Rose (with Leaves and Assembly)
Materials
- Yarn:
- Rose color (worsted or DK weight, cotton or acrylic)
- Green (for leaves and stem)
- Crochet Hooks:
- 2.6 mm for petals
- 3.0 mm for leaves (using double yarn strand)
- Notions:
- Stitch marker (or safety pin)
- Acrylic floral wire or pipe cleaner (for stem and leaf structure)
- Hot glue gun
- Scissors
- Yarn needle
Abbreviations (US Terms)
| Abbreviation | Meaning |
|---|---|
| MR | magic ring |
| ch | chain |
| sc | single crochet |
| hdc | half double crochet |
| dc | double crochet |
| sl st | slip stitch |
| inc | increase (2 st in same st) |
| dec | decrease (sc2tog) |
| picot | ch 2, sl st in 2nd ch |
Special Notes
- The rose is built from 4 small petals and 4 large petals.
- Picot stitch is optional for added texture on petals and leaf tips.
- Leaves are worked with double yarn for thickness.
- The wire is covered by wrapping with green yarn.
- Adjust number and placement of petals and leaves as desired.
Pattern
Rose Petals
Petal Base (Common for Both Sizes)
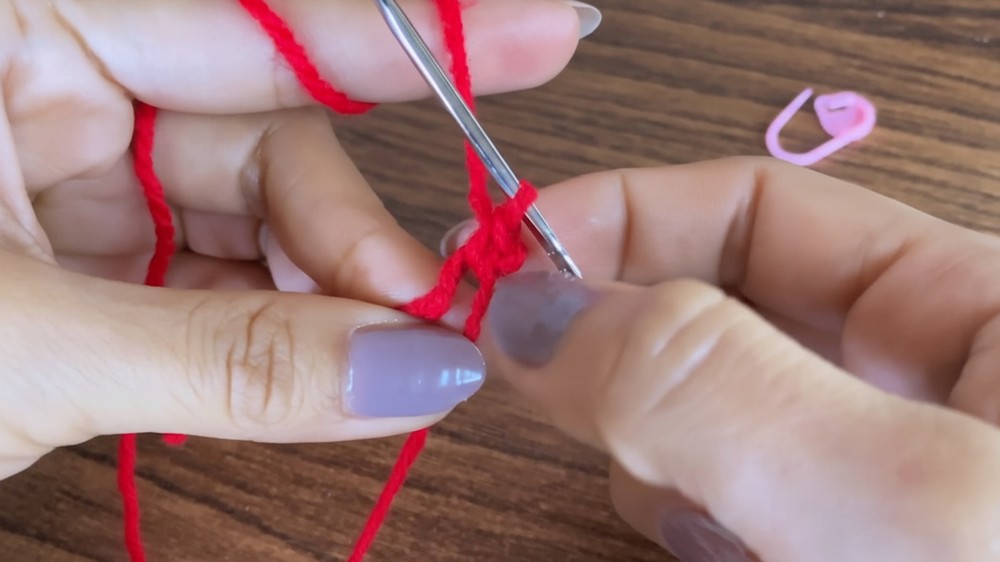
- Round 1:
- MR, ch 1, 5 sc in MR. Pull closed. (5 st)
- Mark the first st.
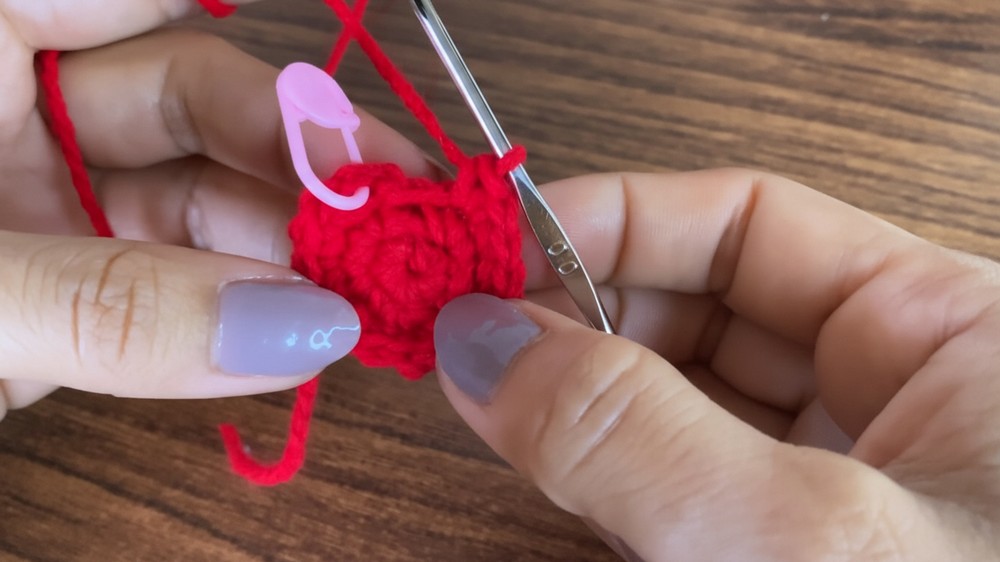
- Round 2:
- Inc in each st around (2 sc in each st) — (10 st)
- Close with sl st to first sc, ch 1.
- Round 3:
- Sc in next st, inc in next st; repeat around — (15 st)
- Close with sl st, ch 1.
- Round 4:
- Sc in next 2 st, inc in next st; repeat around — (20 st)
- Close with sl st, ch 1.
- Round 5:
- Sc in next 3 st, inc in next st; repeat around — (25 st)
- Close with sl st, ch 1.
- Round 6:
- Sc in next 4 st, inc in next st; repeat around — (30 st)
- Close with sl st, ch 1.
Large Petal
- Round 7:
- Hdc in next 5 st, inc (2 hdc) in next st; repeat around as possible.
- On one side: (5 hdc, inc), repeat—this forms the petal’s rounded sides.
- Round 8:
- Hdc in next 6 st.
- Dc inc (2 dc) in each of next 27 st.
- Optional: After the 14th dc inc, work a picot (ch 2, sl st into 2nd ch) for a pointy tip.
- Hdc in next 7 st to finish the round.
- Close with sl st.
- Row 9 (Shaping):
- Ch 3, turn, work dc inc (2 dc) in same st.
- Ch 3, dc inc in same st.
- FO and leave a tail for sewing.
Make 4 large petals.
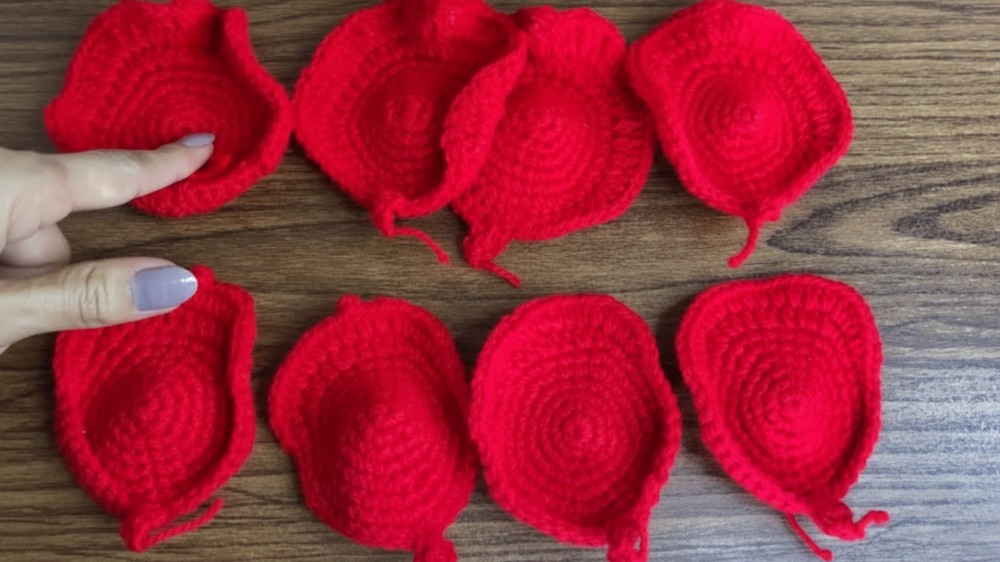
Small Petal
- Round 7:
- Sc in next 5 st, inc in next st; repeat around for 2 repeats.
- Next: Work hdc inc (2 hdc) in next st, hdc in next st, repeat for 2.
- Next 2 st: Work hdc inc in each.
- Finish with sc in next 5 st, inc in next st; repeat for 2.
- Close with sl st.
- Round 8:
- Sc in next 11 st.
- Hdc inc (2 hdc) in next 15 st.
- Optional: After 7th hdc inc, work a picot as in the large petal.
- Sc in next 12 st to finish the round.
- Close with sl st.
- Row 9:
- Ch 3, turn, dc inc in same st.
- FO, leave a tail.
Make 4 small petals.
Sepal (Base “Star”)
- Round 1:
- MR, 5 sc in MR. Do not close tightly (leave room for stem).
- Mark first st.
- Round 2:
- Sc in each st around (5 st).
- Close with sl st to first st, ch 1.
- Round 3:
- Inc in each st around (2 sc in each st) — (10 st). Mark first st.
- Round 4:
- Sc in each st (10 st).
- Round 5:
- Sc in next st, inc in next st; repeat around (15 st).
- Round 6:
- Sc in each st (15 st).
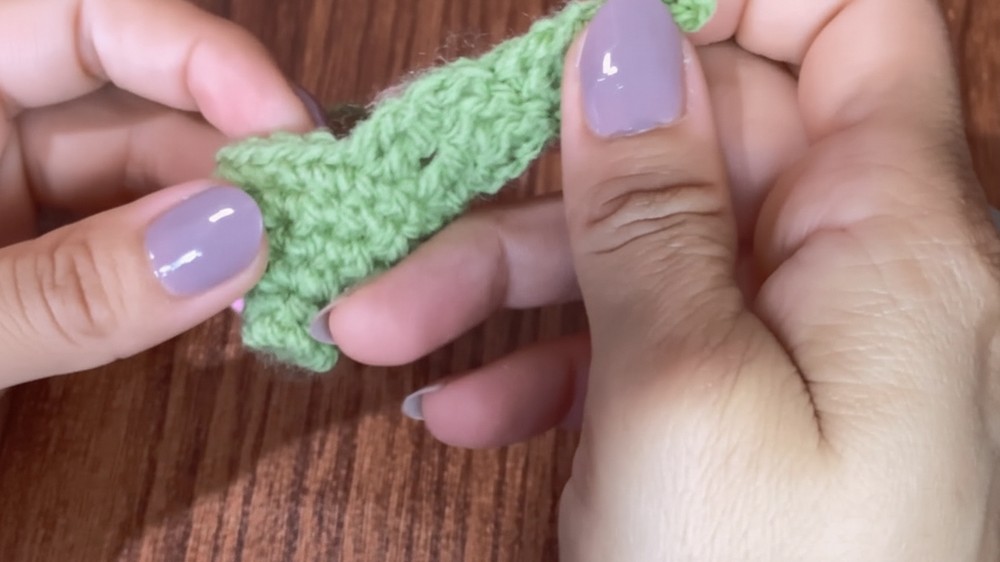
Leaves
With double strand green yarn and 3.0 mm hook
- Foundation:
- Ch 11.
- Row 1:
- In 2nd ch from hook: sc.
- Next ch: hdc.
- Next 6 ch: dc in each (6 dc).
- Next ch: hdc.
- Last ch: sc.
- Row 2:
- Ch 1, turn.
- In same st as last sc: sc.
- Next ch: hdc.
- Next 6 ch: dc in each.
- Next ch: hdc.
- Last ch: sc.
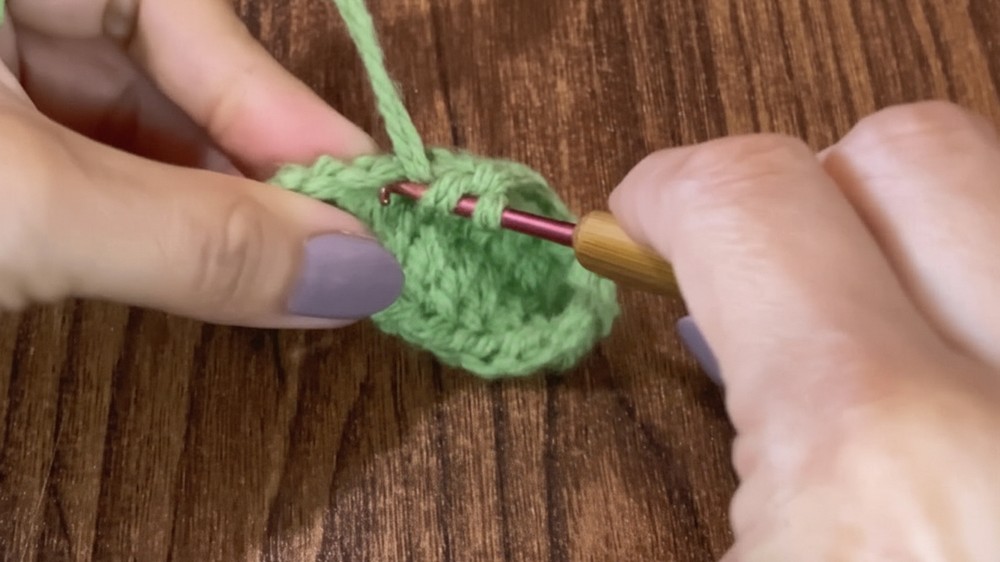
- Edge Decoration:
- Insert wire/pipe-cleaner along edge of leaf.
- For picot tip (optional): At leaf point, ch 2, sl st in 2nd ch.
- Work around leaf edge, repeating: ch 2, sl st in next st (encases wire).
- Close round with sl st to starting point.
- Finishing:
- FO, leave long tail to wrap wire for smooth finish.
- Secure yarn end with hot glue.
Make 3 leaves.
Assembly
- Petal Assembly:
- Start with the small petals (those without picot).
- Glue the first to wire stem; wrap and secure.
- Continue adding and gluing the other small petals, overlapping slightly and wrapping around wire.
- Add picot-edged small petals next.
- Add large petals in the same manner, spiraling outward for a natural rose shape.
- Sepal/Base:
- Position sepal base under assembled petals, with hole for wire stem.
- Tie or glue in place.
- Stem:
- Wrap wire with green yarn, securing with glue at top and bottom.
- Leaves:
- Arrange leaves along stem, tying in place with yarn and securing with glue.
- Bouquet Tip:
- Arrange roses and leaves as desired for bouquet effect.
Conclusion
This detailed crochet rose, with layered petals and textured leaves, makes a striking standalone flower or part of a bouquet. By alternating picot detailing and playing with number of petals, you can adjust uniqueness and fullness to your taste. The sturdy stem and leaves ensure a lifelike flower that holds its shape.
Pattern Corrections & Tips
Corrections:
- Spanish “low point” = US single crochet (sc); “mid-high” = half double crochet (hdc); “high” = double crochet (dc).
- Rounds and increases made explicit by rows above.
Tips:
- Always mark the first st of each round to keep track.
- Optional picot tips add a natural character.
- Leaves are thickened with double yarn and wire for structure.
- Secure all pieces with glue for durability.
- Add more petals for a fuller rose, or less for a closed effect.
Leave a Reply