
Brighten wardrobes with the Crochet Butterfly Cardigan Pattern, a playful handmade piece featuring fluttery motifs, cozy texture, and standout style.
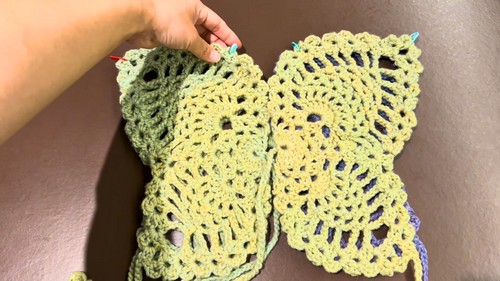
Whirl, drape, and cozy vibes come together in this playful handmade cardigan that feels just as fun to wear as it is to crochet. Shown in the video tutorial, this piece stands out with its wing-like shape that spreads softly across the back, giving it a light and flowy appearance inspired by butterfly wings.
Crochet Butterfly Cardigan Pattern With a Relaxed Fit

Important tips are shared along the way, such as keeping stitch tension consistent, checking measurements as you go, and adjusting hook size or yarn thickness to achieve the right drape and fit. This guidance makes the project feel less intimidating, even for those new to wearable crochet pieces.
This cardigan becomes a versatile wardrobe favorite. It can be layered over casual outfits, worn during mild weather, or styled as a statement piece for relaxed outings. With its soft movement and eye-catching form, the Crochet Butterfly Cardigan pattern offers a joyful mix of comfort, style, and handmade personality that truly stands out.
Step-by-Step Guide for the Crochet Butterfly Cardigan
Materials Needed
The following materials are used in this tutorial:
- Medium-thick yarn: Preferred for the project. If you have thinner yarn, you can combine two or three strands.
- 6 mm crochet hook: The ideal size for this project.
- Stitch markers: For precise alignment when sewing.
- Scissors: To cut yarn at the end of each section.
- Optional tripod and phone/camera setup (if you’re recording your progress for tutorials).
Step-by-Step Instructions
Step 1: Creating a Magic Ring
- Start by making a slipknot.
- Chain 4 and slip stitch to the first chain to connect, forming a magic ring.
- Chain 3 (this counts as a double crochet), then work 12 double crochets into the magic ring.

Step 2: Round Two
- Chain 5, which counts as one double crochet and two chains.
- Turn the piece and work one double crochet into the first stitch, then:
- Skip two stitches, crochet one double crochet, chain two, and make another double crochet into the same stitch.
- Repeat the pattern for the entire round.

Step 3: Round Three
- Chain 1, turn the piece, and make a slip stitch between the two double crochet stitches of the last round.
- Follow this pattern:
- Chain 3, make a double crochet in the chain space, chain 2, and make 2 double crochets in the same space.
- Work 2 double crochets in the next chain space, chain 5, and add 2 more double crochets in the same space.
- Repeat for the round.

Steps 4-8: Building the Wings
- Each subsequent round builds more structure for the butterfly wings:
- Round Four uses 6 double crochet clusters in the spaces, with chain 1 or 2 separations.
- Round Five introduces “group sections” such as repeating single crochet + chain patterns.
- Round Six onwards emphasizes larger group sections and chain three spaces to define both larger and smaller “wing areas”.
- Special techniques include:
- Switching between chain and double crochet patterns.
- Dividing the smaller (inner) wings and larger (outer) wings, making each separately.

Step 9: Constructing the Straps and Finishing Small Wings
- Create straps for the cardigan by chaining 60 stitches.
- Add flower decorations (optional) using small petals crocheted into a magic ring.
- Finish with neat edges by crocheting the “H pattern” (2 double crochets, chain 2, 2 double crochets).

Step 10: Making the Larger Wings
- The larger wings follow the same stitch patterns as smaller wings but cover larger areas for the dramatic butterfly effect.
- Align with the smaller wing parts for balance.
- Continue chain, double crochet, and “H pattern” for each section.

Step 11: Sewing the Pieces Together
- Use stitch markers to align the front and back pieces perfectly.
- Begin sewing the shoulder seams together:
- Create slip stitches in the chain three spaces.
- Complete the stitching and secure with a final knot.
Special Features of the Butterfly Cardigan
The butterfly cardigan is special because:
- Elegant butterfly design: The cardigan emulates the shape of butterfly wings.
- Adjustable size: You can customize it by adjusting yarn weight or the number of stitches/rows.
- Versatile material: Works well with various yarn types, making it a great fit for all seasons.
- Intermediate artistry: While accessible to beginners, it’s a project that grows with the crocheter, offering room for creativity.
Level of Difficulty
This project is rated as beginner to intermediate:
- Beginners can embark on this with patience, thanks to clear instructions.
- Intermediate crocheters will enjoy learning shape-making techniques and balancing design sections.
Tutor’s Suggestions
- Use Medium-Thickness Yarn: Choosing the correct yarn thickness ensures the structure and flow of the cardigan align correctly. For thinner yarns, combine two or three strands.
- Pay Attention to Alignment: Use stitch markers to align the shoulder pieces properly during assembly.
- Start Small if You’re a Beginner: Practice chaining and double crochet stitches before starting this project.
Uses of the Butterfly Cardigan
- Fashion Statement: A unique handmade garment for casual outings or layering.
- Elegant Design: Works well as a lightweight summer cardigan or a fall fashion accessory.
- Gift Idea: Makes a thoughtful and creative gift for loved ones.
Pro Tip
When creating the magic ring for flowers or wings, leave a longer beginning tail. This allows you to easily tighten and secure the ring when finishing your rounds.
Conclusion
The butterfly cardigan combines creativity, elegance, and versatility, making it a rewarding project for crocheters of all levels. Follow this step-by-step process to create your unique cardigan inspired by this tutorial. Customize your yarn and colors to match your personal style, and enjoy wearing or gifting your handmade masterpiece! Don’t forget to subscribe to the creator’s channel for more inspiring projects.
Leave a Reply