
Handmade charm meets style with this free crochet Headscarf Pattern, perfect for adding a cozy, fashionable touch to any outfit effortlessly.
The first time I made a crochet accessory that combined style and function was truly exciting. This headscarf features clusters of double crochet stitches paired with a half double crochet edging, giving it a delicate yet sturdy texture. Its classic triangular shape grows row by row, allowing you to easily customize the size to your preference. It’s perfect for adding a handmade touch to any outfit, whether to keep cozy on cooler days or to accessorize an airy summer look.
Other Projects to Try
The stitch pattern and shaping technique used here can be adapted to many other crochet pieces. You might enjoy making matching neck warmers or wrist cuffs that carry the same textured beauty. Lightweight shawls or small wraps created with these clusters bring cozy elegance to your wardrobe. By experimenting with different yarns and colors, the possibilities expand to include colorful patterns or even incorporating beads for a sparkly detail. Each of these ideas offers a chance to personalize your crochet creations while practicing versatile skills.
Versatile Crochet Headscarf Pattern for Every Hair Type
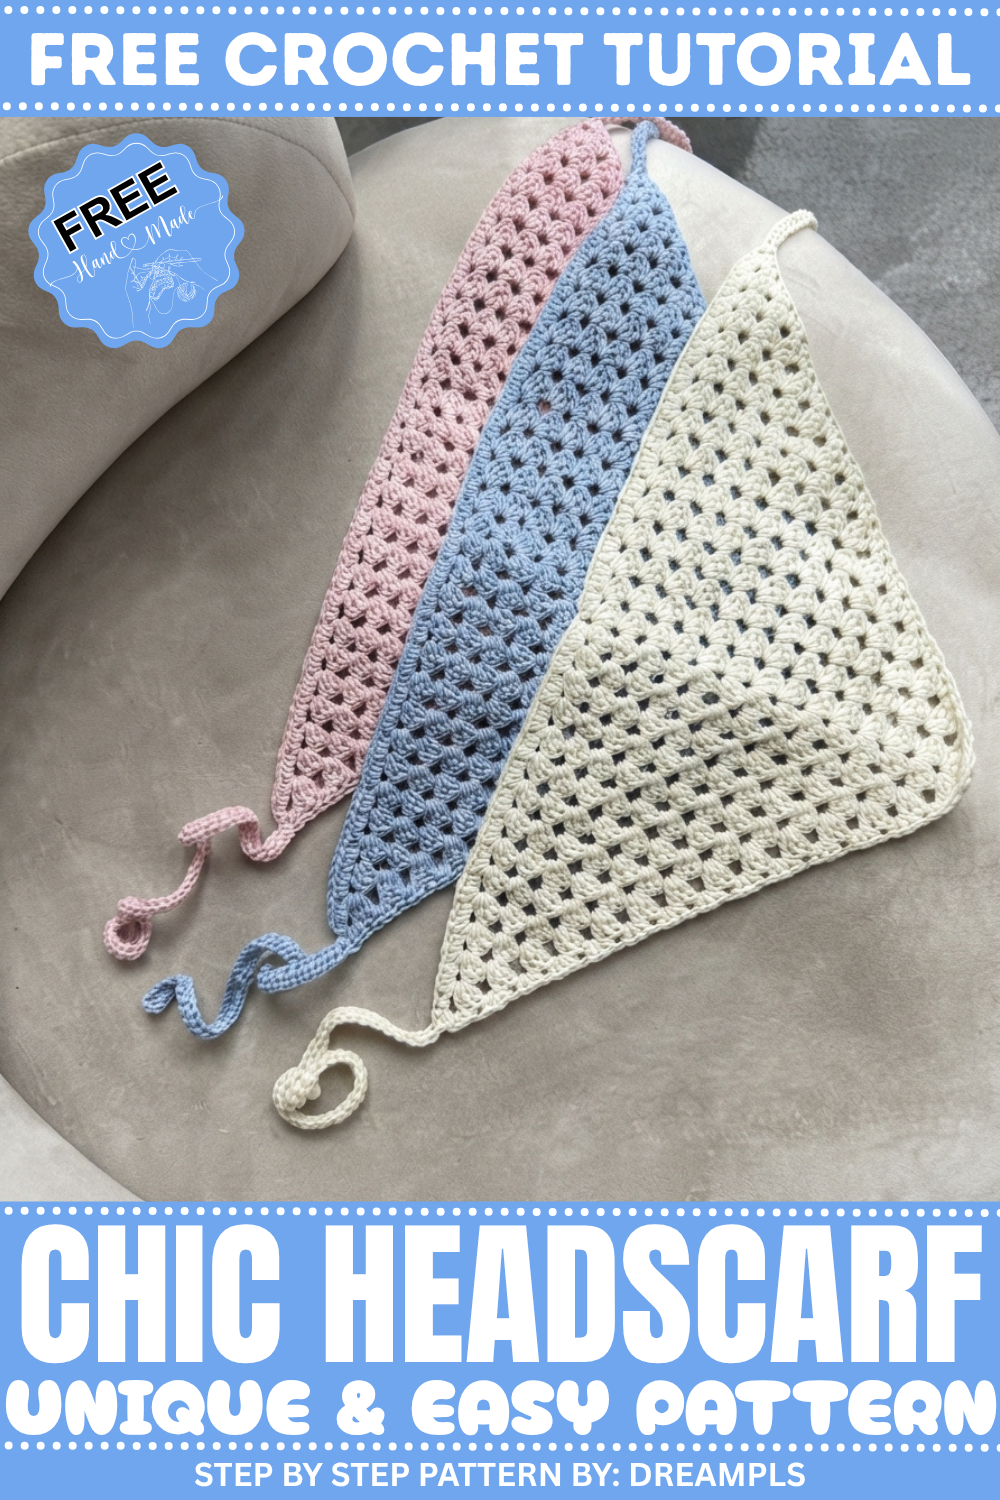
Beginning with a magic ring, the pattern develops by working clusters of three double crochets separated by chain spaces. This repetition makes it simple for beginners to follow and helps create a beautiful, balanced shape. The neat edging made with half double crochets prevents the scarf from stretching out over time and adds a refined finish. The long crochet ties let you secure the scarf comfortably, and you can make them longer or shorter depending on your style. The soft texture and versatile design make this accessory suitable for all ages and occasions.
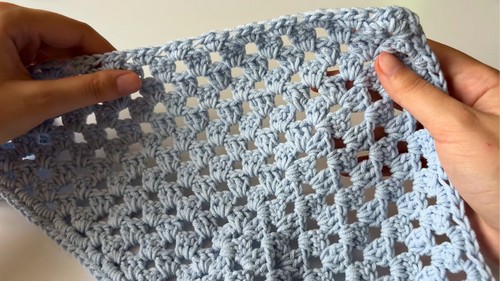
Crochet Headscarf with Ties – Detailed Pattern (US Terms)
This pattern shows you how to crochet a light, elegant triangle headscarf with ties, worked from the tip up. It uses simple stitches and repeating clusters, making it a relaxing project that’s easy to memorize. The edging in half double crochet and built-in ties give it a neat, finished look.
Uses of this pattern
- Everyday headscarf or hair accessory
- Lightweight neck kerchief or bandana
- Great stash-buster, gift, or quick market item
You start from a magic ring and build the triangle with double crochet clusters, then edge it with half double crochets and finish with two ties.
Skill Level & Terminology
- Skill Level: Confident Beginner
- Terminology: US crochet terms
You should be comfortable with basic stitches and turning rows.
Materials & Tools
- Yarn: Light-weight or DK-weight yarn (Category 3), cotton or cotton blend recommended
- Approx. 80–120 g depending on size
- Hook: 4.0 mm (G) or size recommended for your yarn
- Notions:
- Yarn needle for weaving in ends
- Scissors
- Optional: stitch marker (to help track corners)
Gauge
Gauge is not critical, but it will affect the finished size and drape.
To approximate:
- Work a small swatch in double crochet (dc):
- About 14–16 dc = 4″ (10 cm)
- About 8–10 rows dc = 4″ (10 cm)
If your scarf feels too stiff, go up a hook size; if too loose, go down one.
Abbreviations (US Terms)
- ch – chain
- st / sts – stitch / stitches
- dc – double crochet
- hdc – half double crochet
- sl st – slip stitch
- sp – space (e.g., “ch-sp” = chain space)
- MR – magic ring
Special Stitch Instructions
Magic Ring (MR)
- Wrap yarn around two fingers to form a loop.
- Insert hook under the first strand, grab the second strand, twist hook and pull through.
- Ch 1 to secure, then work the required stitches into the ring.
- Pull the tail to close the ring.
dc Cluster (cluster of 3 dc)
- Cluster in this pattern means 3 dc in the same chain space.
Finished Size
With DK yarn and 4.0 mm hook, and 14 rows as in the video:
- Wingspan (across top edge): approx. 90–110 cm (35–43″)
- Depth (center point to top edge): approx. 30–35 cm (12–14″)
You can adjust the size by working more or fewer rows.
What You’ll Learn from This Pattern
- How to start a triangular scarf from a magic ring.
- Building a triangle using clustered double crochets and a consistent corner pattern.
- Adding a clean hdc border that also stabilizes the edge.
- Creating simple but sturdy ties that are integrated into the edging.
The Pattern Itself
You’ll crochet:
- The main triangle panel
- The edging along all three sides
- The ties on each end of the top edge
Below each part you’ll find a short explanation in simple language.
Part 1 – Triangle Headscarf Body
All rows begin at the right-hand side of the scarf and end at the left-hand side, working back and forth.
Row 1
- MR, then:
- Ch 1, then ch 3 more (4 chains total – counts as dc + ch-1).
- Into the MR, work:
- 3 dc,
- ch 2,
- 3 dc,
- ch 1,
- 1 dc.
- Pull the short tail to close the ring.


You now have a tiny triangle with a cluster on each side and a corner (3 dc, ch 2, 3 dc) at the center.
Plain explanation:
You begin in a magic ring and build a tiny “V” shape: 3 dc, ch-2, 3 dc for the corner, and extra chains/dc to form the side edges.
Row 2
- Ch 4, turn.
- In the first ch-1 space (just after the starting dc of the previous row):
- 3 dc (first cluster).
- Ch 1.
- In the corner ch-2 space:
- 3 dc, ch 2, 3 dc (corner cluster set).
- Ch 1.
- In the last ch-1 space:
- 3 dc.
- To finish the row:
- Ch 1, 1 dc in the same ch-1 space.

You chain up, make a 3-dc group in the first gap, then repeat a larger group (3 dc, ch 2, 3 dc) right in the middle gap for the corner, then another 3-dc group in the last gap, and end with chain and a dc so the edge stays straight.
Rows 3–14 (or desired number of rows)
Repeat the same logic:
For each row:
- Row start:
- Ch 4, turn.
- In the first ch-sp, work 3 dc (cluster).
- Side clusters:
- Between clusters along the row:
- Ch 1, then 3 dc in the next ch-1 space.
- Continue this until you reach the corner space.
- Between clusters along the row:
- Corner:
- At the center ch-2 space:
- 3 dc, ch 2, 3 dc (corner cluster).
- At the center ch-2 space:
- Other side:
- After the corner, repeat:
- Ch 1, then 3 dc in each ch-1 space.
- After the corner, repeat:
- Row end:
- In the final ch-1 space:
- 3 dc, ch 1, 1 dc into the same space.
- In the final ch-1 space:

Work until you have 14 rows total (or more/fewer depending on the size you want).

Plain explanation:
Each row grows the triangle. In every gap (chain space) along the sides you put 3 dc, separated by 1 chain. In the very middle gap you always put 3 dc, ch 2, 3 dc to make the corner. You stop when the scarf reaches the size you like.
Part 2 – Edging the Top Edge and First Tie
Now you’ll work along the top side (the long straight edge opposite the point).
Edging – First Side of the Top Edge
- From the last row, do not fasten off.
- Ch 1.
- Work along the first long side of the triangle:
- In each ch-1 space along this top edge, work 3 hdc.
- No chains between these clusters.
As you approach the center, pick up and crochet over the magic ring tail to hide it: lay the tail along the edge and work hdc over it.
You now go along the top edge of the triangle, filling each gap with 3 half double crochets. This makes a thicker, more stable border and hides the starting tail inside.
First Tie
At the end of the first top-side edge (just after the last hdc cluster on that side):
- Ch 51 (or desired tie length; adjust as needed).
- Starting in the 2nd ch from hook:
- Work 1 hdc in each ch back down the chain (you’ll have 50 hdc).
- To attach the tie back to the scarf:
- Insert hook into the nearest hdc on the scarf edge,
- Pull up a loop and make a sl st.
- Make one more sl st into the same chain space for security.
- Insert hook into the nearest hdc on the scarf edge,

Plain explanation:
You create a long chain for the tie, then fill it with half double crochets to make it thicker. Then you slip stitch it back into the edge of the scarf so it becomes a permanent tie.
Part 3 – Edging the Other Sides and Second Tie
Now you’ll go down the second side, around the corner, and back up the opposite side, repeating the hdc clusters and making the second tie at the end.
Edging – Second Side of the Triangle
- From where the first tie attaches, continue along the next side of the triangle:
- In each ch-1 space, work 3 hdc.
- No chains between clusters.
It may look like the edge pulls in slightly; that’s fine and helps prevent stretching over time.
Plain explanation:
You repeat the same hdc groups along the second side of the triangle. Even if it looks slightly snug, that’s intentional for better structure.
Corner Edging
When you reach the corner chain space at the triangle’s tip:
- In that corner ch-sp:
- Work 3 hdc, ch 1, 3 hdc in the same space.
This frames the bottom point nicely.
At the very tip of the triangle, you add more stitches (3 hdc, chain 1, 3 hdc) in one spot so the corner stays smooth and doesn’t curl too tightly.
Edging – Third Side of the Triangle
Continue up the third side:
- In each ch-1 space, work 3 hdc with no chains between clusters.
- At the final chain space of this side, work your last 3 hdc cluster.
You complete the border by repeating the same pattern—3 hdc in each gap—until you reach the other top corner.
Second Tie
At this top corner:
- Ch 51 (again, adjust length if desired).
- Starting in the 2nd ch from hook:
- Work 1 hdc in each ch back down (50 hdc).
- Attach the tie:
- Insert hook into the nearest hdc on the scarf edge,
- Pull up a loop and make a sl st.
- Add one more sl st into the same chain space.
You make another strap exactly like the first one, then attach it to the opposite corner. These two straps will be tied behind your head to secure the scarf.
Part 4 – Finishing & Weaving Ends
- Ch 1, cut the yarn, and leave a short tail.
- Use a yarn needle to weave in:
- The beginning tail (if not already fully covered).
- The ending tail.
- To smooth the final “step” at the end of the edging:
- Run your needle through a few stitches at the top border to even the edge visually.
- Then continue weaving into nearby stitches to hide the tail securely.
You cut the yarn and hide all loose ends with a needle. If you see a tiny step where you finished, just sew through a couple of nearby stitches to make that spot look straight and smooth.
Assembly & Finishing
There is no extra sewing beyond weaving in ends; the scarf and ties are made in one piece.
- Lightly steam block or wet block if desired to open up clusters and straighten edges.
- Try on the scarf:
- Place the center point at the back of your head or on your neck (if wearing as a kerchief).
- Wrap the ties around and secure with a bow.
Why I Love This Pattern
It uses just a few simple elements—clusters, chains, and half doubles—but looks polished and delicate. The design is highly customizable: you can adjust length, yarn weight, or color. Once you understand the repeat, it becomes a meditative project perfect for TV or travel.
Leave a Reply