
Enjoy fashionable handmade accessories with this Crochet Handbag Pattern that keeps your everyday style fresh and elegant.
If you want a nice and simple project to update your bag collection, the modern crochet handbag free pattern is a great choice. This pattern makes a stylish and useful handbag that looks good and feels strong. The bag has a neat shape with a soft texture that adds some fun detail without being too much. This design features a clean, contemporary look that’s both stylish and practical, making it a great addition to your wardrobe or a thoughtful handmade gift.
Modern Crochet Handbag Free Pattern with Everyday Appeal
The style is clean and simple but still interesting to look at. It uses a mix of open and tight stitches making the fabric soft but strong. The bag is usually made with medium-thickness yarn which helps it keep its shape while staying light. This pattern works well for different sizes often giving ideas for small to medium bags. You can also make the bag bigger or smaller to fit what you need.
Making the bag is quite easy. It starts with a flat bottom then you crochet up the sides in rounds or rows connecting the parts simply. For the best results I suggest picking yarn that feels smooth and a bit firm like cotton blends or sturdy acrylic. These yarns help the stitches stand out and make the bag last longer. It is also important to keep your stitches even and tight so the bag looks neat. Feel free to play with colors or add a lining and straps to make the handbag truly yours.

I made this handbag to look nice and work well for daily use. You can take it when you go shopping meet friends or do small tasks. It is good for holding things like your phone money keys and small makeup items. You can also use it as a casual bag to carry some things when you go out. It is a nice gift for birthdays or special days. You can use different colors or add decorations to make it your own. This bag is fun to make and easy to use. Lets stsrt making ths easy crochet handbag.

Charming Mini Crochet Purse Pattern
This project shows how to make a charming mini purse that is just the right size for your essentials. Using classic granny squares as the base, this bag adds a fresh, modern feel by mixing in different textures and colors. The design is both fun and practical, making it great for everyday use. Whether you have plenty of crochet experience or you’re just starting out, this guide breaks down every step clearly to help you through the process. Each stitch and detail is explained in a way that is easy to follow, making it a relaxing and rewarding project. The finished purse is lightweight, stylish, and perfect for carrying small items like your phone, keys, or wallet. This handbag is a lovely accessory that adds a handmade touch to your daily look while showing off your crochet skills.
Quick Overview
-
Structure: Rectangular base followed by circular foundation rows.
-
Design: A recurring motif pattern worked in alternating colors.
-
Functionality: Includes a secure button closure and a sturdy integrated strap.
-
Technique: Uses back-and-forth rows for the base and seamless circular rows for the body.
Notes
-
Color Transitions: When switching colors, carry the yarn inside the work where possible, or fasten off and weave in ends for a polished finish.
-
Stitch Tension: Keep a consistent tension to ensure the motifs look uniform across all rows.
-
Terminology: This pattern uses standard crochet terminology.
Skill Level
Intermediate
Materials
-
Milk cotton yarn (multiple colors)
-
Tulip gold hook (size 6/0)
-
Stitch marker
-
Scissors
-
Button
Measurements & Sizing
-
Finished Base: 19 cm long by 4 cm wide.
-
Total Height: Approximately 15 rows of motif patterns.
Stitch Abbreviations
-
ch: Chain
-
sc: Single crochet
-
dc: Double crochet
-
sl st: Slip stitch
-
blo: Back loop only
Gauge
- 15 single crochet (sc) stitches and 16 rows = 10 cm (4 inches) square, worked in back-and-forth rows with milk cotton yarn and 6/0 Tulip gold hook.
- Gauge is important to ensure the purse measures approximately 19 cm long by 4 cm wide at the base and keeps the correct shape.
- If your gauge is too tight, try using a hook one size larger. If too loose, use a smaller hook.
Special Stitches
- Back Loop Only (blo): Insert the hook only into the back loop of the stitch and complete the stitch as usual. This creates a ridge and adds texture.
- Slip Stitch (sl st): Insert the hook into the stitch, yarn over, and pull through both the stitch and the loop on the hook in one motion. Used for joining rounds or moving yarn.
- Double Crochet (dc): Yarn over, insert the hook into the stitch, yarn over and pull through, yarn over and pull through two loops, yarn over and pull through remaining two loops.
- Single Crochet (sc): Insert the hook into the stitch, yarn over, pull up a loop, yarn over, pull through both loops on hook.
The Crochet Pattern
Part 1: The Base
-
Foundation: Start with a slip knot and make a chain of 7 (6 chains + 1 extra).
-
Row 1: Work 1 sc into each of the 6 chains .
-
Row 2: Ch 1, turn. Work 1 sc in the same stitch, then 1 sc in each of the next 5 stitches (6 sc total).
-
Row 3–33: Repeat Row 2 to achieve 33 rows of 6 sc .
-
Perimeter: Place a marker. Working around the rectangle, make 32 sc along the side edge .
- At the corner, work a sc increase (2 sc in one hole), then 4 sc along the end, followed by another sc increase at the next corner. Finish by working 32 sc along the final side and joining with a sl st to the marker.


Part 2: Foundation & Body
-
Foundation Row 1: Ch 1, work 78 sc in blo around the entire base.
-
Foundation Row 2: Ch 1, work 1 sc in every stitch, taking both loops . Join with a sl st.
-
Motif Row 3: Ch 2, work 3 dc in the same stitch. Mark the first dc. Skip 2 stitches, then work 3 dc in the next stitch. Repeat this around .
-
Rows 4–15: Continue the motif pattern, alternating colors every two rows. Work 3 dc into each cavity formed by the previous row. Change colors by finishing the sl st with the new yarn
-
Closure: Once row 15 is complete, ch 12 for the button loop and secure with a sl st.


Part 3: The Strap
-
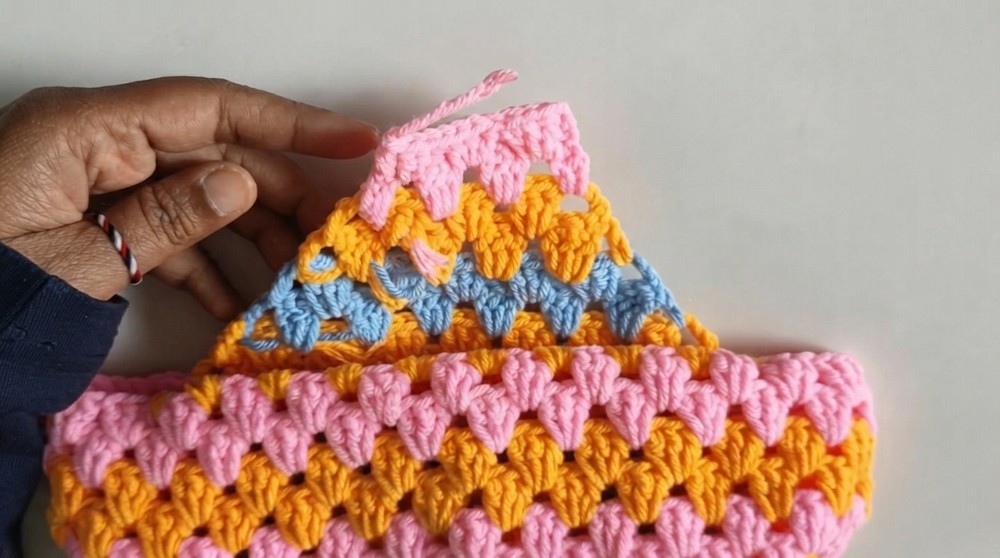
Strap Foundation: Attach yarn to the body by skipping two motifs.
-
Row 1: Ch 3, work 3 dc into the next 8 spaces.
-
Row 2: Ch 3, turn, work 3 dc into the next 7 spaces, end with 1 dc in the last cavity .
-
Rows 3–6: Continue working with decreasing spaces per row (6, 5, 4, 3), switching colors as desired.
-
Rows 7–14: Using the pink yarn, work the remaining rows by starting with ch 3 and 1 dc in the same space, 3 dc in subsequent spaces, and 2 dc in the last space.
-
Second Side: Repeat this strap process for the other side.

Assembly
-
Align the Straps: Fold the purse carefully so that the two strap ends meet evenly at the top.
-
Join the Seam: Secure the two sides together by working 11 slip stitches across the top edge to create a seamless connection.
-
Secure Ends: Once the join is complete, fasten off the yarn with a single chain and cut, leaving a small tail.
-
Weave and Conceal: Neatly tie off and weave all remaining yarn ends into the inner fabric of the bag to ensure the final result is clean and invisible.
-
Attach Closure: Position and sew your chosen button onto the front of the bag, ensuring it aligns perfectly with the chain loop created at the end of the body construction.

Finished Size
-
Base Length: The foundation measures 19 cm in length.
-
Base Width: The base width is 4 cm.
-
Overall Height: The bag body is constructed up to 15 rows of the motif pattern, providing a compact and functional size suitable for your daily needs.
Conclusion
Congratulations on finishing your new mini bag. You successfully turned simple yarn into a functional accessory that shows your personal touch. This project is a practical item for your daily life. Whether you use it for your own errands or give it as a gift for someone special it stands out with its unique look and vibrant colors. Thank you for following this detailed guide and I hope the process satisfied you as much as the final result. Work like this requires patience and skill so keep practicing and stay inspired while you show off your new piece. You should be very proud of the hard work and dedication you put into every single stitch. Finishing this task shows how much time you spent on your work. Continue using your ability to finish more items for your collection and keep moving forward with your skills.

Leave a Reply