
Share the love with this Free Crochet Heart Amigurumi Pattern, perfect for adding a sweet touch to décor, gifts, or cute collectibles.
Making a soft, cuddly heart by hand brings a warm, personal touch to any gift or decor. This charming little heart is crocheted using the single crochet stitch, which creates a sturdy but flexible fabric perfect for amigurumi projects. Its plump shape and smooth texture make it ideal for expressing love—whether as a decoration, a keychain, a gift topper, or a small token for someone special. What makes this pattern particularly enjoyable is how easy it is to shape by increasing and decreasing stitches carefully, giving it a recognizable, classic form that feels friendly to beginners.
Cute Crochet Heart Amigurumi Pattern for Cozy Décor

This crochet heart is more than just a pretty shape; it’s a versatile project that introduces you to essential amigurumi skills like working in rounds, joining pieces together, and shaping with decreases. The pattern guides you through making two halves that you join seamlessly, making the final product look clean and professional. Plus, stuffing the heart with fiberfill gives it that satisfying squishy feel, great for holding in your hand or brightening up a shelf.
Explore More with This Stitch Pattern
Once you’ve mastered crafting this adorable heart, the same technique can lead to a variety of other amigurumi shapes such as stars, animals, or simple fruit. The single crochet stitch and shaping methods used here are foundational skills for creating a whole universe of cute, small projects. You can even experiment with different yarn colors and sizes to create customized charms, ornaments, or little gifts that carry your personal style and creativity.
Crochet Pattern: Mini Heart
This crochet mini heart is a simple yet adorable project perfect for beginners and advanced crocheters alike. Whether you use it as a decoration, keychain, gift, or a way to practice your amigurumi skills, this heart pattern will add handmade charm to any occasion. The pattern is worked in continuous rounds starting from two identical pieces that are joined to form the top of the heart. Decreases shape the bottom section, giving the heart its signature look.
What You’ll Learn From This Pattern
- Creating symmetrical shapes using increases and decreases.
- Joining crochet pieces seamlessly.
- Simple techniques for stuffing and closing amigurumi projects.
Skill Level & Terminology
- Skill Level: Beginner
- Terminology: US Crochet Terms
Materials & Tools
- Yarn: Worsted weight yarn (e.g., “One Pound” brand or similar) in red, pink, or any color of your choice.
- Hook: 5.5 mm crochet hook (adjust size to achieve smaller or larger hearts).
- Additional Tools:
- Stitch marker (to track the first stitch of each round).
- Scissors.
- Fiberfill or pillow stuffing.
Gauge
Gauge is not crucial for this project, but ensure tight stitches to prevent stuffing from showing through. If your stitches are loose, use a smaller hook.
Abbreviations
- ch – Chain
- sc – Single Crochet
- inc – Increase (2 sc in the same stitch)
- dec – Decrease (sc two stitches together)
- sl st – Slip Stitch
Special Stitch Instructions
Magic Circle (MC):
- Create a loop with yarn, ensuring the working yarn is on top of the loop.
- Insert the hook into the loop, yarn over, and pull through the loop to form a chain.
- Crochet the required number of stitches into the loop.
- Pull the yarn tail tightly to close the loop.
Finished Size
- Approximately 3 inches wide × 3 inches tall (completed heart). The size may vary based on yarn thickness and hook size.
How to Start
This heart is worked in two identical pieces that are joined to form the top sections. From there, the bottom of the heart is shaped using single crochet rows that gradually decrease in stitch count. The pattern uses techniques such as the magic circle, continuous rounds, increases, decreases, and slip stitches for joining.
Step-by-Step Instructions
1. Starting with Round 1 – Making the Magic Circle
- Begin by forming a magic circle.
- Chain two stitches and single crochet six times into the circle.
- Pull the loop tightly to close the circle. This forms your initial base for the heart.

2. Round 2 – Increasing Stitches
- Perform increases all the way around to end up with 12 stitches in total.
- Increase Method: Single crochet twice into each stitch for this round.
3. Round 3 – Expanding with Single Crochet + Increases
- Single crochet into the next stitch, then make an increase (two single crochets into the same stitch).
- Repeat this process until you have 18 stitches in total for the round.
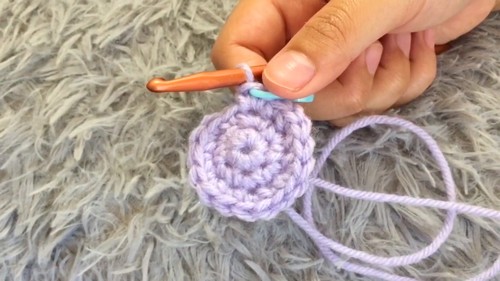
4. Round 4 – Expanding Further
- Single crochet into the next two stitches, then create an increase.
- Repeat this sequence until you end with 24 stitches in total.
5. Round 5 – Single Crochet Around
- Simply single crochet into each stitch around.
- You will still have 24 stitches after completing this round.
Note: This completes one half of the heart. Create two identical pieces. For the second half, follow rounds 1-5 in the same way.
6. Joining the Two Heart Pieces
- Take the two completed halves. Hold them together and join the second piece to the last single crochet from the first piece (not the slip stitch).
- Insert your hook into the last stitch of the first half, pull yarn through both layers, and slip stitch to join.
- Single crochet around each piece, ensuring proper alignment. For this first combined round, you will end up with 48 stitches.

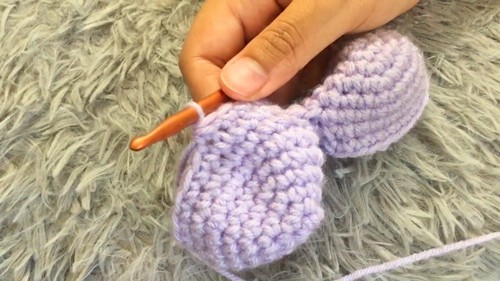
7. Adding Fiberfill and Working on Decreases
- Continue the following rounds to reduce stitches and form the heart shape:
Round 4:
- Single crochet into the next 5 stitches, then decrease.
- Single crochet into the next 10 stitches, then decrease.
- Repeat this three times, then finish with 5 single crochets.
- End with 44 stitches.
Round 5:
- Single crochet 9 stitches, then decrease.
- Continue this process all around.
- End with 40 stitches.
Round 6:
- Single crochet into the next 4 stitches, then decrease.
- Single crochet into the next 8 stitches, then decrease.
- Repeat this process three times, then finish with the last 4 single crochets.
- End with 36 stitches.

Round 7:
- Single crochet into the next 7 stitches, then decrease.
- Repeat this process all around the heart.
- End with 32 stitches.
Round 8:
- Single crochet into the next 3 stitches, then decrease.
- Single crochet into the next 6 stitches, then decrease.
- Repeat this cycle three times, then finish with 3 single crochets.
- End with 28 stitches.
Round 9:
- Single crochet into the next 5 stitches, then decrease all around.
- End with 24 stitches.
- Stuff the heart with fiberfill at this stage if desired.
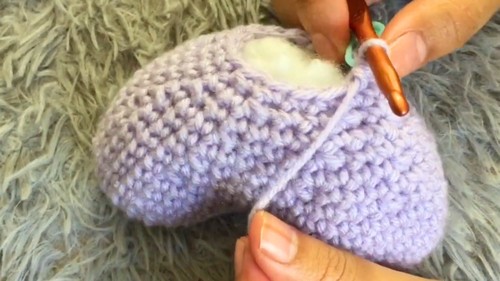
Round 10:
- Single crochet into the next 2 stitches, then decrease.
- Single crochet into the next 4 stitches, then decrease.
- Repeat for all stitches until 20 stitches remain.
Round 11-14 – Final Rounds:
- Continue decreasing through repeated rounds.
- Round 14 (Final): Perform 4 decreases, secure the end, and weave in excess yarn. Push it inside the heart for a clean look.

Tutor’s Suggestions
- Use the magic circle method for the base. Skip the chain-two alternative if you dislike its look.
- Be patient when joining the two pieces together; it can feel tricky but improves with practice.
- Stuff during the later rounds for better control while working.
- Avoid overstuffing, as it can distort the shape.
Uses
- Decorative Item: Perfect for home decorations, like cushions or shelf ornaments.
- Gift: Ideal as a handmade present for loved ones during Valentine’s Day or other special occasions.
- Customizable Shape: Adjustable for a larger or tighter final design depending on your skills or preferences.
Why You’ll Love This Pattern
This crochet heart is perfect for expressing love or giving thoughtful handmade gifts. It’s simple, quick, and endlessly customizable, making it ideal for beginners who want to try amigurumi without feeling overwhelmed. The combination of two symmetrical shapes joined flawlessly into one heart is satisfying and rewarding.
Conclusion
You’ve successfully crocheted a heart! This Pinterest-inspired design is simple yet elegant. Although the joining and decreasing process may be slightly difficult for beginners, the repetitive nature of the pattern helps build confidence. Stuffing provides the heart with fullness, and the finished product is highly versatile. It’s perfect for gifting or decorative purposes, showcasing your crochet skills.
Pro Tip
To avoid visible gaps when filling the heart, crochet tightly and maintain consistent tension throughout. The cleaner the stitches, the better your final product will look.
Leave a Reply