
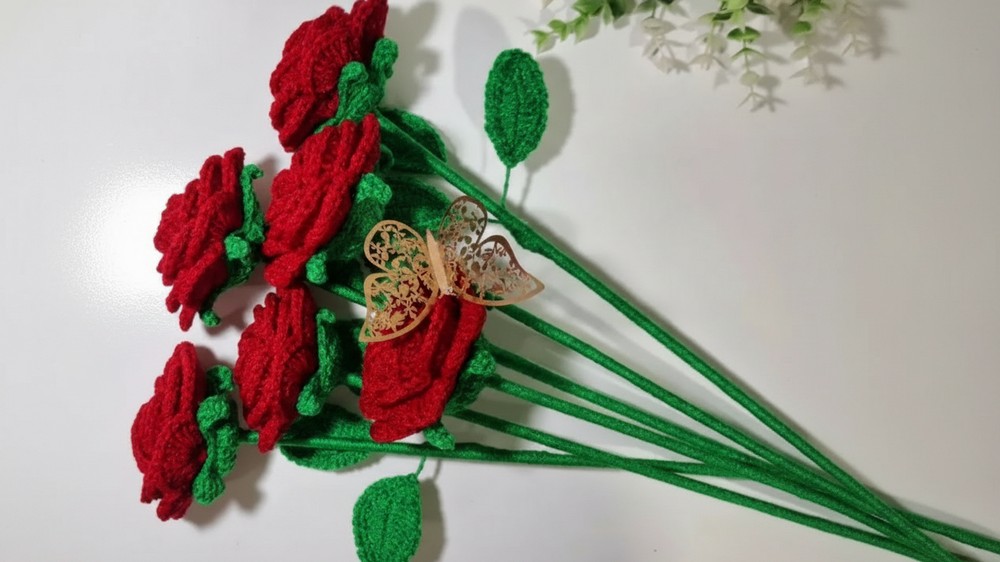
Decorate your space with everlasting beauty using a Free Crochet Rose Bouquet Pattern, bursting with color for any room or special occasion.
People often look for ways to bring happiness and color into their homes without worrying about watering or sunlight. A soft petal made with gentle hands brings a smile to every face while the soft touch of yarn feels comforting to hold. With one flower blooming brightly your space becomes warm and inviting just by placing a Crochet Rose Bouquet pattern on your table shelf or windowsill. This rose never fades and stays beautiful forever giving you a worry-free bloom every day.
Modern Free Crochet Rose Bouquet Pattern for Decor Lovers

The pattern lets you make a lovely bouquet in a rosy shade that matches any mood or celebration. A soft green leaf with a lifelike bloom looks stunning and can even be used as a special handmade gift for a family member or friend. The joy of making or receiving such a lovely bouquet is something everyone can cherish making it a perfect addition to any room or occasion.
Free Crochet Rose Bouquet Pattern
Materials
- Yarn/Thread: Omega Cris, Crystal, or similar acrylic thread (use double strand)
- Main rose color (choose as desired)
- Green (calyx, leaves, stem wrap)
- Hooks:
- 3.5 mm crochet hook (rose)
- 2.0 mm crochet hook (calyx and leaves)
- Wooden stick: 35 cm (for stem)
- Wire: Thin (No. 3), doubled, for leaf structure
- Scissors
- Hot glue (silicone) or cold glue
- Stitch marker (optional)
- Pearl/bead (optional, for embellishment)
- Lighter: For finishing acrylic threads
- Yarn needle
Key Abbreviations (US Terms)
- ch: Chain
- sc: Single crochet
- hdc: Half double crochet
- dc: Double crochet
- sl st: Slip stitch
- inc: Increase (2 stitches in same stitch)
- st(s): Stitch(es)
- beg: Beginning
Special Notes
- Adjust hook size for comfortable tension and to accommodate double-strand threads.
- Petals, calyx, and leaves are made separately and assembled.
- Wire is needed for leaves to enable shaping and stability.
- Use hot glue for secure and quick assembly.
Pattern Instructions
1. Rose Petals
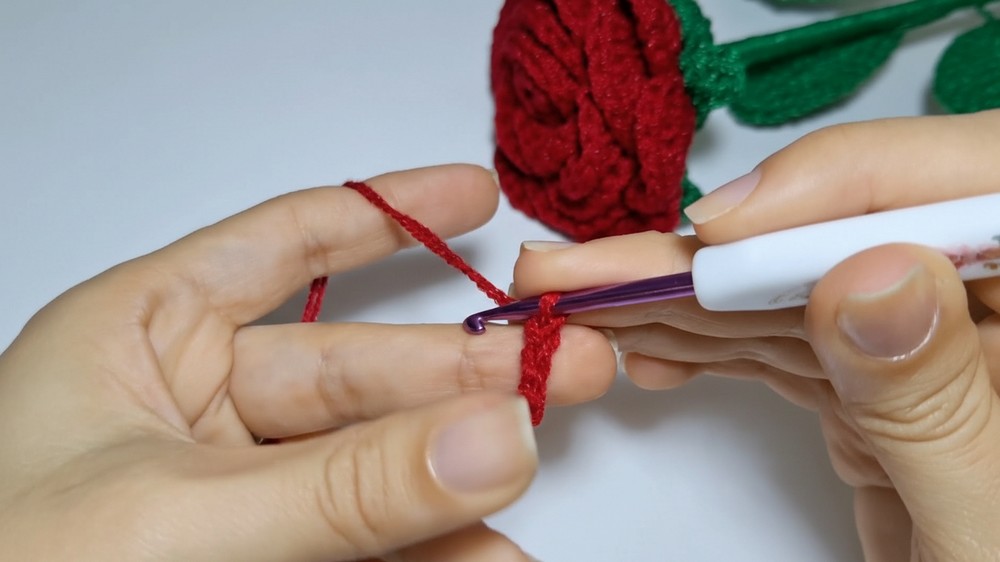
With double-strand rose color yarn and 3.5mm hook:
Foundation Row
- Ch 55.
Row 1
- Dc in 4th ch from hook (counts as first dc + ch-3).
- Dc in each ch across (total: 56 dc).
Row 2
- Ch 3, turn. Dc in same st.
- Ch 1, 2 dc in next st.
- Repeat sequence: (ch 1, skip 1, 2 dc in next st, ch 1, 2 dc in next st) across the row.
- Between groups: ch 1, skip 1 ch, 2 dc in next st, repeat.
- At row end: ensure 56 stitches; last group ends in last stitch.
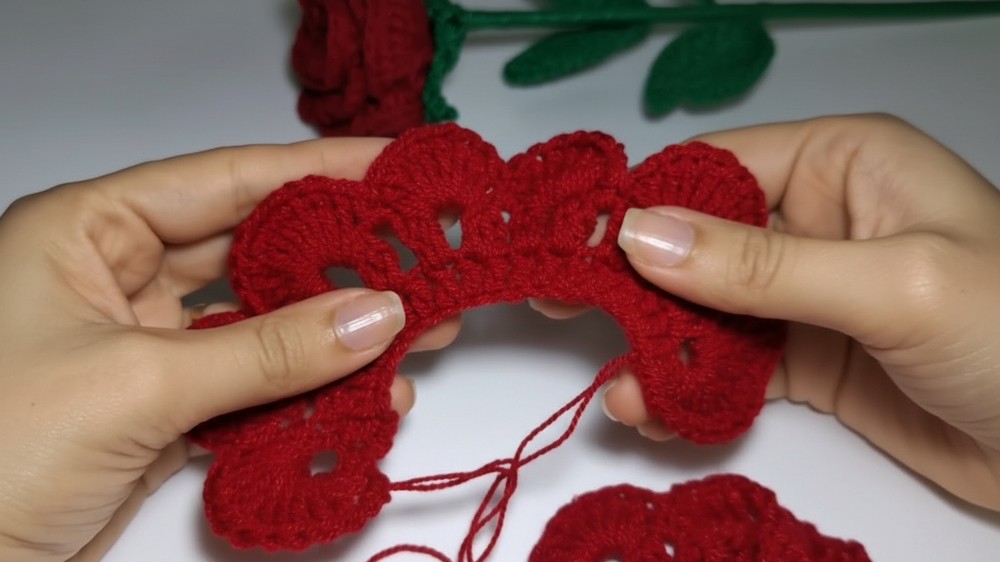
Row 3 – Petal Shaping
- Ch 1, turn.
- In each “V” space (formed by previous row’s groups):
- Work 10 dc (all into the ch-1 space of each group).
- After each petal, sc in the next ch-1 space (between petal groups).
- Continue across, forming as many petals as groups (should be several to create a full rose).
- At row end: ch 2, sl st in last space for finishing. Fasten off.
2. Rose Calyx
With green yarn and 2.0mm hook:
Round 1
- Magic ring, ch 2 (counts as hdc), 9 hdc into ring (total: 10 hdc).
- Do not close ring completely; leave space for stem.
- Sl st in top of beg ch-2.
Round 2
- Ch 3.
- (2 dc in next st) around (increase in each st; total 20 dc).
- Sl st to join in ch-3.
Calyx Points
- Ch 8.
- In ch 7th and 8th from hook, sc in each.
- For remaining chains, dc in each (total: 2 sc + 5 dc).
- Skip 3 sts on calyx base, sl st in next st.
- Repeat steps 7–10 for 5 points (calyx sepals).
- Fasten off, leave a tail for sewing.
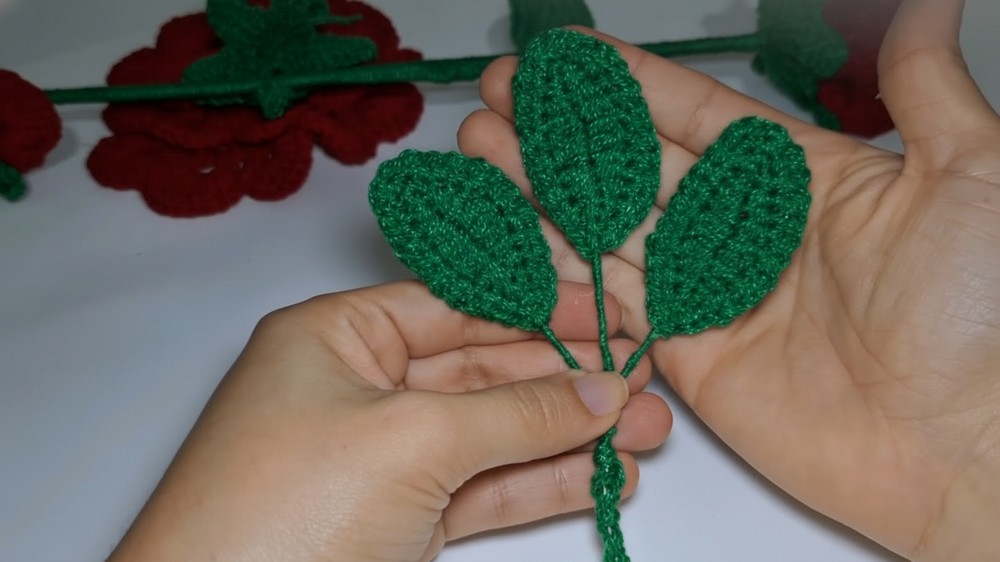
3. Leaves (with Wire)
With green yarn and 2.0 mm hook:
Foundation
- Ch 12.
Row 1 (Leaf Shape)
- Sc in next 2 ch, hdc in next 2 ch.
- Dc in next 3 ch.
- Hdc in next 2 ch, sc in next 2 ch (to end).
- At tip of leaf: 3 sc in last ch (one for each side of tip).
Row 2 (Leaf Mirror, opposite side)
- Work along opposite edge of chain:
- Sc in next 2 ch
- Hdc in next 2 ch
- Dc in next 3 ch
- Hdc in next 2 ch, sc in next 2 ch.
Add Wire
- Cut wire length to match leaf perimeter, double for strength.
- At leaf tip, place wire between hook and yarn, ch 1 to wrap wire.
- Working around leaf edge:
- (sc, ch 1) in each st around, enclosing wire and forming picot-like “points”.
- At end: sl st into beginning, ch 1 to secure, fasten off leaving a long tail.
- Use tail to wrap and cover wire end as needed.
Leaf Assembly
- Make 1–3 leaves; group as desired for bouquet.
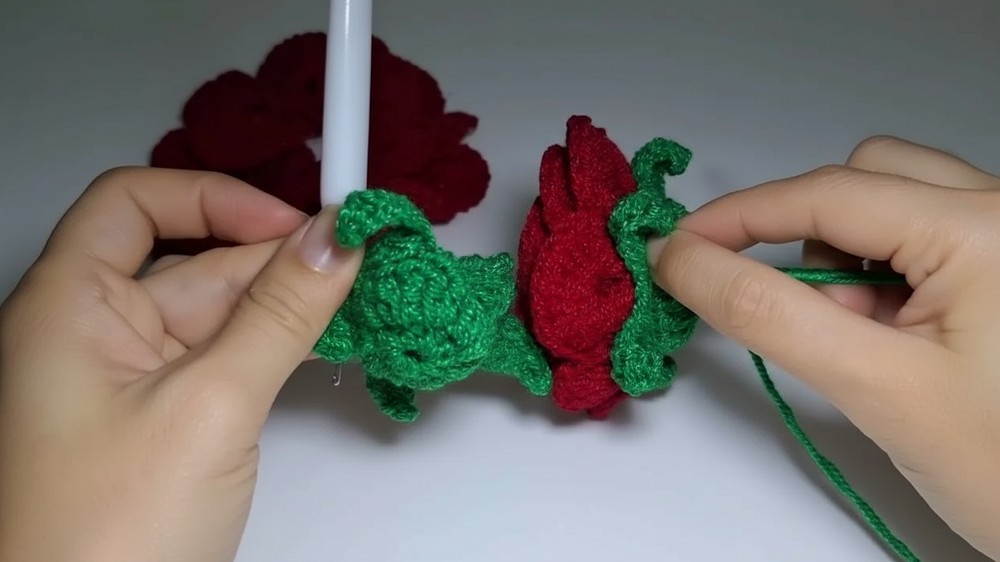
4. Assembly
Follow these steps for a polished bouquet:
a) Form Rose
- Starting from one petal end, coil and wrap petals loosely, forming a rose shape.
- Use hot glue to attach base to wooden stick, about 2 cm from tip.
b) Add Calyx
- Place calyx at base of rose, adjusting sepals to cover the join.
- Secure with hot glue.
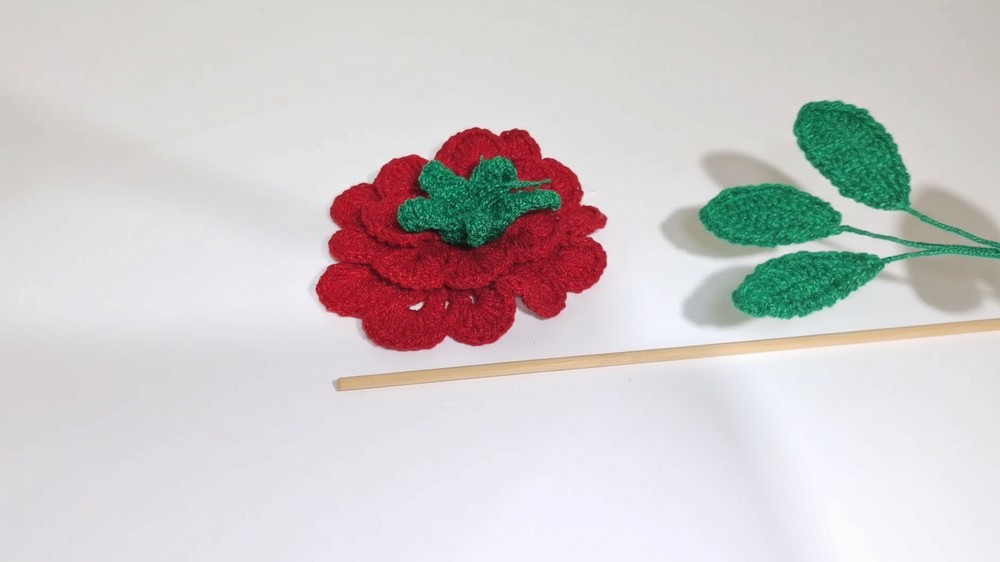
c) Wrap Stem
- Using green yarn (double-strand if desired), leave a glue spot at top of stick.
- Wrap yarn tightly down the stick, covering and securing with glue at intervals.
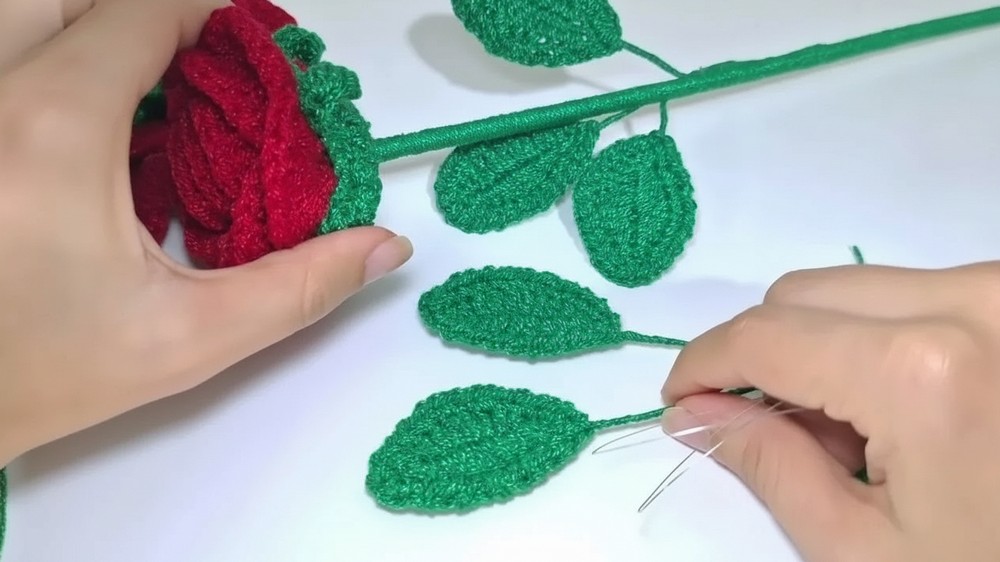
- Stop at preferred point to attach leaves; glue leaves to stem, wrap additional yarn over joins for a tidy finish.
d) Attach Leaves
- Group leaves as desired (single, pair, or three).
- Use wire ends and tails to secure leaves under the calyx or along the stem; glue and wrap yarn for neatness.
e) Finishing Touches
- If rose is acrylic, use a lighter to singe stray fibers for a clean look (do not use with cotton).
- Shape rose petals, calyx sepals, and leaves for natural appearance.
- Optional: Attach a bead or pearl at rose center.
Pattern Correction
- If stitch counts are off in the rose base, add extra dc at row end so petal groups align.
- When working leaves, ensure mirror symmetry for realistic effect.
- Picots along leaf edge are made with (sc, ch 1) stitches—adjust number for desired “points”.
Tips
- Use stitch markers to track petal and leaf tips.
- Hot glue gives the strongest, quickest hold; cold glue can be used for more working time.
- Adjust rose length and fullness for bouquets versus single stems.
- Tightly wrap stem yarn for durability and aesthetics.
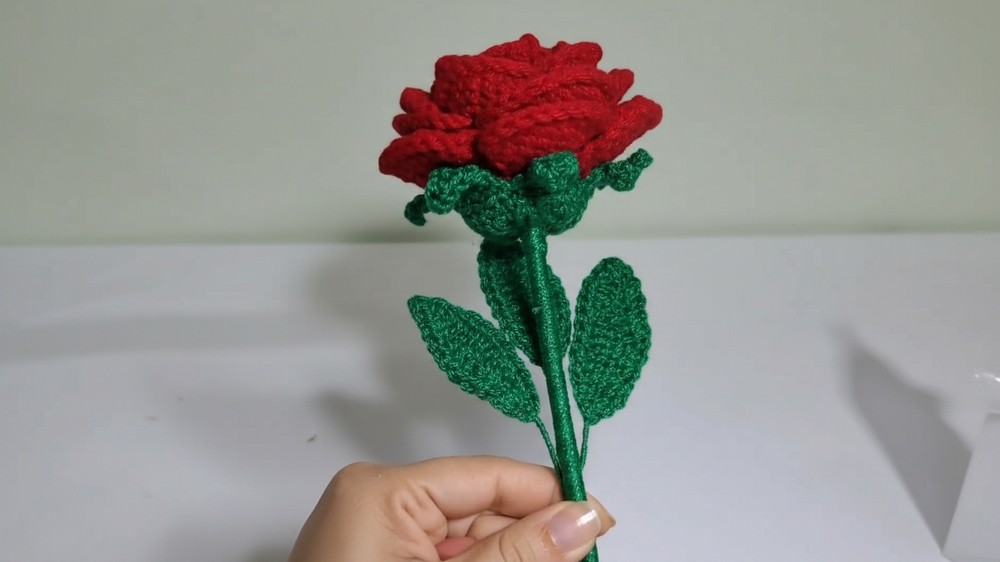
Conclusion
This detailed crochet rose pattern produces a beautifully realistic flower, perfect for bouquets, gifts, and decor. With structural leaves, a sturdy stem, and flexible petal shaping, your rose will be both durable and visually stunning. The pattern invites creativity in color and arrangement, allowing each crocheter to craft unique and meaningful floral pieces.
Leave a Reply