
Add a fresh touch to your table with this Crochet Cucumber Slice Coaster Pattern featuring bright colors fun details and a playful handmade style for everyday use.

Cute Crochet Cucumber Slice Coaster Pattern for Summer Table Style
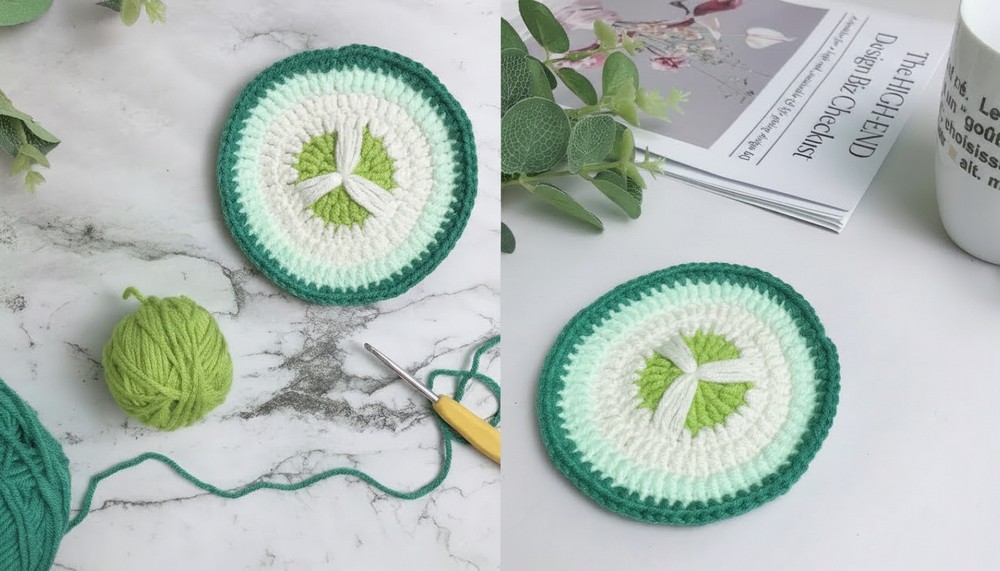
Brighten up your table with a fresh and fun touch that everyone will love! These little coasters look just like cool cucumber slices—green, fresh, and full of tiny details that make them special and cute. They are soft but strong, perfect to keep your drinks steady and your table safe from spills and heat. Whether you’re enjoying a cold lemonade or a warm cup of tea, these coasters add a splash of color and happiness to every sip.

Easy to make with simple crochet stitches, they’re fun to create and even more fun to use. You can make a whole bunch to share with family and friends or gift them to someone who loves bright and pretty things. Their cheerful look makes any kitchen or coffee table feel fresh, lively, and welcoming. These coasters are small, useful, and bring a little joy everywhere they go.
Crochet Cucumber-Shaped Coasters Pattern
Special Features
- Multi-colored round design mimicking a cucumber slice
- Textured layers created by alternating stitch types
- Compact size ideal for cups and mugs
- Lightweight, washable, and practical
- Room for creative color customization
Difficulty Level
Beginner to Intermediate — Requires familiarity with basic crochet stitches: chain (ch), slip stitch (sl st), double crochet (dc), half double crochet (hdc), and magic ring.
Materials
- Four colors of yarn (small amounts for each, approx. 2 mm thickness)
- 2.5 mm crochet hook
- Wool sewing needle for finishing
- Scissors
Pattern Instructions
Round 1: Magic Circle and Base
- Create a magic circle (magic ring) with your first color (blue recommended for base).
- Chain (ch) 3 (counts as first double crochet – dc).
- Work 11 more dc stitches inside the magic circle. Total 12 dc including starting ch 3.
- Pull the yarn tail to close the ring tightly.
- Join round with a slip stitch (sl st) in the top of the initial ch 3.

Round 2: Double Crochet Increases
- Chain 2 (does not count as stitch).
- For every stitch around, work 2 dc in the same stitch (double increase).
- Continue this double increase in every stitch for a total of 24 dc.
- Join with a sl st to top of first dc.
- Cut the working yarn leaving a tail, secure it.

Tip: Arrange the yarn tails to hide knots neatly inside the work.
Round 3: Change Color and Repeat Pattern
- Join the second color yarn (white).
- Chain 2.
- Work 1 dc in the next stitch, then work 2 dc in the following stitch (increase).
- Repeat around alternating 1 dc and double increase until you have 36 stitches.
- Join round with sl st.


Round 4: Continue Pattern with Next Color
- Join the third color yarn (white or different).
- Chain 2.
- Work 1 dc in the first 2 stitches, then 2 dc in the next stitch (increase).
- Repeat around. Total 48 stitches.
- Join with sl st.
- Cut yarn and arrange ends.

Round 5: Returning to First Color
- Join the first color yarn again (blue).
- Chain 2.
- Work 1 dc in the next 3 stitches, then 2 dc in the next stitch (increase).
- Repeat around. Total 60 stitches.
- Join round with sl st and cut yarn.

Round 6: Final Round with Dark Green Yarn (Half Double Crochets)
- Join dark green yarn.
- Chain 2.
- Work half double crochet (hdc) around, increasing as follows:
2 hdc in one stitch (increase), then 1 hdc in the next 4 stitches. - Repeat this pattern until you have 72 stitches.
- Join with sl st.

Finishing
- Use a wool sewing needle to weave in all yarn ends neatly on the back side.
- Trim any excess yarn close to the fabric.
- Arrange and flatten the coaster for best shape.
Tutor’s Suggestions
- Use stitch markers if you find counting increases challenging.
- Keep tension consistent to avoid curling edges.
- Be mindful of joining new yarns by pulling tails tightly to prevent loose knots.
- Change colors cleanly for a crisp layered look mimicking cucumber slices.
Uses
These coasters are perfect for protecting tables from hot or cold drinks, adding a whimsical touch to your kitchen or dining decor. Their compact size fits most mugs, glasses, or small bowls. Also great as small gifts or party favors!
Pro Tip
If you want your coasters to be extra sturdy, consider using cotton yarn or lightly starching when finished to keep them flat and durable over time.
Conclusion
Creating these delightful cucumber-shaped coasters is a fun and fulfilling project that incorporates basic crochet techniques with colorful layering. With careful tension and neat finishing, you’ll add a fresh and charming handmade touch to your home or gift collection.
Leave a Reply