
Snuggle up with this charming crochet bunny lovey blanket pattern that’s perfect for cozy cuddles and bringing smiles to little faces everywhere.
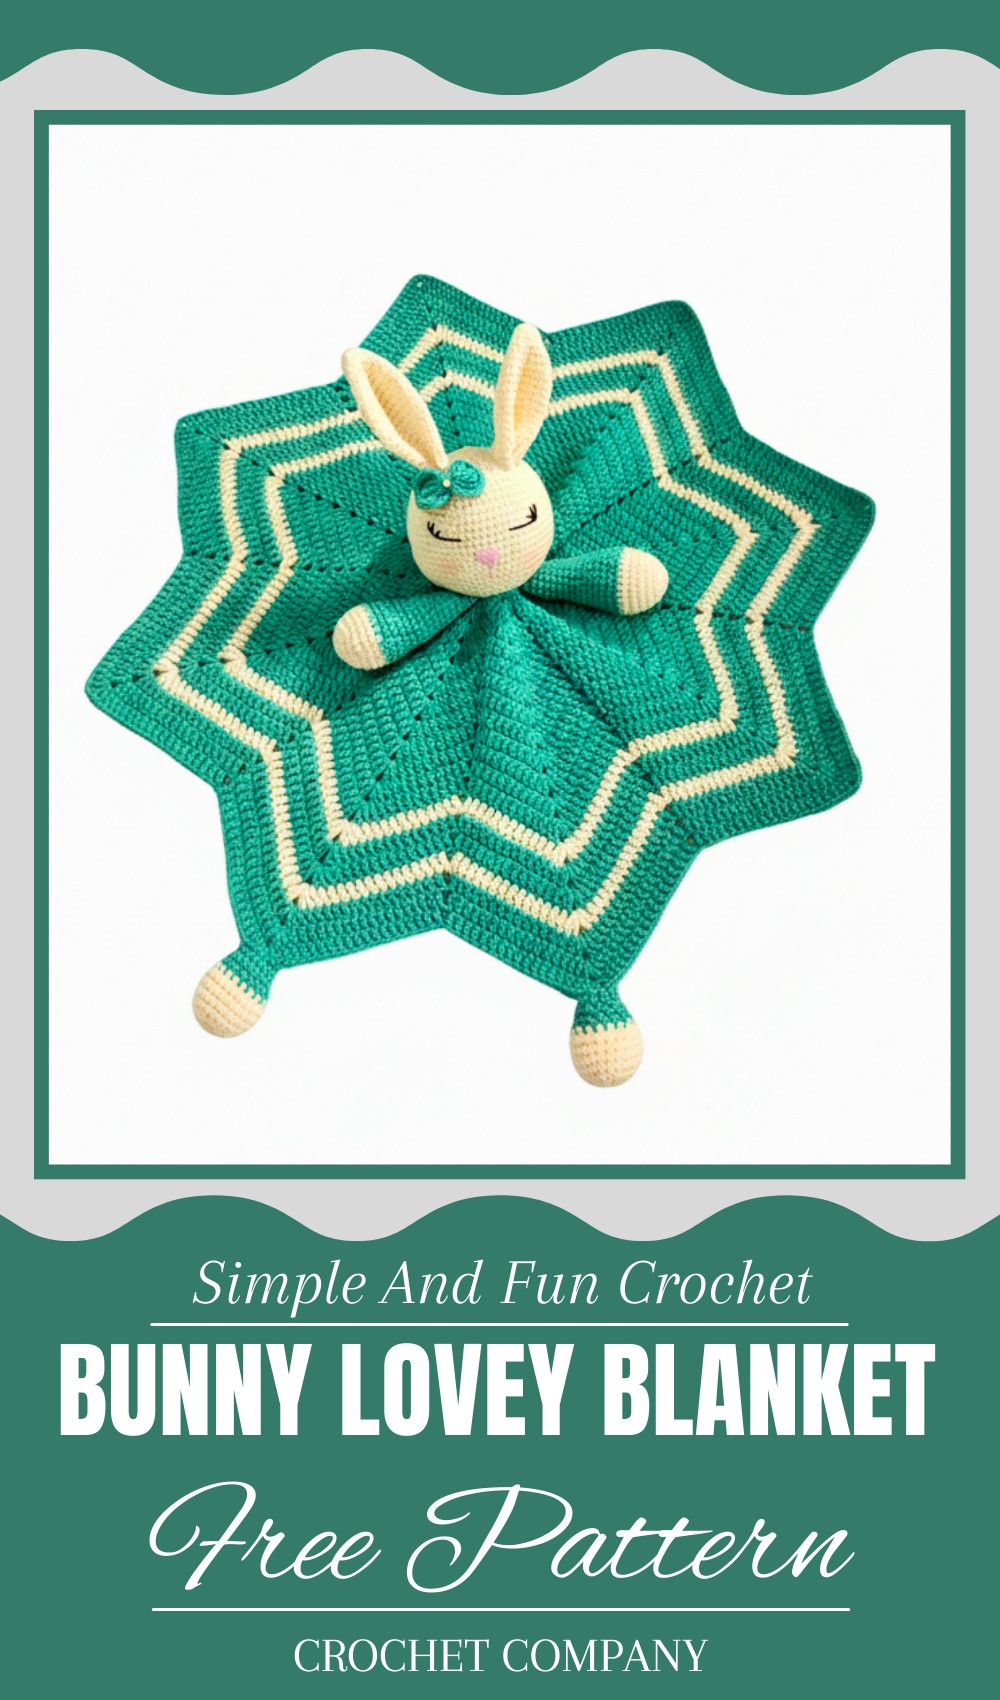
Sweet Crochet Bunny Lovey Blanket Pattern for Cozy Snuggles
Looking for a fun and snuggly friend that your little one will adore? The crochet bunny lovey blanket pattern is just the perfect mix of comfort and cuteness! This soft, handmade blanket features a sweet bunny face that feels like a gentle hug, making it great for babies to cuddle with during naps or bedtime. Its cozy texture not only keeps babies warm but also gives them a sense of security and calm.
With charming details and soft colors, this lovable blanket adds a cheerful touch to any nursery or playtime spot. Handy for both home use and on-the-go, it’s a delightful companion that soothes and comforts. Easy to hold and hard to put down, this blanket is a wonderful handmade gift filled with warmth and love—perfect for little ones and anyone who wants to share a bit of joy.
Crochet Baby Bunny with Blanket Pattern
Materials:
- 3 mm crochet hook
- 5-ply cotton yarn (multiple colors for bunny and blanket)
- Fiberfill stuffing
- Yarn needle for sewing parts together
Bunny Head Construction
Step 1: Magic Circle Foundation
- Make a magic circle, chain 1
- Work 6 single crochet (sc) inside the magic circle
- Pull the tail to tighten the circle
- Close round with a slip stitch in the first sc
Step 2: Increase Round
- Chain 1
- Work 2 sc in each stitch around (total 12 sc)
- Close with a slip stitch to first sc
Step 3: Alternating Increase Round
- Chain 1
- 1 sc in next stitch, 2 sc in next stitch – repeat around
- Close round with a slip stitch
- (Total 18 sc)
Step 4: Increase Round with Spacing
- Chain 1
- *1 sc, 2 sc in next stitch, 2 sc, repeat from * around
- Close round with slip stitch
- (Total 24 sc)
Step 5: Increase with Sets of 3 Single Crochet
- Chain 1
- 3 sc, 2 sc in next stitch – repeat around
- Close round with slip stitch
- (Total 30 sc)
Step 6: Increase Changing Repeat Pattern
- Chain 1
- Work pattern: 1 sc, 2 sc in the same stitch, then 4 sc, increase, 4 sc, increase repeating
- Close round with slip stitch
- (Total 36 sc)
Step 7: Increase with 5 Sc Sets
- Chain 1
- 5 sc, 2 sc in next stitch repeat
- Close round, (42 sc)
Step 8-10: Increase with Larger Blocks
- Chain 1
- Round 8: 3 sc, increase, 6 sc, increase repeat
- Round 9: 7 sc, increase repeat
- Round 10: 4 sc, increase, 8 sc, increase repeat
- Total counts: 48 sc, 54 sc, 60 sc respectively
Step 11-20: Straight Rounds (No Increase)
- Chain 1
- Work straight rounds of sc over each stitch
- Maintain 60 sc each round
- Do this for 10 rounds total
Step 21-30: Decreasing Rounds to Shape the Head
- Chain 1
- Work rounds with:
- 4 sc, decrease (sc 2 together) repeat (54 sc)
- 7 sc, decrease repeat (48 sc)
- 3 sc, decrease, 6 sc, decrease repeat (42 sc)
- 5 sc, decrease repeat (36 sc)
- 2 sc, decrease, 4 sc, decrease repeat (30 sc)
- 3 sc, decrease repeat (24 sc)
- 2 sc, decrease repeat (18 sc)
- 1 sc, decrease repeat (12 sc)
- Stuff the head firmly with fiberfill before decreases reduce opening
Step 31: Final Round and Finish
- Work one last round of sc without decreasing (12 sc)
- Fasten off, leave a long tail for sewing the head onto the blanket
Bunny Hands (Make Two)
Step 1: Magic Circle
- Make a magic circle, chain 1
- Work 6 sc inside the circle, close with slip stitch
Step 2: Increase Round
- Chain 1
- Work 2 sc in each stitch (12 sc)
- Close with slip stitch
Step 3: Increase with Spacing
- Chain 1
- 1 sc, 2 sc in next stitch repeat around (18 sc)
- Close slip stitch
Step 4: Increase Round
- Chain 1
- 1 sc, 2 sc in next stitch, 1 sc, 2 sc in next stitch repeat
- Close slip stitch (24 sc)
Step 5: Larger Increase Round
- Chain 1
- 7 sc, increase repeat twice (27 sc)
Step 6-7: Straight Rounds
- Chain 1
- Work 2 rounds sc over each stitch (27 sc each)
Step 8: Change Yarn Color (Optional for Detail)
- Use slip stitch to join new color
- Work one round sc with new color (27 sc)
Step 9-11: Decreasing Rounds
- Chain 1
- Round 9: 7 sc, decrease repeat (24 sc)
- Round 10: sc each stitch (24 sc)
- Round 11: 2 sc, decrease repeat, finish with one sc (18 sc)
Step 12-13: Straight Rounds
- Chain 1
- Work 2 rounds sc each stitch (18 sc)
Step 14-20: Decreasing Rounds Continue
- Round 14: 2 sc, decrease repeat, finish with four sc (15 sc)
- Round 15: sc each stitch (15 sc)
- Round 16: 13 sc, slip stitch to close (14 sc)
- Round 17: sc each stitch (14 sc)
- Round 18: 12 sc, slip stitch close (13 sc)
- Round 19-20: sc each stitch (13 sc)
Step 21: Final Decreasing Round
- 11 sc, slip stitch close (12 sc)
- Fasten off and leave a tail for sewing
Stuff hands lightly with fiberfill before closing.
Bunny Ears (Make Two)
Step 1: Magic Circle
- Make magic circle, chain 1
- Work 6 sc in circle, close with slip stitch
Step 2: Increase Round
- Chain 1
- 1 sc, 2 sc in next, repeat alternating (9 sc)
Step 3: Straight Round
- Chain 1
- 9 sc, close with slip stitch
Step 4: Increase Round
- Chain 1
- 1 sc, 2 sc in next repeat (12 sc)
Step 5: Increase Round
- Chain 1
- 3 sc, increase repeat (15 sc)
Step 6: Increase Round
- Chain 1
- 2 sc, 4 sc, increase repeat
- Finish with 2 sc, close with slip stitch (18 sc)
Step 7: Straight Rounds
- Chain 1
- Work 6 rounds sc (18 sc)
Step 8: Decreasing Round
- Chain 1
- 5 sc, decrease repeat (15 sc)
Step 9: Straight Round
- Chain 1
- 15 sc
Step 10: Final Decreasing Rounds
- Continue to decrease gradually until the ear shape is formed
- Fasten off and leave tail for sewing
- Block ears lightly by shaping with fingers or pins as you assemble
Blanket Construction
Step 1: Foundation
- Chain 4, close with slip stitch to form a ring
- Chain 5 (counts as 1 dc + 2 ch)
- Work 1 dc, ch 2 eight times into ring – Total 9 dc and 8 ch-2 spaces around
- Close with slip stitch in 3rd chain of starting chain-5
Step 2: Round 2
- Slip stitch to first ch-2 space
- Chain 3 (counts as dc)
- Work 2 dc in same ch-2 space
- Ch 2, 3 dc in next ch-2 space repeat around
- Close with slip stitch
Step 3: Round 3
- Slip stitch to second dc of the first cluster
- Chain 3
- 2 dc in ch-2 space, dc over next dc repeat around
- Close with slip stitch
Step 4: Subsequent Rounds
- Repeat the pattern increasing stitches between clusters by working columns on previous rows’ spaces and starting chains
- Alternate groups of columns with chain-2 spaces creating a textured, airy blanket fabric
- Continue until desired blanket size is reached, approx 20 rows in the sample
Step 5: Color Changes (Optional)
- Add stripes in green and off-white (or any preferred colors) by changing yarn color at the end of a row using slip stitch method
Assembly
Step 1: Sew Hands
- Position hands on the blanket around the second row
- Use yarn needle and matching yarn to sew securely
Step 2: Sew Head
- Position head centered aligned with the second row
- Sew carefully ensuring it is firmly attached
Step 3: Embroider Eyes
- Mark eye position opposite the hands, about row 13
- Use black yarn or embroidery thread to stitch eyes
- Use a backstitch or satin stitch to form two eyes symmetrically
Step 4: Attach Ears
- Sew ears to the top of the head, shaping slightly for natural curve
Tutor’s Suggestions
- Use stitch markers to count rounds easily, especially during increases and decreases.
- Stuff parts firmly but not overly tight for a plush yet shapeable bunny.
- Change colors in the blanket carefully, pulling up loops under stitches for neat joins.
- Practice decreasing stitches evenly for smooth shaping.
Uses
- Baby toy and comfort blanket
- Gift for new parents or children
- Nursery decoration
Tip
Work slowly on shaping rounds, counting carefully, especially on decreases to avoid holes or misshaping. Use soft cotton yarn for baby-safe toys and blanket, and always secure yarn tails well during assembly.
Conclusion
This lovely baby bunny and blanket set is a rewarding intermediate project combining shaping, texturing, color changes, and assembly. Its soft cotton yarn and thoughtful design make it perfect for babies and toddler gifts. With patience and care, you’ll create a charming heirloom toy to cherish or share.
Leave a Reply