
Wear up in style with this Crochet Granny Square Cardigan Pattern with colorful squares cozy fit and a playful look perfect for cool breezy days.

Stylish Crochet Granny Square Cardigan Pattern with Classic Squares
A cozy afternoon where the sun is shining just right, and you wrap yourself in a beautiful patchwork of colors, that’s exactly the feeling this jacket brings. Made from many little squares, each one lovingly crocheted by hand, it comes together like a bright, soft puzzle. These colorful squares mix and match, creating a jacket full of life and warmth. Lightweight yet snug, it’s perfect for chilly days when you want comfort without bulk.

Wearing it feels like carrying a happy, handmade treasure that adds joy to your everyday style. Whether you pair it with jeans or dresses, this jacket makes every outfit special. It’s not only charming but also great for gifting, spreading smiles and warmth wherever it goes. This colorful, cozy jacket is a wonderful way to brighten your day and stay comfortably stylish.
Crochet Granny Square Jacket Pattern
Materials Needed
- Yarn: Lazy Cotton Gold or any yarn of your choice (3 colors used)
- Crochet hooks: 3.5 mm (for squares), 3.0 mm (for joining)
- Darning needle
- Stitch markers
- Scissors
- Measuring tape
Special Features
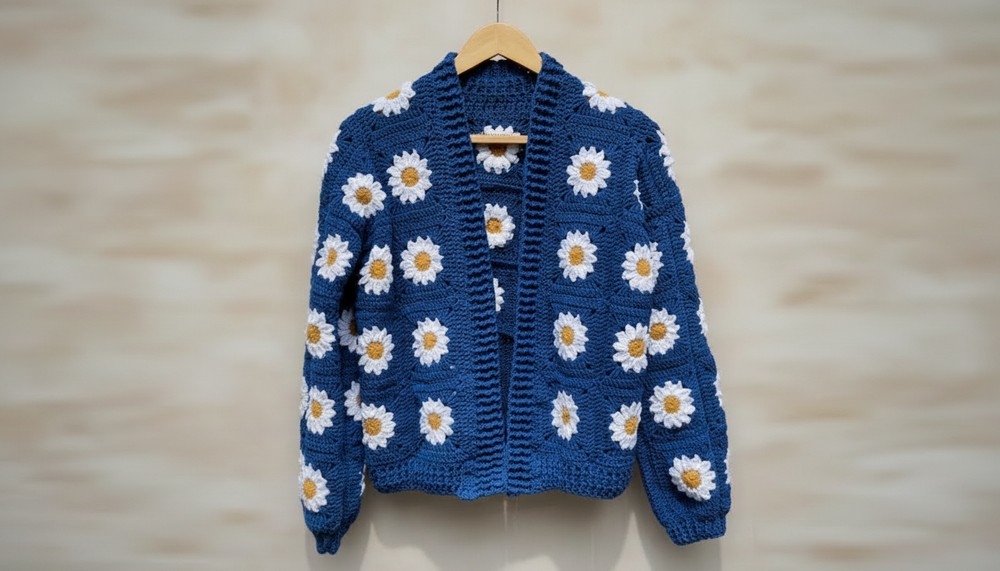
- Uses colorful Daisy Granny Squares (tutorial linked)
- Customizable sizes by adjusting square size or count
- Ribbing details on sleeves, bottom, and neckline with front post/back post double crochet for texture
- Versatile styling with options to add buttons or leave open
Difficulty Level
Beginner to Intermediate – works well for those familiar with basic granny squares and crochet joins. Ribbing and shaping add moderate complexity.
Pattern Steps
1. Make Granny Squares
- Crochet 64 granny squares (4 inches each approx.) following the Daisy Granny Square pattern (linked).
- Block squares to even out size.

2. Calculate Size and Layout
- For a medium size:
- Bust approx. 42 inches → half is 21 inches.
- Each square roughly 4 inches wide → 5 squares per row = 20 inches width, close enough.
- Panels layout:
- Back panel: 5×4 squares
- Front panels (left and right): approx. 5 squares wide (including shoulder squares) and 4 squares long
- Sleeves: 3 squares wide by 4 squares long
- Shoulder panels (2 squares per shoulder) connect front and back and contribute to sleeve width.

3. Join Squares Using Single Crochet Join
- Use 3.0 mm hook for joining squares (smaller than hook used for squares).
- Join wrong sides together, aligning chains and stitches carefully.
- Insert hook through first chain space on each square, make a single crochet stitch for joining.
- Work joins in rows, then join rows to form panels.
- Join shoulder squares to front and back panels.
- Join sleeve panels similarly and attach sleeves to body at shoulder squares.

4. Join Side and Sleeve Seams
- Fold jacket to align the side seams (from sleeve end to body bottom).
- Single crochet seam from underarm down to bottom edge on both sides, with wrong side facing out for clean finish.
5. Make Sleeve Cuffs (Ribbing)
- Attach yarn at sleeve seam edge.
- Round 1: Chain 3 (counts as first double crochet), decrease by working two double crochets together (dc2tog) around to scrunch cuff. Slip stitch to join.
- Round 2: Chain 3, double crochet (dc) in each stitch around.
- Rounds 3-5: Alternate front post double crochet (fpdc) and back post double crochet (bpdc) stitches for ribbing texture. Slip stitch to close rounds.
- Fasten off and weave ends.

6. Make Bottom Ribbing
- Attach yarn at bottom edge corner.
- Row 1 (working in rows): Chain 3, dc in every stitch and chain space across all joined squares, including chain spaces at joins.
- Row 2: Chain 3, turn, dc in every stitch.
- Row 3-6: Alternate between fpdc and bpdc, maintaining ribbing pattern as in sleeves.
- Fasten off and weave ends.
7. Make Neckline Ribbing
- Starting at the bottom of the neckline (after bottom ribbing), attach yarn.
- Chain 3, dc across neckline edges following same ribbing pattern: alternating fpdc and bpdc for 6 rows.
- At shoulder seam corners, crochet 4 double crochets together to create shaped neckline scrunching and definition.
- Finish off and weave ends.

Tutor’s Suggestions
- Use a smaller hook for joining to tighten seams.
- Customize size by adjusting square count or size: smaller hook/squares for smaller size or more squares for bigger size.
- Add buttons if you like or wear open as a casual cardigan.
- Blocking the squares before assembly greatly improves uniformity and final look.
Uses
- Perfect for casual wear in cooler weather.
- Great gift idea made from colorful granny squares.
- Mix and match granny square patterns for unique designs.
Tip
When joining squares and sewing seams, always keep the wrong sides facing you to ensure all joins and seams are neat and hidden inside the jacket.
Conclusion
This granny square jacket pattern is a wonderful way to combine colorful crochet motifs into a wearable, cozy piece. With simple techniques and customization options, it’s perfect for those who want to practice their granny squares while creating a fun and fashionable cardigan.
Leave a Reply