
Mark special moments with this Crochet Graduation Bear Amigurumi Pattern offering joyful charm easy steps and a keepsake bear made for proud milestones.

Stylish Crochet Graduation Bear Amigurumi Pattern for Special Days
Fresh charm shines through a small celebratory bear that feels warm and friendly at first glance. Made with simple stitches and clear steps this project suits beginners who want steady progress without stress. Its neat cap and tiny gown add instant personality while keeping the shape soft and balanced. The size stays manageable making it easy to hold count stitches and fix small mistakes. Gentle curves smooth limbs and a sweet face give the bear a calm joyful look.

This piece works well as a graduation keepsake desk buddy party accent or thoughtful surprise. Colors can match school themes or personal favorites for a special touch. Yarn choice stays flexible letting newcomers practice tension without worry. As a finished gift it holds meaning and lasts beyond the big day. Overall the Crochet Graduation Bear Amigurumi pattern brings beauty purpose and confidence to early crochet projects for absolute beginner friendly results.
Crochet Graduation Teddy Bear Pattern
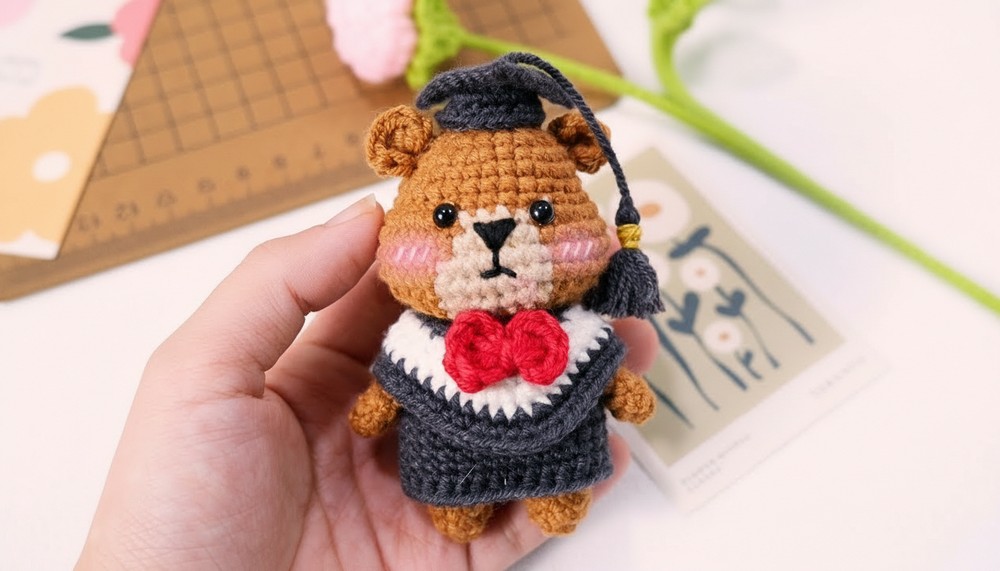
Special Features
- Includes accessories: graduation gown, cap, and bow tie
- Uses multiple yarn colors for realistic detailing
- Attachable keychain option to use the bear as a pendant
- Uses 5mm safety eyes for added personality
Difficulty Level
Beginner to Intermediate: Basic stitches are used, but color changes and shaping require attention. Beginners will find this tutorial clear and supportive.
Materials Needed
- 50g cotton yarn (approx. 1 ml amount) in coffee brown, gray-white, white, black, red, and orchid colors
- 5mm animal safety eyes (pair)
- Crochet hook size 2.5 mm
- Scissors, sewing needle, marking pins
- Stuffing cotton
- Glue for assembly parts (optional)
Step-by-Step Pattern
Head
- Begin with brown yarn using a 2.5 mm hook. Create a magic circle.
- Round 1: Crochet 6 single crochet (sc) stitches into the magic circle and join with a slip stitch.
- Round 2: Chain 1, increase in each stitch (2 sc in the same stitch) — total 12 stitches.
- Round 3: Alternate 1 sc, increase, repeat — total 18 stitches.
- Round 4: 1 sc, 1 increase, repeated — total 24 stitches.
- Round 5: Crochet 3 sc, increase; repeat for a total of 30 stitches.
- Rounds 6–8: Crochet 30 sc evenly, no increases.
- Round 9: Start color changes — crochet 4 sc gray-white, 6 coffee brown, 8 white sc for nose details, total 42 stitches.
- Round 10: Crochet 18 coffee brown, 6 off-white, 18 coffee brown stitches.
- Rounds 11–12: Alternate 17 eggplant color, 8 off-white, and 17 coffee brown stitches, totaling 42 stitches.
- Round 13: Decrease stitches with color changes following the pattern to 30 stitches.
- Rounds 14–15: Continue decreasing as per instructions to shape and finish the head.


Stuff the head firmly with cotton before closing.
Ears (Make 2)
- Create magic circle and crochet 4 double crochets (dc).
- Continue with half double crochets (hdc), then fasten off, leaving yarn to sew onto head.
Arms (Make 2)
- Create magic circle, crochet 7 single crochet (sc).
- Crochet 7 sc per row for 5 rows without increasing.
- Fold and join sides with 3 sc stitches and sew to body.
Legs and Body
- Start with a magic circle, crochet 6 sc for the leg base.
- Round 2: Increase gradually to 8 stitches.
- Crochet even rows with 8 stitches for shaping.
- After making the second leg, connect legs with additional chains and crochet across both legs to form the body.
- Crochet upwards following increases and decreases up to 28 stitches per row, completing body shape.

Stuff legs and body as you go.
Graduation Gown
- Chain 26 stitches, join to form a circle.
- Row 1: Crochet 26 sc.
- Row 2: Crochet 28 sc with increases.
- Row 3: Crochet 32 sc with increases.
- Row 4: Crochet 40 sc with increases.
- Change yarn color to black for the outer gown.
- Row 5: Crochet 16 sc.
- Continue shaping with increases up to 44 sc.
- Finish bottom half with half double crochet (hdc) stitches and tidy edges.

Graduation Cap
- Chain 9 stitches, crochet 8 sc starting from the second chain stitch.
- Crochet evenly for 7 rows (8 sc per row), no increases.
- Create a flat square for the top cap and attach circular band using chaining and slip stitches.
- Attach a strap to the center with stitching or glue.

Bow Tie
- Using red yarn, create a magic circle and crochet 3 stitches into it.
- Work multiple double crochet sequences with chain stitches to form bow shape.
- Cinch in the middle by tying yarn tightly and shape the bow.

Assembly
- Sew all parts together starting from the head to the body.
- Attach ears, arms, and legs securely.
- Dress the bear in the gown and cap.
- Sew or glue the bow tie in place.
- Attach eyes and embroider or sew the nose and mouth. Use glue as needed for security.
- Add a keychain if desired for portability.

Tutor’s Suggestions
- Use stitch markers to remember rounds and decreases.
- Stuff firmly but avoid overstuffing to keep the bear cuddly.
- Follow color changes carefully for best appearance.
- Watch the video alongside pattern instructions for visual aid.
Uses
- Perfect as a graduation gift or keepsake
- Can be used as a keychain or bag charm
- Lovely home décor piece for special celebrations
- Great learning piece for beginners advancing to colorwork and shaping
Tip
When changing yarn colors, leave a 2-3 inch tail on each side to weave in later neatly — this avoids loose ends and keeps your work tidy.
Conclusion:
This Graduation Teddy Bear crochet pattern offers a charming and achievable project that helps beginners practice shaping, color changes, and assembly. Completing it brings joyful satisfaction and creates a memorable gift for graduates and crochet lovers alike.
Leave a Reply