
Wrap up in color using this Crochet Granny Square Sweater Pattern bringing cozy warmth bold blocks and a happy retro look for cool days ahead today.

Fresh Crochet Granny Square Sweater Pattern for Modern Style
This cozy sweater is made from colorful little squares that come together to create a warm and charming piece of clothing. Each square has its own special pattern, making the whole sweater full of life and joy. It’s soft and comfy, perfect for cool mornings, chilly evenings, or breezy days when you want to stay warm without feeling bulky.
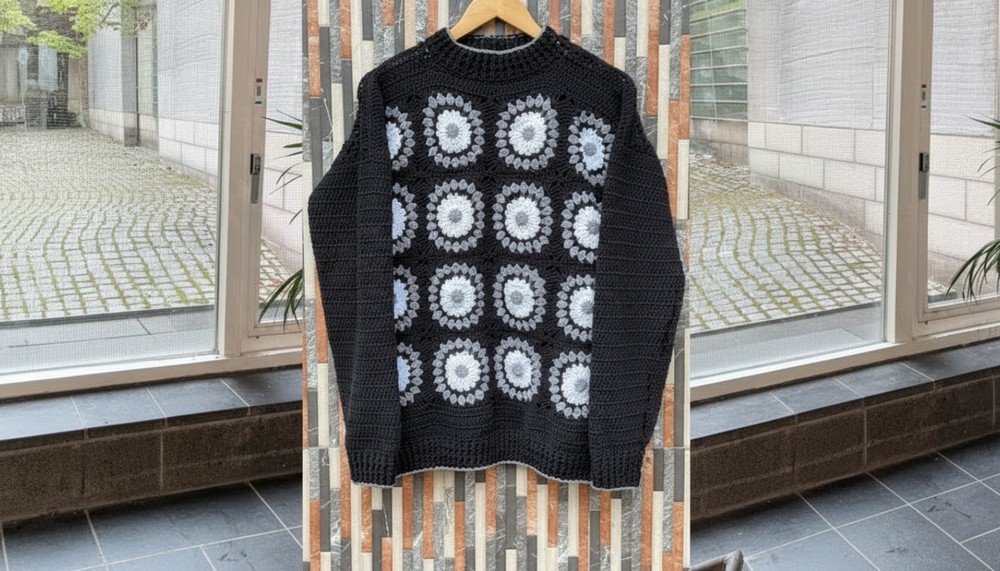
The bright and cheerful colors bring happiness to any outfit and make you stand out in a crowd. You can wear it with jeans or skirts for a casual, fun look or layer it over your favorite outfits for added warmth. This sweater shows the love and skill in every stitch, giving you a special feeling when you put it on. It’s not just clothes, it’s a cozy hug you can wear, full of personality and hand-made beauty.

Crochet Granny Square Sweater Pattern
Level of Difficulty
Intermediate – Requires knowledge of double crochet, front and back post double crochet, increasing/decreasing, and joining panels with single crochet.
Special Features
- Two-panel construction (front and back) with an open neckline
- Textured ribbing with alternating front and back post double crochet
- Shoulder seams joined with single crochet for durability
- Sleeves worked from cuff upward, shaped with increases
- Neat slip stitch edging for a polished finish
Materials Needed
- Two colors of yarn (or as desired)
- 4.0 mm crochet hook (or size matching your yarn)
- Stitch markers
- Scissors and yarn needle
- Tape measure
Step-by-Step Pattern
Back Panel
- Start by ensuring your back panel has the same number of rows as your front panel—here, 95 rows.
- For the first 3 rows, make normal double crochet (dc) stitches across (95 stitches per row).
- On row 4, mark the middle stitch (e.g. stitch number 31).
- Work double crochet stitches from the edge to stitch 31.
- Chain 1, then cut your yarn.
- Attach yarn on the opposite side and repeat: dc to stitch 31, chain 1, cut yarn.
- This creates a small center space (gap) similar to the front panel.


Joining Shoulder Seams
- Align front and back panels with wrong sides facing each other.
- Using a long yarn tail, join the panels with single crochet (sc) stitch in corresponding stitches starting from the edges, joining to the center.
- Repeat for both shoulder seams, ensuring neat and even joins.

Working the Round Neckline
- Attach yarn at the center back neckline, removing stitch markers as needed.
- Chain 3 (counts as first dc).
- Work 1 double crochet (dc) in every stitch evenly around the neckline, including edges of front and back panels.
- When working across the top edge of front and back panels, put 2 dc in every dc to accommodate the curve.
- Join with a slip stitch to the top of the starting chain 3 to complete round 1.

Ribbing Rows (Neck Ribbon)
- Round 2: Chain 3, turn.
- Alternate between front post double crochet (fpdc) and back post double crochet (bpdc) stitches across the round to create ribbing texture.
- Front post: yarn over, insert hook from front around post of stitch, yarn over, pull through, complete stitch.
- Back post: yarn over, insert hook from back around post, yarn over, pull through, complete stitch.
- For shaping, decrease on shoulder seams by working two fpdc stitches together at shoulder corners.
- Round 3: Repeat ribbing stitch pattern following decreases until neckline cinches nicely.
- Rounds 4 & 5: No decreases, just fpdc and bpdc alternating. Finish round 5 with slip stitch and chain 1; cut yarn.

Sleeves
Measurements & Preparation
- Sleeve length: Adjusted sleeve length = Sleeve length desired minus (Half chest width minus shoulder width), e.g. 25 in – 3 in = 22 in.
- Sleeve width: Calculate half circumference by measuring front and back panel sides (e.g. 9 in per side = 18 in total circumference).
Cuff (Sleeve Opening)
- Make slip knot.
- Chain based on cuff width + 3 chains for turning (e.g., chain 37 + 3 = 40 chains).
- Dc in 4th chain from hook and in each chain across, ending with the same number of stitches as your chain count (e.g., 38 dc).
- Rounds 2–5: Work alternating front post double crochet and back post double crochet ribbing.
Main Sleeve Body
- Row 1: Chain 3 (counts as dc), increase by making 2 dc at the beginning and end of the row, 1 dc in each stitch across.
- Rows 2 & 3: Repeat increase row as above (2 dc at beginning and end), continuing ribbed texture with fpdc and bpdc.
- Rows 4–6: No increases; maintain ribbing in every stitch.
- From Row 7 onwards, increase every 4th row:
- Row 7: Increase row (2 dc at each end)
- Rows 8, 9, 10: No increase
- Repeat pattern until sleeve width matches your measurement (e.g., 18 in or 62 stitches).
- If sleeve length is not enough after reaching width, continue straight rows without increases until desired length.
Joining Sleeves to Body
- Mark sleeve edges and sweater armholes to correspond stitch counts.
- With wrong sides facing, join sleeves to body panel edges using single crochet stitch, aligning marks to ensure fit.
- Join sides of sweater body from underarm to hem using single crochet similarly.
- Continue joining cuff and sleeve edges by single crochet.
Final Edging
- Add a neat finish by working slip stitches around the neckline, cuffs, and bottom edge using a contrasting yarn or matching yarn.
- Insert hook into stitch, chain 1, make slip stitch in next stitch.
- Repeat around edges for a clean polished look.
Tutor’s Suggestions
- Always crochet panels with wrong sides facing inward when joining to keep seams neat.
- Use stitch markers to keep track of increases, decreases, and middle stitches for shaping.
- Adjust measurements frequently to ensure perfect fitting as you go.
- Blocking sweater pieces before assembly improves drape and shape.
Uses
This cozy crochet sweater is versatile for cool weather layering, ideal for casual and semi-formal wear. Customizable in size and color, it’s a rewarding project offering warmth, style, and comfort.
Helpful Tip
To avoid bulky seams when joining, use a smaller hook size for single crochet seams. Also, alternate seam merges (e.g., sc in front loop only on one side, back loop on the other) for a smoother finish.
Conclusion
You’ve now created a beautifully constructed crochet sweater with a fitted back panel, textured neckline, shaped sleeves, and neat finishing edges. Take pride in your work—the combination of basic stitches and thoughtful shaping results in a fashionable, comfortable garment you’ll love to wear.
Leave a Reply