
Open up the potential of a Crochet Tie Up Top Pattern with its unique charm and versatility, allowing customization of colors, textures, and styles effortlessly.
Refresh your wardrobe and turn heads with a totally customizable piece that’s just as fun to make as it is to wear. Crocheting a stylish top has never been more fun. With its playful tie-up design, this fashion staple is perfect for layering over tank tops, dresses, or even rocking as a breezy beach cover-up. A Crochet Tie Up Top Pattern opens the door to endless creativity, letting you play with colors, stitches, and textures to match your personal style.
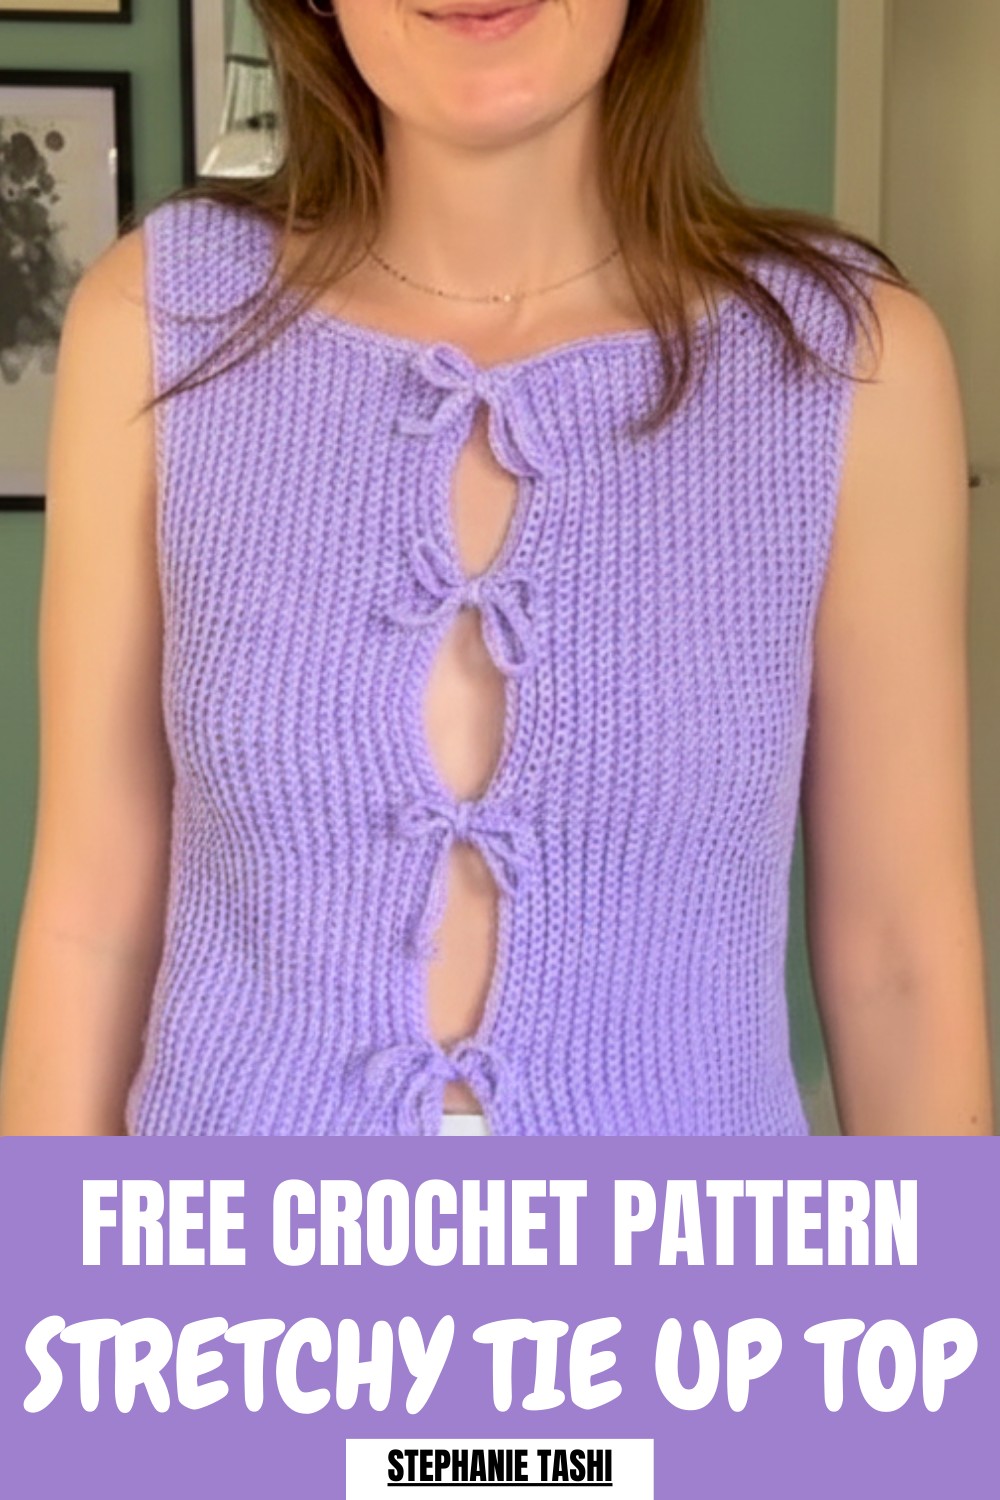
Free Crochet Tie Up Top Pattern for a Chic Look
Whether you prefer soft, feminine pastels or bold, vibrant shades, this top blends simplicity with eye-catching charm. Fun fact: crochet tie-up tops are beginner-friendly, making them an approachable choice for those diving into garment-making for the first time.

Crochet Tie-Up Top Pattern
Materials Needed
- Yarn:
- Approximately 160 g of lightweight yarn (#3, DK). Adjust according to the desired size or length.
- Hook:
- 4 mm crochet hook.
- Additional Tools:
- Stitch markers (optional, for placement).
- Scissors.
- Darning (tapestry) needle for weaving ends.
Overall Finished Measurements
- Length from shoulder to base: (varies by size).
- Width under arm: (based on size).
- Stretch allows for slight size adjustments, but if you want a fitted look, consider sizing down.
Customization Suggestions
- For a longer top, increase the length of the initial chain for panels.
- To ensure a perfect fit, compare the size against a top that you like the fit of.
Special Techniques
- Back Loop Single Crochet (BLSC):
- Work into the back loop to create stretchy textured ribbing.
- Joining Panels:
- Use slip stitches for underarm joins and darning needle stitches for shoulder joins.
- Decreases:
- Use 2- and 3-stitch decreases to create corners and seamless transitions.
Step-by-Step Pattern Instructions
Step 1: Front and Back Panels
Underarm Section
- Foundation Chain:
- Start with a slip knot and chain the required number of stitches based on your chosen size. For a size small, chain 47 stitches.
- Skip the first chain closest to the hook and begin single crochet into the second chain.
- Row 1:
- Work single crochet (SC) across the row.
- You’ll end the row with one fewer stitch than your foundation chain. For size small, you’ll have 46 stitches in Row 1.
- Row 2 and Beyond:
- Chain 1, turn your work, and begin back loop single crochets (BLSC) across the row.
- Continue in this pattern until the underarm section reaches the desired height.


Shoulder Section
- At the end of the underarm section, start the shoulder by chaining additional stitches.
- For size small, chain 39 stitches.
- Skip the first chain and single crochet into the second chain and each chain along.
- Join this chain to the main underarm section using back loop single crochets, giving you one extended row.
- Rows 3 Onward:
- Chain 1, turn your work, and continue working BLSC straight across.
- Work straight rows—no increases or decreases.


Neckline Dip (Front Panel)
- Mark stitches for neck shaping using stitch markers or counts based on your size.
- For a size small, mark 11 stitches from the top of one shoulder section.
- Work your way up to these marked stitches using BLSC and stop short where the marker is placed.
- Chain 1, turn your work, and continue stitching in straight rows from this new neckline.

Back Panel Adjustments
- The back panel is identical to the front, except that it does not have the neckline shaping.
- Simply continue with straight rows instead of stopping.

Step 2: Joining Panels
- Shoulder Joins:
- Place the right sides of the front and back panels together.
- Use a darning needle to whip stitch both shoulder seams.
- Underarm Joins:
- Work slip stitches into the sides of the panels to join underarm seams.
- Remember to work loosely to avoid tightening the fabric excessively under the arm.
Step 3: Armhole Trim
- Turn the top right-side out with the correct side facing you.
- Single Crochet Trim:
- Join yarn at the underarm seam and work single crochets evenly along the edge of the armhole.
- Use 2- or 3-stitch decreases at the corners as needed for smooth shaping.
- Additional Trim Rows:
- Complete at least one or two rows around the armholes to ensure tidy edges.
Step 4: Neckline Trim and Ties
Single Crochet Around Neckline
- Join yarn at the base of the neckline.
- Work single crochets evenly around the neckline, using 3-stitch decreases at all corners and 2-stitch decreases at shoulder joins for shaping.
Adding Ties
- Placement:
- Decide where you want the ties to be placed on either side of the neckline and mark using stitch markers.
- For size small, ties are spaced approximately 20 stitches apart.
- Creating Ties:
- At the marked stitches, chain 30 (or desired length) for each tie section.
- At the end of the chain, work single crochets back down into each chain until you reach the base of the stitch marker again.
- Continue adding ties evenly on both sides of the neckline.
Step 5: Finishing
Blocking
- To straighten the ties and panels, soak the top in lukewarm water and pin it to your desired shape on a flat surface to dry.
- Focus especially on the ties and neckline edges that may curl due to tension.
Final Words
Congratulations! Your tie-up crop top is complete. This highly adjustable design can be worn multiple ways—tie all ties, leave some undone, or even stitch the sides permanently for a traditional fit.
Tips for Maintenance
- Washing: Hand wash gently in cold water to preserve the stretch and texture.
- Storage: Fold the top carefully to avoid stretching the ties unnecessarily.
- Customization: Experiment with alternative colors, yarn textures, or even decorative embroidery for a unique look.
Leave a Reply