
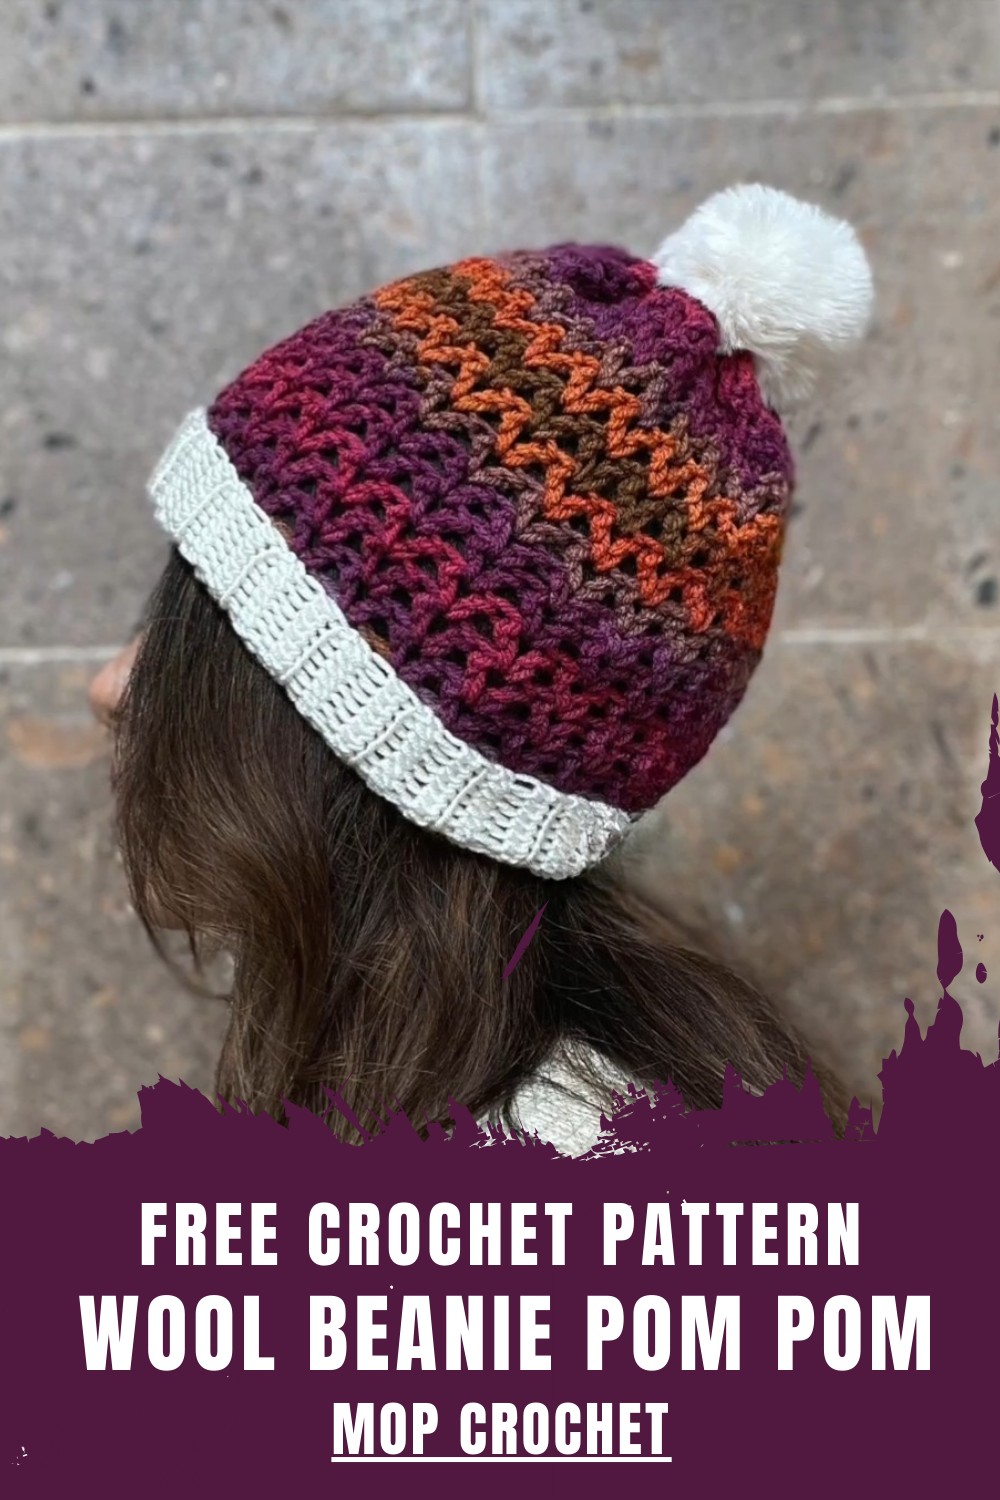
Surround yourself with the cozy charm of a crochet wool beanie pattern, perfect for staying warm in style while showing off your love for handmade accessories.
A beanie is more than just a way to keep your head warm; it’s a stylish accessory that adds charm to your outfit in any season. The free crochet wool beanie pattern brings both comfort and beauty together effortlessly. Soft wool yarn makes it cozy, while the intricate crochet design gives it a classic and appealing look. Perfect for chilly days, this beanie is both functional and fashionable, protecting you from cold winds while enhancing your overall appearance.
Crochet Wool Hat Free Pattern for Stylish Warmth
Its timeless texture pairs well with casual or outdoor attire, making it a go-to addition for daily wear or special winter outings. Lightweight and snug, it fits comfortably and looks great whether you’re staying indoors or heading outside. This handmade creation not only serves practical needs but also highlights the creativity and warmth behind crochet work, making it an ideal project for anyone looking to stay stylishly cozy.
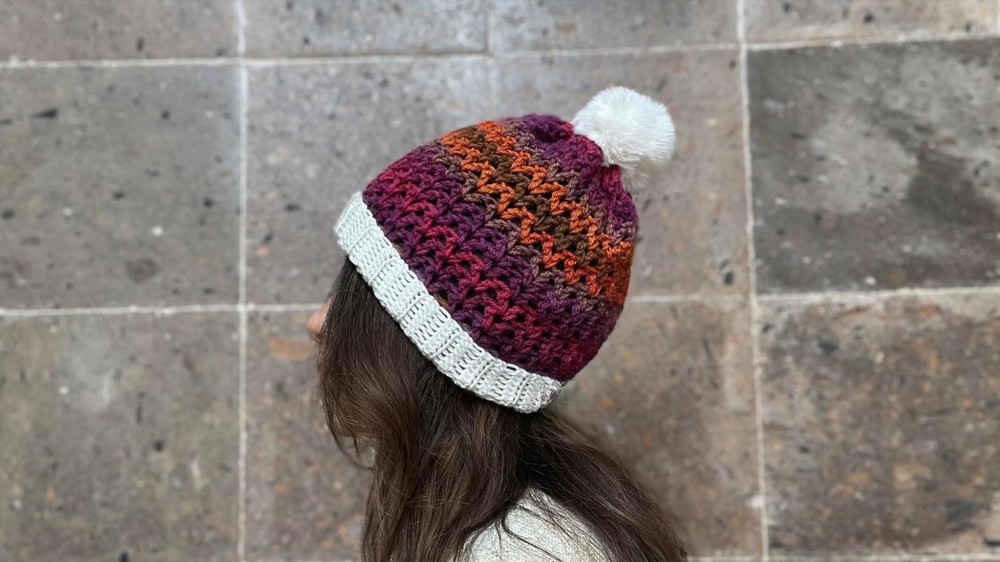
Crochet Hat Pattern with Stitch B and Pom-Pom
Materials List
- Yarn:
- 100g of crochet yarn suitable for hats.
- Recommended: Double-knit (DK) or 100% acrylic yarn for warmth and stretch. Choose one main color for the hat and an optional contrasting color if desired for the top of the hat.
- Hook Size:
- 4.5 mm crochet hook for the main pattern.
- Optional: Adjust the hook size if needed to achieve the desired tension.
- Other Supplies:
- Scissors.
- Wool or tapestry needle (for weaving ends and sewing).
- Pom-pom (optional): Choose pre-made or create your own.
- Stitch marker (optional) to mark the starting point of rows.
Skill Level
Intermediate – Suitable for those with prior experience in working with basic stitches, reading patterns, and sewing crochet pieces.
Key Abbreviations (US Terminology)
- Ch – Chain
- Sl St – Slip Stitch
- Sc – Single Crochet
- Hdc – Half Double Crochet
- Dc – Double Crochet
- St(s) – Stitch(es)
- B Stitch – A combination of stitches: (1 Dc, Ch 1, 1 Dc) worked into the same space.
Special Notes
- Tension: Maintain even tension throughout to achieve the correct fit. Verify your measurements after creating the foundation strip (spring).
- Customizable Width/Length: Adjust the starting chain count or row count for the foundation strip to create a wider/thicker brim or accommodate different head sizes.
- Ensure your brim row count is divisible by 3 to align with the “Stitch B” repeats.
Crochet Hat Pattern
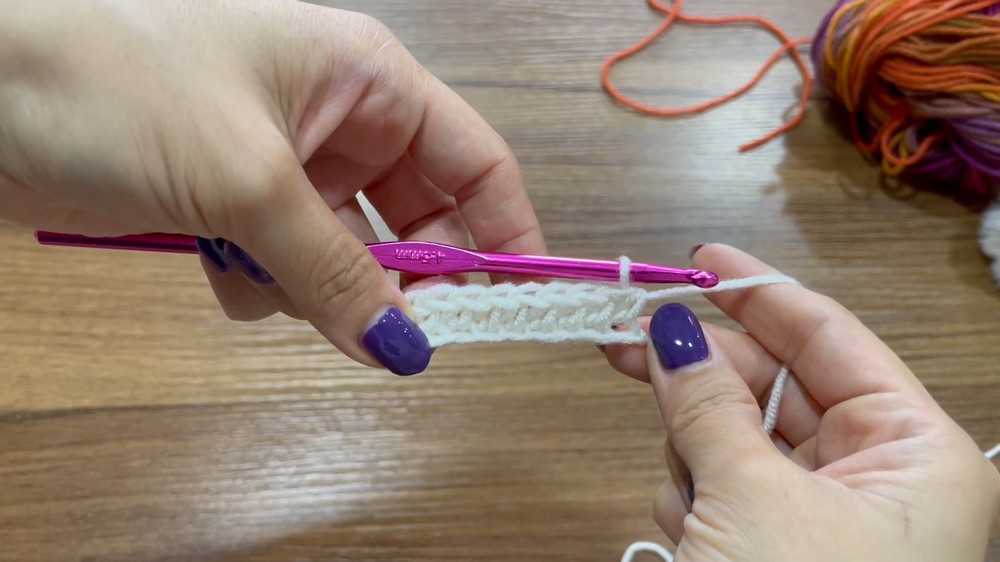
Step 1: Crochet the Brim (Foundation Strip)
- Start with the foundation chain:
- Begin with a slip knot on your hook.
- Chain 8 to create a strip approximately 5 cm (2 inches) wide.
- Tip: If you’d like a thicker brim, increase the chain count.
- Row 1:
- Ch 2 (does not count as a stitch), and starting in the third chain from the hook, work 1 Hdc in each chain across.
- Turn your work.
- You will have 8 Hdc across.
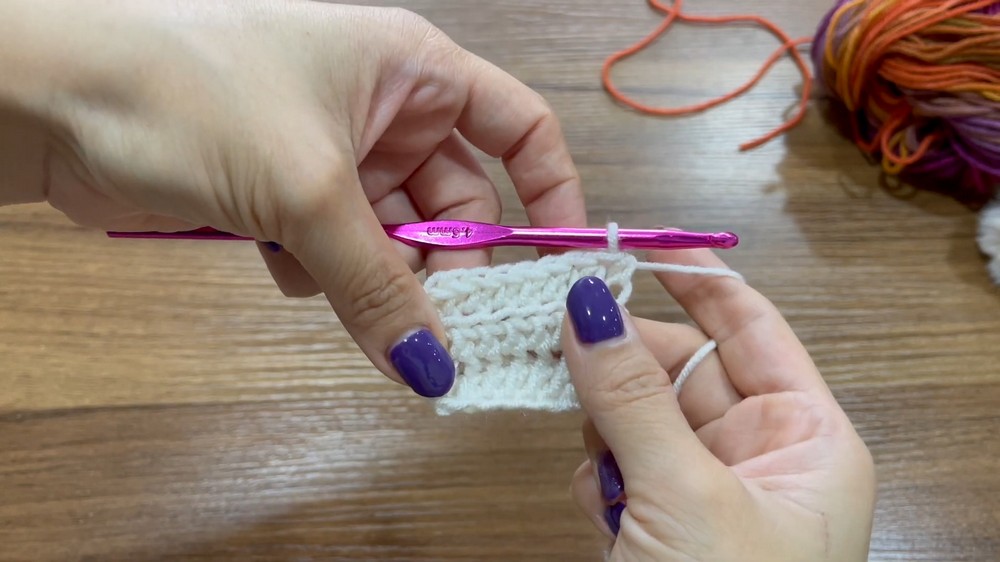
- Row 2 and Beyond:
- Ch 2, turn. Work 1 Hdc into the back loop only of each stitch across.
- Repeat this step for subsequent rows to create a ribbed texture.
- Continue for 39 Rows:
- Repeat Row 2 until the strip measures approximately 50 cm (20 inches) or is long enough to wrap comfortably around your head.
- Ensure the total number of rows is a multiple of 3 for the top pattern alignment.
Step 2: Join the Brim
- Fold the strip in half, bringing the starting edge and ending edge together.
- Sl St the edges together by working into both loops of the starting row and the back loops of the ending row.
- This will create a seamless join for the brim.
- Once joined, turn your work inside out so that the seam is on the inside (wrong side).
Step 3: Crochet the Body of the Hat (Using Stitch B)
Round 1: Establish the Base
- Ch 1 and begin working around the top edge of the brim.
- Work 2 Sc into each ribbed row of the brim to ensure a smooth transition.
- Tip: For 39 rows, you should have 78 Sc.
- Complete the round with a Sl St to the first Sc, then cut and fasten off if changing to a contrasting yarn color.
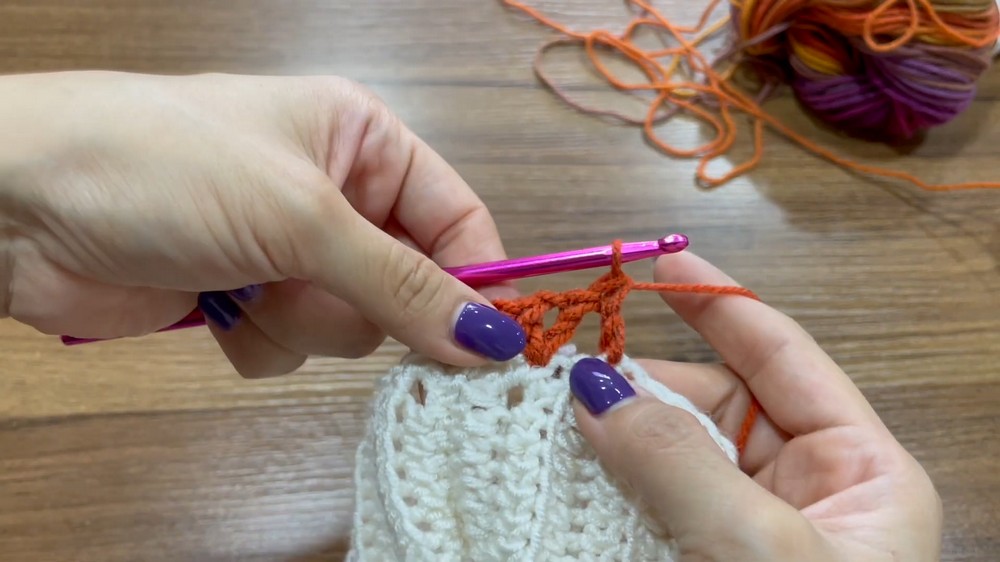
Round 2: Begin “Stitch B” Pattern
- Join your new yarn (if changing colors) and Ch 4 (counts as 1 Dc + Ch 1).
- Work 1 Dc into the same stitch where you started your chain.
- This creates your first “Stitch B.”
- Skip 2 stitches, then work 1 Dc, Ch 1, 1 Dc into the next stitch.
- Continue this pattern: Skip 2 stitches, then work (1 Dc, Ch 1, 1 Dc) into the next stitch.
- Complete the round with a Sl St into the 3rd chain of the starting Ch 4.
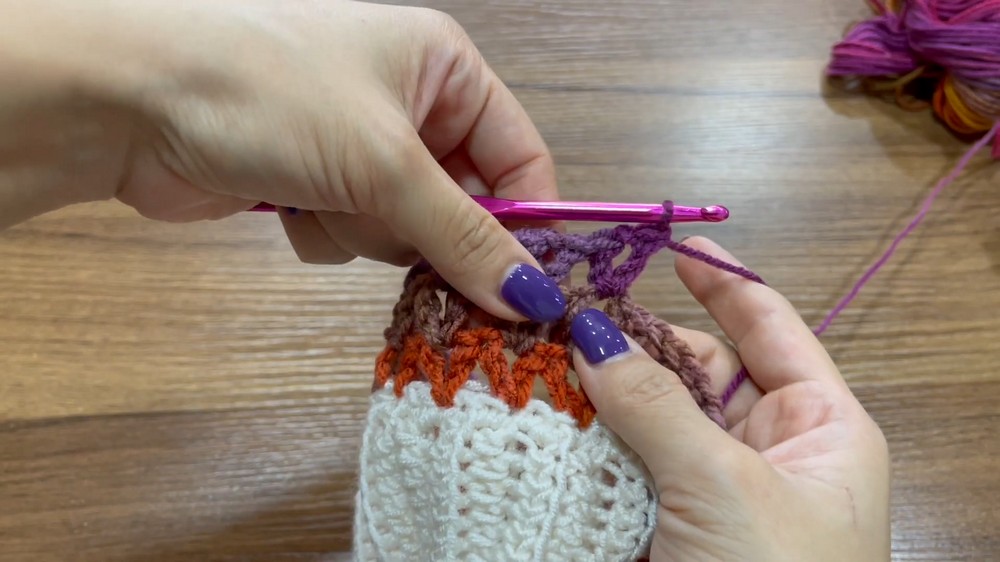
Round 3 and Beyond: Continue “Stitch B”
- Sl St into the first Ch 1 space of the previous round.
- Ch 4 (counts as 1 Dc + Ch 1).
- Work 1 Dc into the same Ch 1 space. This completes another “Stitch B.”
- Move to the next Ch 1 space and work (1 Dc, Ch 1, 1 Dc) into the space.
- Repeat this process, working “Stitch B” into all Ch 1 spaces around.
- Complete the round with a Sl St into the 3rd chain of the starting Ch 4.
- Repeat for a total of 16 rounds or until the hat measures 30 cm (12 inches) in height.
Step 4: Closing the Top of the Hat
- After completing the final round of “Stitch B,” cut your yarn, leaving a long tail for sewing.
- Use a wool needle to weave the tail through every Ch 1 space of the final round, pulling gently as you go to cinch the hat closed.
- Pull tight to fully close the opening and sew securely with several knots to hold it in place.
Step 5: Add a Pom-Pom (Optional)
- Attach a pom-pom to the top of the hat, either by sewing the elastic band securely or by tying it with yarn.
- Adjust and secure tightly to prevent it from loosening.
Finishing
- Weave in all loose ends using a tapestry needle, ensuring the edges and cinched top are neat and secure.
- Turn the hat right-side out to admire the clean finish.
Conclusion
Congratulations—you’ve created a beautiful crochet hat with a textured ribbed brim and intricate Stitch B pattern! The pom-pom adds a fun and stylish touch. This hat is functional, fashionable, and perfect as a gift or for personal use.
Pattern Correction
- Ensure an accurate count when stitching the “B Stitch” repeats. Skipping the correct number of stitches is crucial for the alignment of the pattern in each round.
- Use a stitch marker if needed to track the start and end of rounds.
Tips for Better Results
- Try On As You Go: Periodically test the hat length and fit to ensure it meets your preferences.
- Customize the Colors: Use variegated or gradient yarns for a playful look.
- Blocking Option: Block the hat lightly to relax the stitches and even out the texture.
Leave a Reply