
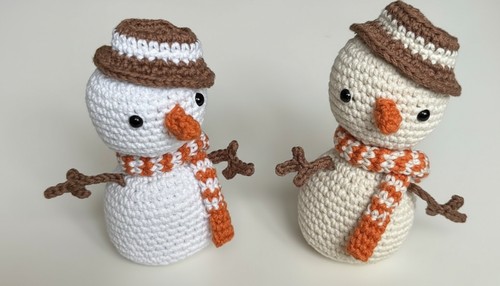
Easy Crochet Snowman Amigurumi Pattern for Seasonal Warmth

Using basic crochet techniques, this snowman pattern offers a stress-free project for beginners while remaining enjoyable for experienced crocheters looking for quick and meaningful projects. The unique combination of soft yarn and vibrant colors ensures an appealing and polished finish. Adding details like a scarf, hat, or buttons allows for fun personalization while improving your skills with assembling and shaping.
Not only does this project offer a relaxing way to spend your time, but it also rewards you with a long-lasting, handmade treasure. Suitable for festive decorating or gifting, this pattern reflects the care and creativity of its maker, making it a memorable addition to any holiday celebration.
Materials Needed
- 100% Cotton Yarn in white, orange (nose), brown (hat), and additional colors of your choice for the scarf.
- 2.2 mm Crochet Hook: Ensures a neat and defined finish.
- Stitch Markers: To mark the first stitch of each round.
- Tapestry Needle: For attaching details and hiding loose ends.
- Scissors: For clean yarn cuts.
- Stuffing or Fiberfill: For shaping the head and body.
- Safety Eyes (optional): Adds a polished and professional look to the face.
Special Features
- Festive Theme: Perfect for creating seasonal decorations or gifts.
- Detail-Oriented Design: Includes accessories like a scarf and hat for added charm.
- Beginner to Intermediate Friendly: Introduces increasing, decreasing, and working in rounds with clear, repetitive patterns.
- Versatile Style: Use different color combinations for unique outputs.
- Compact Design: Lightweight and suitable as a holiday ornament or tabletop décor.
Level of Difficulty
The snowman pattern is beginner-friendly but also enjoyable for intermediate crocheters. It involves basic crochet stitches, magic circles, and working in spirals, making it perfect for a confident beginner looking to improve consistency and learn techniques like invisible decreases.
Step-by-Step Instructions
Part 1: Making the Snowman’s Head
- Start with a Magic Circle:
- Wrap the yarn around your fingers, and create a magic circle (secure it with a chain 1).
- This chain is not a stitch, but serves to secure the circle.
- Round 1: Work 6 Single Crochets into the Magic Circle.
- Pull the loose end to close the loop tightly.
- Slip stitch into the first stitch to complete the round.
- R 2: Work 2 Single Crochets into each stitch around (12 stitches total).
- Insert a stitch marker into the first stitch for easier tracking.
- R 3: Alternate 1 Single Crochet in the first stitch, then 2 Single Crochets in the next (18 stitches total).
- Rounds 4-6: Continue increasing following the pattern: (1 Single Crochet in the first two stitches, 2 in the third, etc.). By Round 6, you should have 36 stitches.
- R 7-14: Work 1 Single Crochet in each stitch of the previous round (no increases). This stabilizes the shape of the head.
- Insert Safety Eyes: Place the eyes between Rounds 9 and 10, leaving 7 stitches between them. Secure with back buttons. Add stuffing to the head at this point.
- R 15-19: Begin decreasing by working invisible decreases every few stitches. By Round 19, reduce to 6 stitches.
- Finish the Head: Cut the yarn, secure it, and hide the tail using a tapestry needle.


Part 2: Creating the Body
- Round 20: Start by increasing (2 Single Crochets into each of the 6 stitches from the last round) to get 12 stitches.
- Round 21-25: Alternate between 1 Single Crochet and 2 Crochets for gradual increases until reaching 36 stitches.
- R 26-34: Continue working in single crochets without increases to shape the body.
- Round 35-38: Decrease the stitches in stages (use invisible decreases) until you reach 6 stitches. Stuff the body before the final decrease round.


3: Adding the Nose
- Use Orange Yarn: Create a magic circle and work 6 Single Crochets into it.
- Rounds 2-3: Work evenly around the stitches (6 stitches per round).
- Attach the Nose: Securely sew the tiny carrot-shaped nose between the eyes.

4: Making the Hat
- Base of the Hat: Start with a magic circle in brown yarn, and work up to 24 stitches per round by increasing evenly.
- Body of the Hat: Create texture with back-loop-only single crochets for one round, then work evenly in rounds with no increases.
- Color Change (Optional): Switch to white for a border or accent before finishing the hat.
- Attach the Hat: Sew it firmly to the snowman’s head.

5: Designing the Scarf
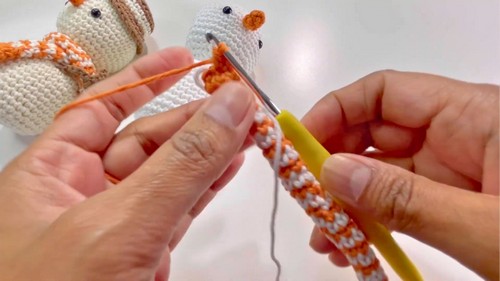
- Start with a Slip Knot: Use orange yarn, and chain 40-50 stitches depending on your desired length.
- Alternate Stripes: Change colors every few rows, alternating between orange and white.
- Attach the Scarf: Wrap it around the snowman’s neck, and secure it with a small invisible stitch.
Tutor’s Suggestions
- Use Stitch Markers: Mark the first stitch of every round to stay organized.
- Ensure Consistent Tension: This will keep the shape of your snowman neat.
- Stuff Firmly but Not Overly: Overstuffing can distort the shape, while under-stuffing might not provide enough structure.
Uses
- Holiday Décor: Perfect for Christmas tree ornaments or mantle displays.
- Gifts: A thoughtful, handmade snowman amigurumi makes a charming gift for friends and family.
- Play Toy: A safe and soft toy for children to enjoy during the holiday season.
Useful Tip
When working with crochet increases and decreases, always use stitch markers to avoid losing track of rounds. For an even finish, count stitches at the end of each round to ensure accuracy.
Conclusion
Crocheting this snowman amigurumi is a delightful way to blend creativity with festive joy. With its adorable details like the scarf, nose, and hat, it’s a project that’s sure to bring a smile to your face and those of your loved ones. Whether decorating your home or gifting to someone special, this pattern is a classic, timeless piece to cherish for years to come.
Leave a Reply