
Carry elegance with this crochet granny square handbag pattern that combines vibrant designs with practicality perfect for daily outings.

A beautiful and vibrant accessory can add charm to your outfits, and nothing stands out like a colorful handmade bag. A crochet granny square handbag pattern offers endless possibilities to create something truly unique and eye-catching. With its striking geometric designs and bursts of color, this bag showcase timeless elegance. Perfect for casual outings, shopping trips, or even special events, they are versatile enough to complement many occasions.
Delightful Crochet Granny Square Handbag Pattern That You’ll Cherish
Their soft yet durable texture provides comfort while carrying, making them practical and fashionable at the same time. Unique pattern on each granny square let creativity shine, allowing you to choose colors that match your style. Whether it’s a gift for someone you love or a personalized addition to your wardrobe, this bag design stands out with its charm and functionality. Express yourself through this stylish bag and enjoy the blend of beauty and usability it provides in day-to-day life.

Materials List
Required Items:
- Yarn:
- Ganga Olivia 3-ply acrylic yarn (or similar durable yarn).
- Two colors (e.g., cream and complementary color). You can use additional colors for a multi-color look.
- Approx. 300 grams total (adjust based on size or extra elements).
- Crochet Hook:
- 3 mm hook (or appropriate size for your yarn).
- Fabric for Lining (optional): To create a lined interior.
- Tapestry Needle: For sewing strips and granny squares together.
- Scissors: For cutting yarn.
- Stitch Marker (optional): To track the beginning of each round.
Key Abbreviations (US Terms)
- Ch – Chain
- Sl st – Slip Stitch
- Sc – Single Crochet
- Dc – Double Crochet
- Hdc – Half Double Crochet
- Puff – Puff Stitch
- Rep – Repeat
Special Notes
- Dimensions: Finished bag measures 13 inches x 13 inches. You can adjust the size by increasing or decreasing the number of granny squares.
- Granny Squares: The bag includes 18 granny squares (9 for the front and 9 for the back).
- Handle Length: The handle is created separately as a strip and attached with stitching. The length of the handle can be adjusted as needed.
- Customization: Use multi-color combinations, single colors, or a neutral palette to personalize your bag.
Pattern Instructions
Step 1: Granny Squares
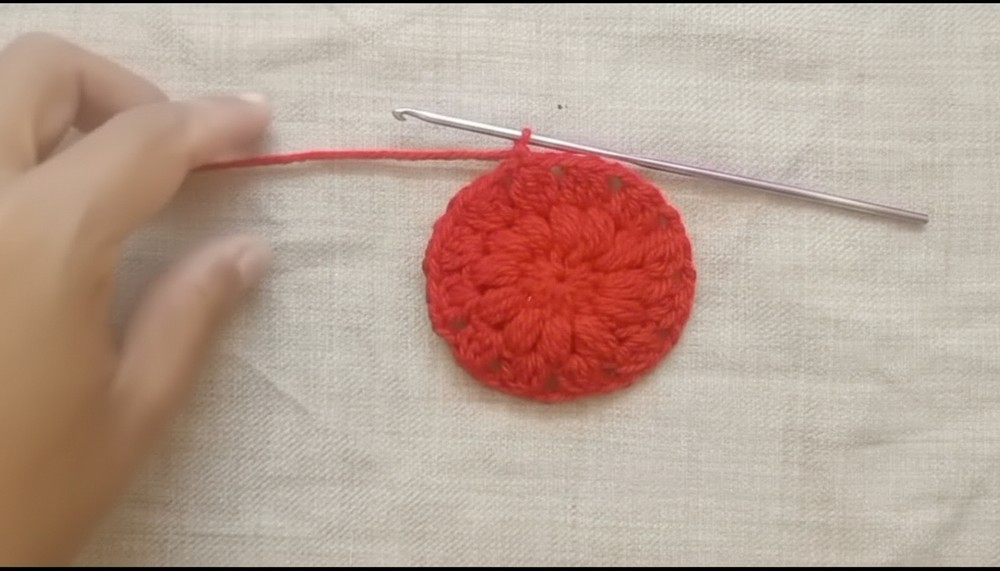
Round 1: Foundation Circle
- Wrap your yarn around your finger twice and secure it with a slip knot to form a magic ring.
- Ch 3 (counts as the first double crochet).
- Work 11 Dc into the ring.
- Total: 12 Dc (including the initial Ch 3).
- Tighten the loop by pulling on the tail end of the yarn.
- Sl st into the top of the initial Ch 3 to close the round.

Round 2: Puff Stitch Formation
- Ch 1, yarn over and insert the hook into the same space.
- Create a puff stitch:
- Pull up a loop 3 times (7 loops on the hook).
- Yarn over and pull through all 7 loops.
- Ch 1 to secure the puff stitch.
- Repeat 12 puff stitches, creating one puff in each Dc of Round 1.
- Sl st into the top of the first puff to finish the round.
Round 3: Half Double Crochet Clusters
- Ch 1, then work 3 Hdc into the same stitch.
- Ch 2 and work another cluster of 3 Hdc in the next space.
- Repeat the pattern (3 Hdc, Ch 2) around the circle to create 12 clusters.
- Sl st into the first Hdc to close the round. Fasten off.
Round 4: Adding the Second Color and Corners
- Join the second color yarn to any Ch-2 space from the previous round.
- Ch 3 (counts as the first Dc), then work 2 Dc into the same space.
- Ch 3, then work 3 more Dc into the same Ch-2 space (this forms the first corner).
- Ch 2 between the clusters, then work 3 Sc into the next Ch-2 space, followed by 3 Dc, Ch 3, 3 Dc in the next corner.
- Repeat this pattern around to create 4 corners. Use 3 Sc between each corner cluster.
- Sl st into the top of the first Dc from the round. Fasten off.


Step 2: Assemble the Bag
Joining Granny Squares
- Make a total of 18 granny squares.
- Arrange 9 squares for the front and 9 squares for the back.
- To join:
- Place two squares together with the wrong sides facing each other.
- Use a slip stitch along the back loops to join them.
- Repeat this for each square to join them into groups of 3 rows of 3 squares for each side (front and back).

Bag Construction
- Stitch the sides of the bag using the same slip stitch technique.
- Leave the top of the bag open for the handle and interior.

Step 3: Handle Strip
Creating the Strip
- Start with a slip knot and Ch 8.
- Work 7 Sc in each row:
- Row 1: Work Sc across the chain (7 Sc in total). Ch 1, turn.
- Row 2 onwards: Continue working rows of 7 Sc, turning at the end of each row.
- Repeat as many rows as required to achieve the desired handle length.
- Fasten off and weave in the ends.


Attaching the Handle
- Position the handle at the top corners of the bag.
- Use a tapestry needle to stitch the handle securely to the bag’s opening.
Step 4: Optional Additions
- Fabric Lining:
- Cut fabric slightly larger than the bag’s dimensions to allow for a seam allowance.
- Sew the fabric into a pouch shape, and attach it to the interior of the bag using a needle and matching thread.
- Zipper Installation:
- Attach the zipper to the fabric lining or directly to the top edges of the bag.
Conclusion
Your granny square handbag is now complete! This elegant project is perfect for gifting, daily use, or enhancing your personal wardrobe. The bag’s unique design combines functionality and style while showcasing your crochet skills.
Pattern Correction
- Ensure that you work evenly into the back loops when joining granny squares to prevent distortion.
- Double-check stitch counts in corners to maintain symmetry throughout the granny square pattern.
Tips for Beginners
- Blocking: Block the granny squares before assembling the bag to ensure they are flat and uniform in size.
- Consistency: Maintain consistent tension for smooth stitches.
- Custom Colors: Experiment with colors to create unique designs that reflect your personal style.
- Optional Hardware: Add metal clasps or embellishments for extra detail.

Leave a Reply