
Organize your essentials with this Free Crochet Card Wallet Pattern for a compact holder that keeps cards secure and adds charm to daily use.

Keeping your important cards safe can be simple and stylish at the same time. This lovely handmade design creates a small holder that looks neat and feels soft in your hands. Carefully stitched with strong yarn, it keeps bank cards, ID cards, and small cash secure without taking much space. Its smooth shape easily fits into a handbag, pocket, or backpack, making it perfect for daily use.
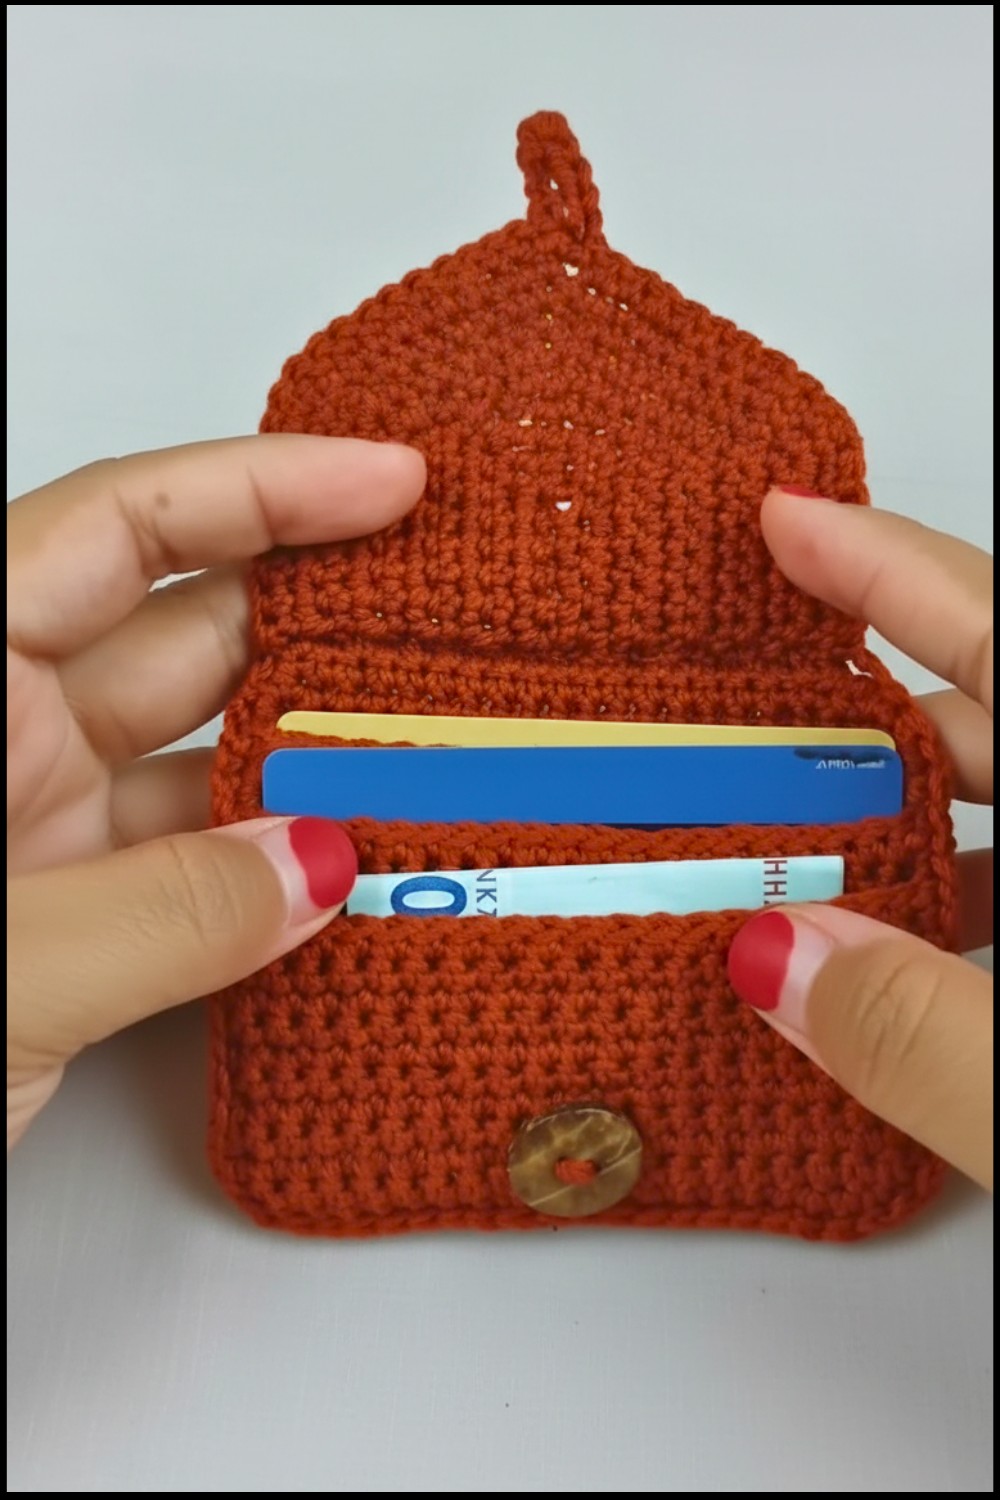
Bold Crochet Card Wallet Pattern Making Everyday Carry Exciting
You can carry it to the market, office, college, or while traveling. The beauty of this piece comes from its clean finish and the freedom to choose bright or soft colors that match your taste. It is not only useful but also adds a charming handmade touch to your everyday items. This crochet card wallet pattern offers a smart and attractive way to stay organized while enjoying something beautiful and practical every single day.

Materials
Yarn and Thread
- Polyester yarn in your preferred color (lightweight yarn is recommended).
Tools
- Crochet hook: Size 4mm (recommended for this pattern).
- Scissors for cutting yarn.
- Button for closure.
- Markers or safety pins to align layers before sewing.
Skill Level
Beginner to Intermediate.
Crocheters should be familiar with basic stitches like single crochet (sc), slip stitch (sl st), and chaining. Simple sewing techniques are required for assembly.
Key Abbreviations (US Terminology)
| Abbreviation | Meaning |
|---|---|
| ch | Chain |
| sc | Single Crochet |
| sl st | Slip Stitch |
| st(s) | Stitch(es) |
| yo | Yarn Over |
Special Notes
- Layer Dimensions: The number of rows for each panel differs to create visible layered compartments.
- Assembly: Use stitch markers to align the panels before sewing to ensure proper positioning.
- Customization: Adjust yarn thickness and hook size for a larger or smaller wallet as desired.
Pattern Instructions
Part 1: Wallet Panels
Step 1: Top Panel
- Begin with a foundation chain of 21 ch.
- Row 1: Work single crochet (sc) into the second chain from the hook and into each chain across. (20 sc).
- Row 2: Ch 1 (does not count as a stitch), turn, work 1 sc into each st across. (20 sc).
- Rows 3–18: Repeat Row 2 for a total of 18 rows.
- Fasten off and weave in the ends.

Step 2: Additional Panels (3 panels)
Repeat Step 1 with adjusted row counts to create the additional panels:
- Panel 2: 15 rows.
- Panel 3: 13 rows.
- Panel 4: 11 rows.
Each panel will have the same width but will reduce in height to create the layered look.

Part 2: Sewing the Layers Together
- Prepare for Assembly:
- Align the 4 panels starting with the largest layer at the base and the smallest on top.
- Insert markers or safety pins along the edges to secure positioning while sewing.
Step 1: Joining the Panels
- Use single crochet (sc) to sew the edges together.
- Begin at the bottom edge with the largest panel and work your way up, ensuring each panel is securely stitched.
- Work evenly along the edges to keep the layers smooth and uniform.

Part 3: Side Stitching
- Begin sc sewing along the side edges to connect the front and back panels, forming the body of the wallet.
- Ensure stitches penetrate all the layers to provide durability.
Part 4: Flap Closure
- Foundation Chain: Ch 7 ch.
- Row 1: Work sc into the second chain from the hook and into each ch across. (6 sc).
- Row 2: Ch 1, turn, work 1 sc into each st across. (6 sc).
- Row 3: Work 3 sc into the last st for rounding the edge. Continue working sc evenly along the opposite side of the foundation chain.
- Row 4+ Increase Rounds:
- At each marked point (corner holes), work 2 sc in one stitch to create width.
- Continue rounding the edges for uniformity, increasing as needed at corners.
- Total Rounds: Repeat for a total of 11 rounds until the flap reaches desired coverage. Fasten off and weave in the ends.

Part 5: Button Placement
- Fold the flap down onto the front of the wallet body to determine button placement.
- Sew the button securely onto the flap using thread or yarn.

Part 6: Final Assembly
- Align the flap with the wallet body.
- Using sewing thread or additional sc, ensure the flap is securely attached to the back panel of the wallet.

Conclusion
Congratulations! Your handmade crochet card wallet is complete. This simple yet functional design is perfect for everyday use or as a personalized gift. The layered compartments and secure flap ensure practicality, and the button provides a polished finish.
Pattern Corrections
- Ensure each row of sc aligns properly during sewing to avoid uneven edges.
- Double-check button placement before sewing. Incorrect positioning may affect flap closure.
Tips
- Use Markers: Align panels with stitch markers before sewing for accuracy.
- Texture Variation: Use contrasting colors for the flap or button decoration for added visual interest.
- Customization: The wallet size can be adjusted easily by increasing the foundation chain for width or adding rows for height.
Leave a Reply