
Transform your hydration routine with this stylish crochet water bottle holder pattern perfect for daily use and thoughtful gifting ideas.
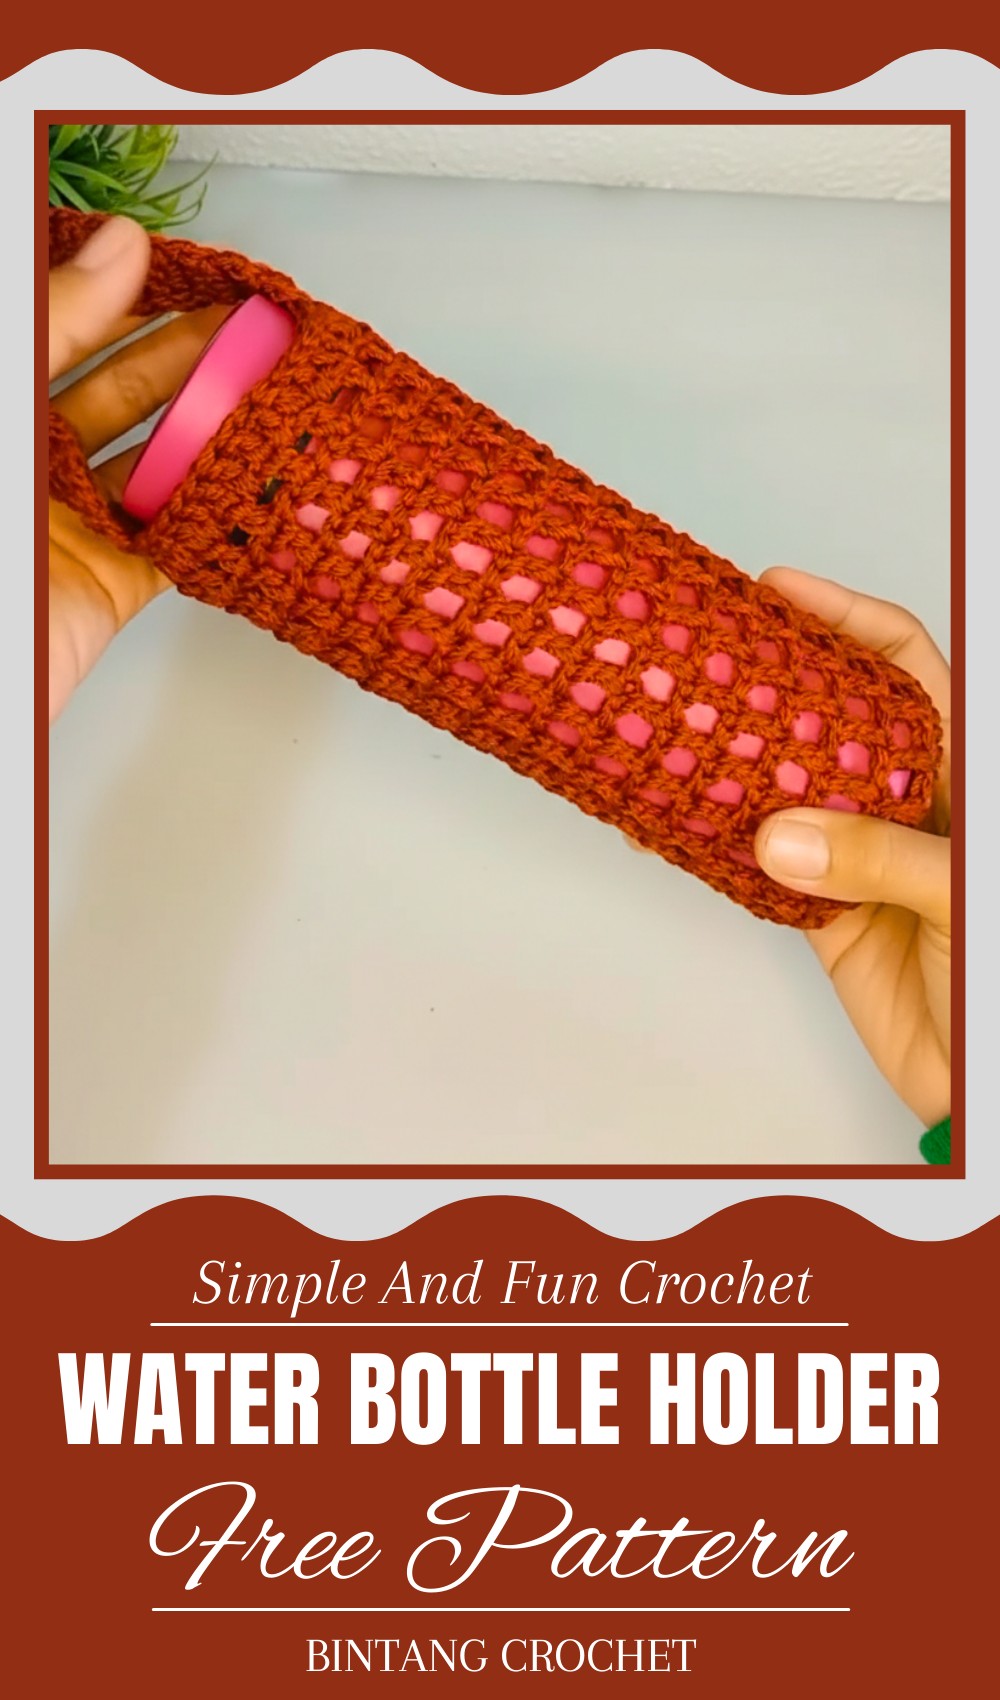
Carrying a water bottle has never been more stylish and practical! A crochet water bottle holder is a beautiful handmade accessory that adds convenience to your everyday life. This lightweight holder is perfect for keeping your hands free while still having your water close by. Ideal for outdoor activities like hiking, walking, cycling, or even a day at the park, it helps you stay hydrated wherever you go.
Trendy Crochet Water Bottle Holder Pattern That’s Eco-Friendly
Its intricate design and vibrant colors make it stand out, turning a simple functional item into a trendy statement piece that reflects your personality. Whether you’re heading to the gym or running errands, it’s versatile and easy to carry. You can easily customize it to fit any bottle size and choose colors or patterns that match your style. Whether used as a thoughtful gift or kept for yourself, it’s a perfect blend of practicality and creative charm!
Materials
- Yarn: Double-stranded polyester thread for durability. You can choose any medium-weight thread in your preferred color.
- Hook: Size 5mm crochet hook.
- Other Tools:
- Tapestry needle for sewing and weaving ends.
- Stitch markers to mark rounds and stitches.
- Scissors for cutting yarn.
- Lighter (optional, for polyester thread) to seal ends and prevent fraying.
Skill Level
- Beginner to Intermediate
This pattern introduces essential techniques—including magic ring, alternating increases, and single crochet edging—making it suitable for beginners wanting to enhance their stitch knowledge.
Key Abbreviations
| Abbreviation | Meaning |
|---|---|
| ch | Chain |
| sl st | Slip Stitch |
| sc | Single Crochet |
| dc | Double Crochet |
| st(s) | Stitch(es) |
| yo | Yarn Over |
Special Notes
- Alternating Stitch Pattern: The alternating increase rows are critical for achieving a rounded shape. Count stitches carefully for symmetry.
- Thread Tension: Maintain consistent tension, especially when working with double strands.
- Customizable Size: Adjust the number of rounds and stitch counts to create larger or smaller pouches.
Pattern Instructions
Part 1: Create the Base
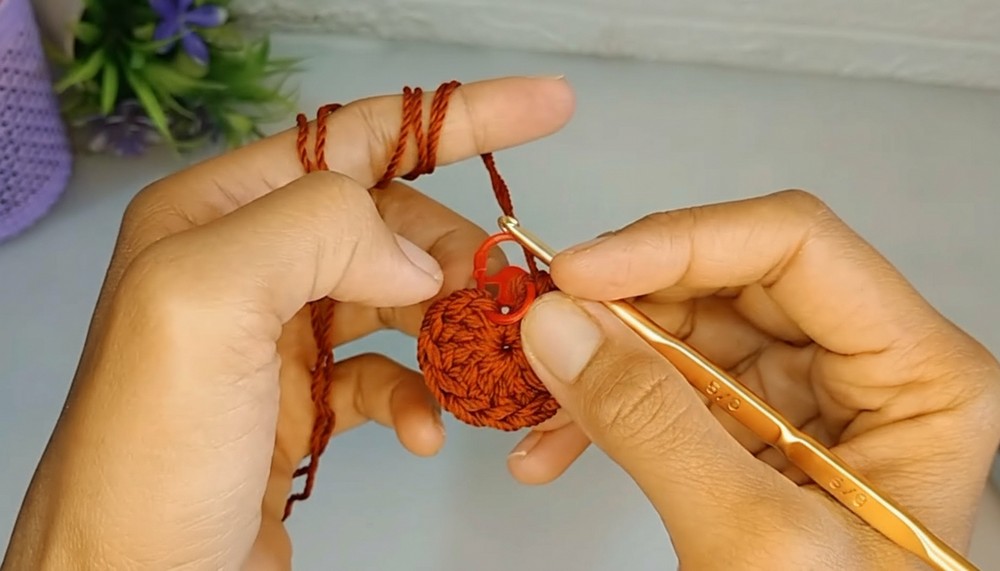
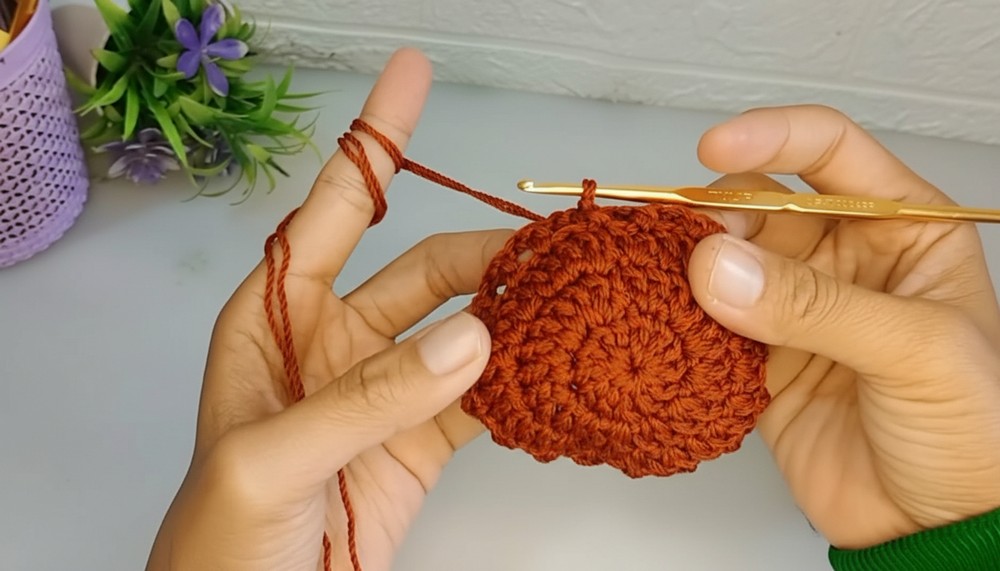
1. Starting with a Magic Ring
- Create a magic ring: Wrap the yarn around your fingers to form a loop, insert the hook into the loop, yarn over (yo), and pull up a loop.
- Chain 1 to secure the loop.
- Turn the loop slightly so that the tail is held tight; ensure it is adjustable.
2. Round 1 – Double Crochet Foundation
- Ch 2 (counts as the first dc).
- Work 12 dc into the magic ring.
- To make dc: Yo, insert hook into loop, yo and pull up a loop (3 loops on hook), yo, pull through 2 loops, yo, pull through last 2 loops.
- Pull the tail to tighten the magic ring.
- Join the round with a sl st into the top of the first dc.
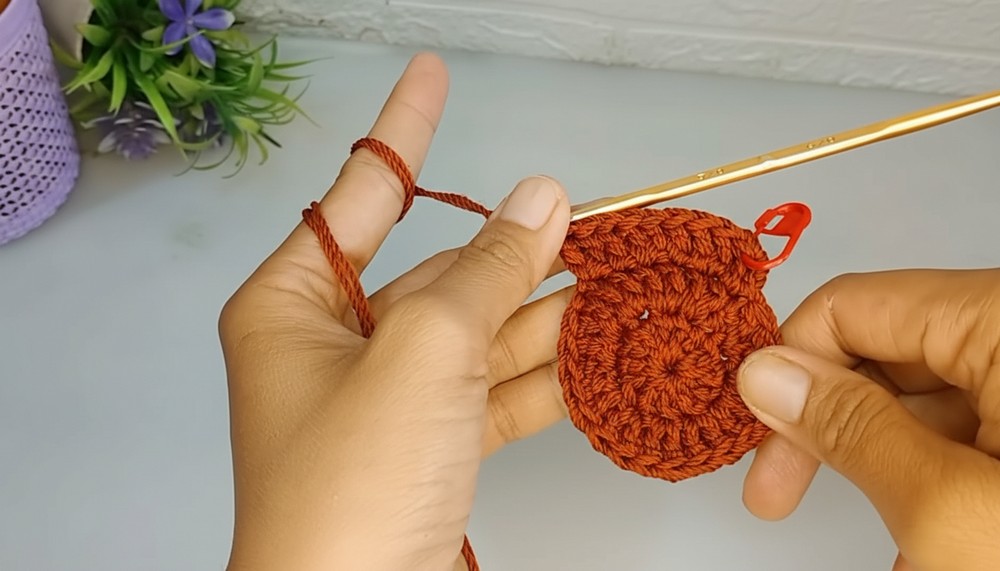
3. Round 2 – Increase Row
- Ch 2 (counts as the first dc).
- Work 2 dc into each st around.
- Place a stitch marker in the first dc to mark the beginning of the row.
- At the end of the row, there should be 24 dc stitches.
- Join with a sl st into the top of the first dc.
4. Round 3 – Alternating Increase
- Ch 2 to start.
- Begin alternating:
- 1 dc into the first st, 2 dc into the second st.
- Repeat the sequence 1 dc, 2 dc around.
- At the end of the row, there should be 36 dc stitches total.
- Join with a sl st into the top of the first dc.
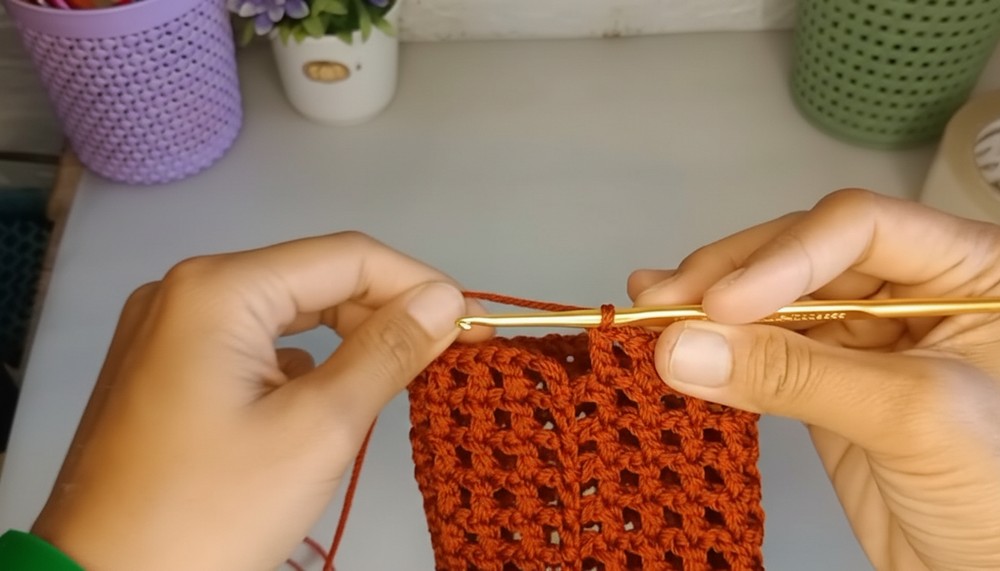
Part 2: Build the Body
5. Start the Body Pattern
- Row 4 (Set Up):
- Ch 3 (counts as the first dc).
- Skip the next st, work 1 dc into the following st, ch 1.
- Continue: Skip 1 st, dc into next st, ch 1 around.
- Join the round with a sl st into the second chain of the starting ch-3.
6. Continuous Rounds for the Body
- From Round 5 onward, repeat the same stitch pattern:
- Ch 3, dc into the next dc from the previous row, ch 1.
- Continue working dc into dc, ch 1 across the round.
- At the end of each round, join with a sl st into the second chain of the starting ch-3.
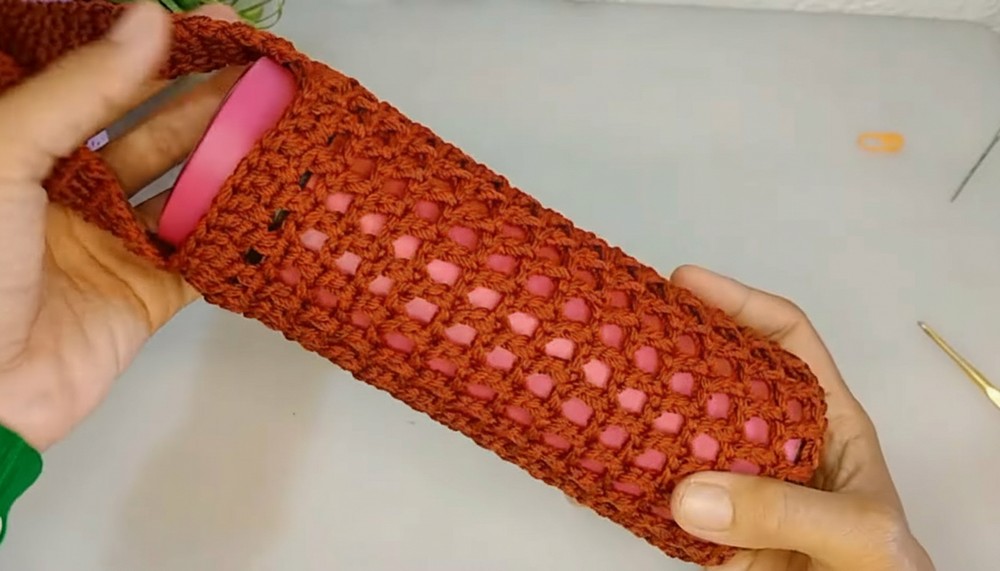
- Continue repeating the body pattern for 17 rounds (or desired height).
Part 3: Top Edging
7. Solid Double Crochet Edging
- After completing the body rounds, work 1 row of solid dc around:
- Ch 2, dc in each opening (stitch or chain space from the previous row).
- Continue across until the entire row is filled with dc stitches.
- Join with a sl st into the first dc, fasten off, and weave in the ends.
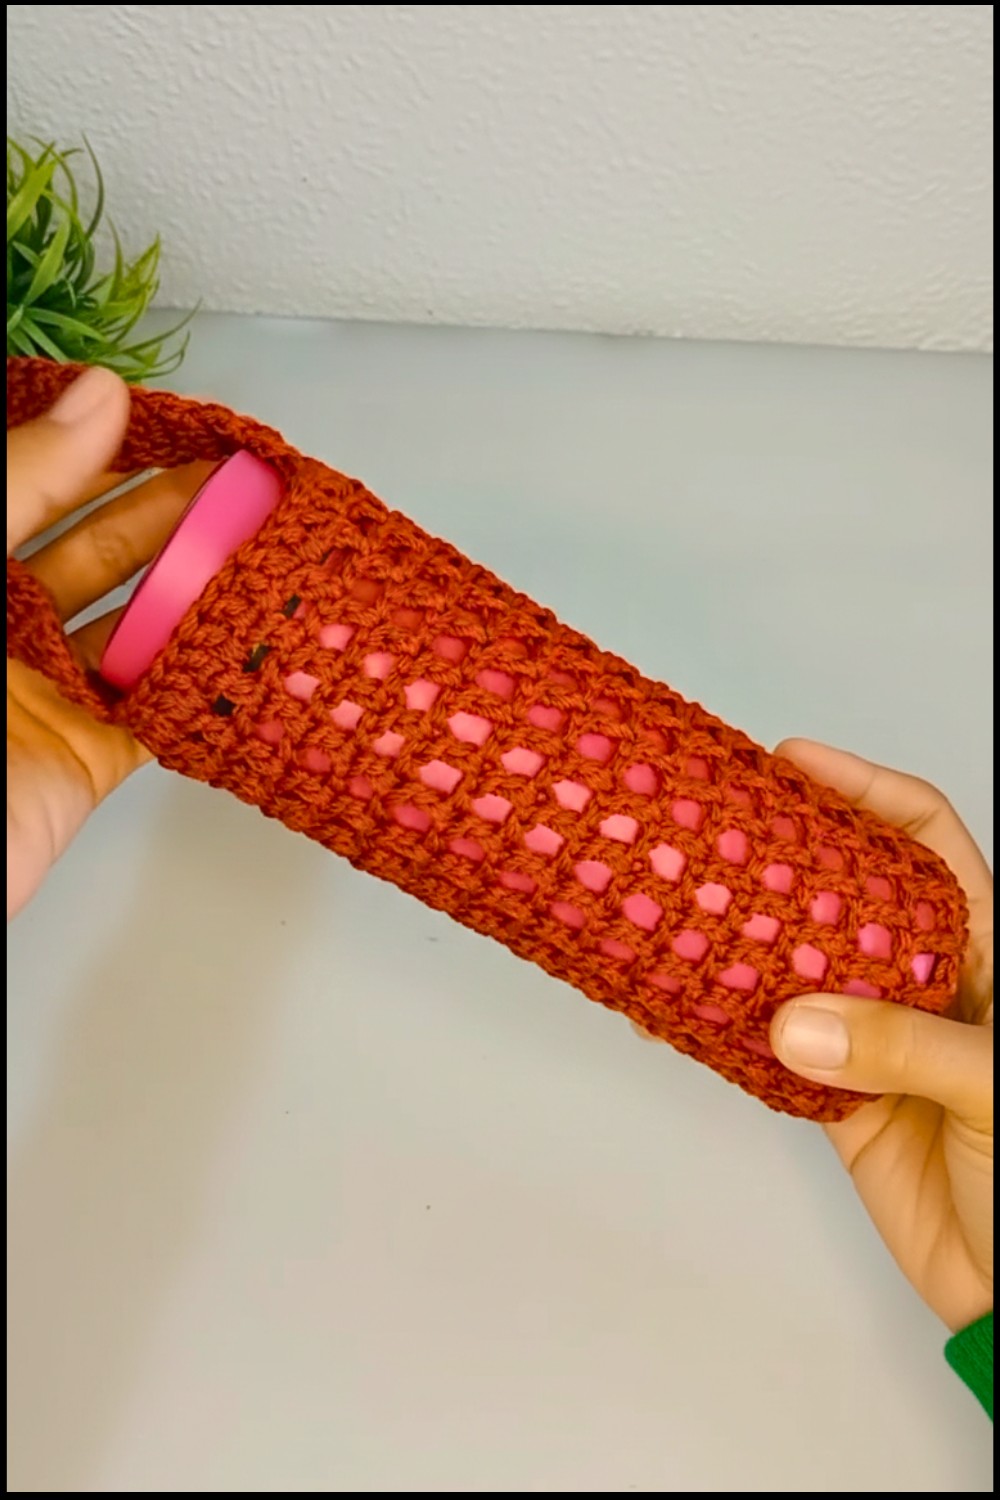
Part 4: Create the Belt
8. Single Crochet Belt
- Attach yarn at the top edge of the bag with a slip knot.
- Ch 1, and work 4 sc into the same edge opening.
- Place a stitch marker at the first sc to mark the starting point.
- Continue working 4 sc into the same opening until you achieve the desired belt length.
- Fasten off and weave in ends.


Finishing Touches
- Optional: Add a button closure to the pouch, sewing it securely into place at the center opening under the belt.
- Seal the edges of polyester thread carefully with a lighter to prevent fraying.

Conclusion
This sleek pouch is ideal for carrying small essentials. The alternating double crochet pattern creates an attractive texture, while the single crochet belt adds functionality. The structure is tightly formed, ensuring durability when used without a lining.
Pattern Corrections
- Ensure stitch counts are correct after each round to avoid distortion. Misaligned increases will skew the pouch’s symmetry.
- Use stitch markers consistently to distinguish between rounds and openings.
Tips
- Customization: Experiment by adding decorative borders, tassels, or contrasting thread for creative flair.
- Practice Stitching: If unfamiliar with magic rings, practice forming loops before starting the project.
- Button Placement: Test button distance for easy opening and closing before adding stitches.
Leave a Reply