
Learn how to make stylish Polymer Clay Miniature Cookies that are perfect for adding a playful touch to gifts, decorations, and everyday accessories.
Tiny treats with a big creative impact—you’d be surprised how much charm miniature cookies can add to your world. Making polymer clay miniature cookies is the perfect hands-on project for anyone who loves adding a playful touch to their spaces or gifts. These bite-sized replicas can be used as adorable keychains, magnets, jewelry, or even decorations for themed events. They’re fun to make, cost-effective, and let your creative imagination run wild.
Easy DIY Polymer Clay Miniature Cookies for Gifts & Decorations

What makes them even more special is how customizable they are. Using a 3D cube-inspired approach for added dimension, you can design cookies that pop with texture and detail. Think layers of glossy icing, colorful sprinkles, or a touch of faux powdered sugar, small details that make a big difference. From classic chocolate chip to rainbow-tinted fantasy cookies, the color palette is entirely yours to choose and play with.
This project is as budget-friendly as it is enjoyable, making it accessible for everyone from beginners to experienced crafters. Plus, it’s a clever way to add handmade personality to everyday items or gifts. A set of magnetic cookie designs can cheer up your fridge, or you can turn them into quirky accessories for bags or notebooks.
Making polymer clay miniature cookies isn’t just about the crafting—it’s about creating something that brings a touch of fun, sweetness, and individuality into your everyday life.
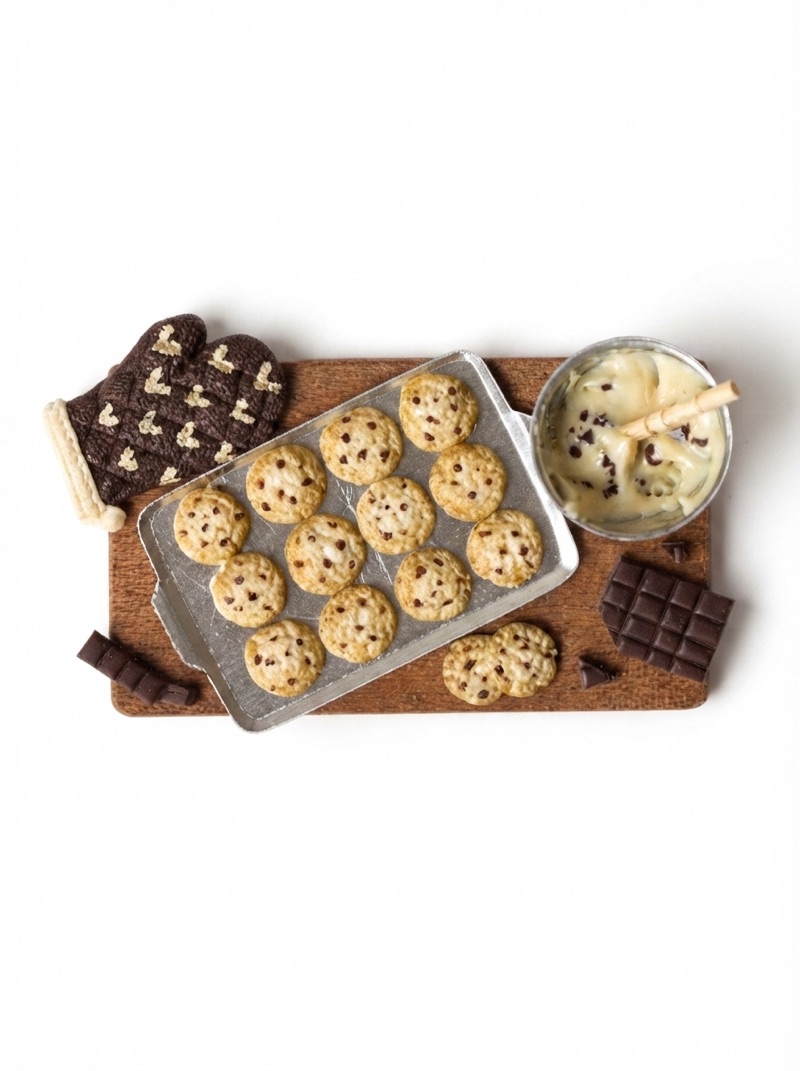
DIY Miniature Cookie Preparation Board
Create your very own charming miniature preparation board of cookies with polymer clay! This adorable craft combines crafting skills like shaping and texturing to create tiny cookies, chocolate bars, and even a cute oven mitt! In this beginner-friendly tutorial, I will break down the steps into a simple, easy-to-follow guide. Let’s get started!
Materials You’ll Need:
For the Cookies:
- Beige polymer clay (for the cookie base)
- Dark brown polymer clay (for chocolate chips)
- Sandpaper (for realistic texture)
- Toothpick or needle tool (for details)
- Dry pastel chalk in brown and yellow tones
- Paintbrush (for the pastel shading)
For the Chocolate Bar:
- Dark brown polymer clay
- Cutting tool (X-Acto knife, blade, or clay cutter)
- Ruler or straight edge
For the Cookie Dough:
- Liquid polymer clay
- Beige polymer clay (crumbly dough texture)
- Chocolate chunks (using the dark brown polymer clay above)
- Toothpick (preferably a fancy toothpick for making a miniature spatula)
For the Oven Mitt:
- Polymer clay (in your favorite oven mitt color)
- Sandpaper (for texture)
- Small detailing paintbrush
- Acrylic paint (optional, for adding tiny designs)
Other Tools:
- Miniature round clay cutter (or items like straws and caps to create small circles)
- Mini paint palette or small mixing surface
- Baking tray lined with parchment paper
Step 1: Make the Miniature Cookies
- Create the Cookie Dough:
- Roll out beige polymer clay into a thin sheet about 2–3 mm thick.
- Use a small round cutter (or a clean, round object like a straw) to cut out small circles for the cookies.
- Texture the Cookie Surface:
- Lightly press a piece of sandpaper onto the cookie surface for a realistic texture. Press gently to create a natural crumbly look.
- Add Details:
- Use a toothpick or any pointy tool to make small uneven marks and dimples on the cookie. This helps make them look baked and homemade.
- Make Chocolate Chips:
- Roll out dark brown polymer clay into a thin sheet and cut it into tiny, irregular “chunks” using an X-Acto knife.
- Gently press these chocolate chunks into the cookie surface.
- Shade the Cookies:
- Scrape brown and yellow pastel chalks into fine powder and use a paintbrush to lightly dust the cookies.
- Concentrate the shading near the edges for a “toasted” or freshly-baked effect.


Step 2: Make the Miniature Chocolate Bar
- Shape the Chocolate Bar:
- Roll out dark brown polymer clay to about 2 mm thick. Using a ruler, trim the clay into a neat rectangular shape to mimic a chocolate bar.
- Add Indents:
- Use a toothpick or a straight tool (like the back of a knife) to add a grid pattern, creating the look of chocolate squares or “breakable sections.”
- Optional: Make a Mold:
- If you want to replicate your chocolate bar for future projects, consider making a mold from this first bar.
Step 3: Make the Cookie Dough Mixture
- Prepare the Dough:
- Mix liquid polymer clay with small pieces of beige polymer clay until it forms a thick, lumpy consistency. This creates a realistic, sticky cookie dough effect.
- Add Chocolate Chips:
- Blend tiny chocolate chunks into the “dough” for extra texture.
- Make a Mini Spatula (Optional):
- Cut the flat end off of a fancy toothpick to create a realistic mini wooden spatula. Pair this with your cookie dough for extra charm!

Step 4: Make the Miniature Oven Mitt
- Shape the Oven Mitt:
- Roll a small piece of polymer clay into a flat oval or rounded rectangle.
- Shape it into a rough oven mitt shape by pinching one end to create the “thumb.”
- Add Texture:
- Press sandpaper gently onto the oven mitt to give it a fabric-like texture.
- Add Details:
- Use a needle tool or toothpick to add stitching details along the edges. For extra flair, paint tiny designs (like small hearts, flowers, or polka dots) using acrylic paint after baking.
Step 5: Assemble the Cookie Board
- Arrange the Items:
- Place the cookies, chocolate bar, cookie dough mixture, and oven mitt neatly on a miniature crafting surface (like a wooden board).
- Make it look like a real baking scene by spreading the dough on the board and placing the cookies as if they’re freshly made.
- Bake the Items:
- Preheat your oven to 275°F (130°C) or the temperature recommended for your polymer clay.
- Bake the miniature items for 15–20 minutes on a baking tray lined with parchment paper or a ceramic tile.
- Cool Completely:
- Let the pieces cool completely before handling them.
Step 6: Optional Final Touches
- If you’re using your project as a keychain or jewelry item, consider gluing an eye pin into some of the cookies or chocolate bar after baking to attach them to a chain.
- Use acetone with a cotton swab to clean up any dust or smudges.
Step 7: Show Off Your Miniature Creation!
Your adorable miniature cookie preparation board is now complete! This is perfect as a display piece, a thoughtful handmade gift, or even turned into tiny accessories like a pendant or keychain.
Bonus Tips:
- Take Your Time: Adding small details, like the texture on your oven mitt or the dimples on your cookies, makes all the difference!
- Experiment with Colors: Try other cookie types, like sugar cookies or oatmeal raisin, by using different clay colors and pastel combinations.
- Create Layers: Add tiny rolling pins, a mini bowl of batter, or small flour piles to make the scene more dynamic.
Leave a Reply