
Bring cuddly charm to your favorite projects with this free crochet amigurumi Rilakkuma pattern that’s perfect for fans of this iconic bear.

Amigurumi Rilakkuma Free Crochet Pattern for Kids
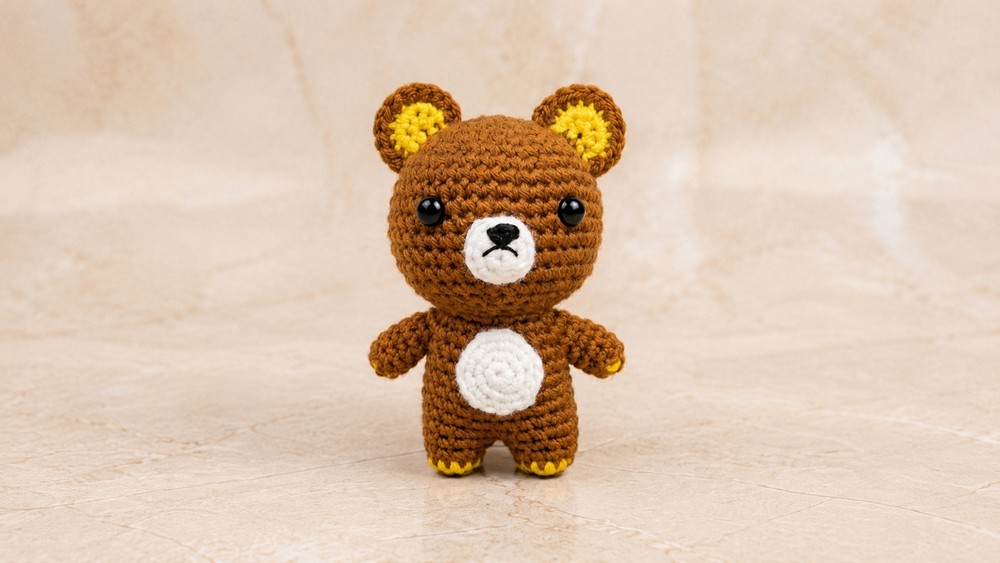
Beyond its decorative charm, a handmade bear makes a deeply personal, meaningful gift for friends, family, or fellow anime and character enthusiasts. Whether displayed on a study desk, nestled in a nursery bookshelf, or given as a heartwarming present, this versatile project brings a comforting, artisanal touch to any environment.
Amigurumi Rilakkuma Crochet Pattern
This comprehensive pattern guides you through making an adorable Amigurumi Rilakkuma using basic crochet techniques. By following rounds of single crochet stitches, increases, and decreases, you will create the bear’s distinctive head, body, limbs, ears, and accessories. This project incorporates finishing details such as facial features using yarn embroidery and felt cloth, plus careful shaping to produce a cuddly and appealing figure.
Quick Overview of Pattern
The Amigurumi Rilakkuma is crafted predominantly with single crochet (sc) worked in continuous rounds starting with a magic ring. The head and body are shaped via systematic increases and decreases to create a rounded, plush form. The arms and legs are worked separately with partitions made for each limb. Color changes to yellow yarn highlight distinct body features such as the ears and belly patch. Facial features are embroidered with black and red thread, complemented by safety eyes. The whole process includes stuffing portions firmly and finishing with neat closures using back loop only stitches.
Notes
- The pattern uses continuous rounds rather than joined rounds, so stitch markers are essential to mark the end of each round.
- The pattern suggests invisible or traditional decreases as preferred, emphasizing invisible decreases for a smoother look.
- Back loop only (BLO) stitching is used to neatly close openings in arms and legs.
- Stuff the amigurumi body parts firmly yet gently to maintain shape without distortion.
- Yarn choices for cotton or acrylic are suitable for all parts depending on your preference for texture.
- Felt fabric and fabric glue are used for certain accents, which add dimension and softness.
Skill Level
Intermediate
Recommended for crocheters who can:
- Work magic rings for tight centers
- Execute increases and decreases (including invisible decreases)
- Work continuous single crochet rounds without slip stitch joins
- Partition stitches for limbs and body parts
- Utilize back loop only stitches to close small openings
- Embroider small details with yarn or thread
Materials
- Yarn: Brown acrylic or cotton yarn for main parts, yellow cotton yarn for details, white acrylic yarn for accents.
- Hook: 3 mm crochet hook.
- Other supplies: Toy stuffing, black thread or yarn, red thread or yarn, needle for embroidery and sewing, safety eyes, fabric glue, scissors, stitch marker or safety pin.
- Felt cloth: White and red felt for facial accents.
- Optional: Fabric glue for attaching felt pieces.
Measurements / Sizing
- Finished doll will measure approximately 15–20 cm tall, depending on yarn thickness and crochet tension.
- The widest part of the head reaches 42 single crochet stitches per round (rounds 7 to 14).
- The body has 28 stitches per round for the torso.
- Each limb is worked over 10 or 14 stitches depending on partitioning.
Gauge and Stitch Pattern
The entire project uses single crochet stitches worked in the round.
Gauge is not critical but uniform tension ensures proper shaping.
Back loop only stitching closes limb openings neatly.
Stitch Abbreviations
| Abbreviation | Term | Explanation |
|---|---|---|
| ch | Chain | Foundation stitch |
| sc | Single Crochet | Compact stitch used for shaping |
| inc | Increase | 2 sc in the same stitch to expand |
| dec | Decrease | Combining two stitches into one, reducing stitch count |
| inv dec | Invisible Decrease | Smooth decrease minimizing visible gaps |
| BLO | Back Loop Only | Crochet worked in back loops to create a neat edge |
Special Stitches
Magic Ring (Magic Circle)
Start projects with a tightly closed center loop to avoid gaps at the beginning of rounds. Essential for amigurumi work.
Invisible Decrease
Insert hook into front loop of two stitches, draw up yarn to complete a single stitch that closes gaps neatly.
Back Loop Only (BLO)
Working into the back loop only helps create neat edges and is ideal when closing small openings in limbs.
The Crochet Pattern
Head
Round 1:
- Begin with a magic ring.
- Chain 1 (does not count as stitch).
- Work 6 sc into the ring. (6 stitches)
- Pull the tail to close the circle tightly.
- Place a stitch marker in the last stitch.
Round 2:
- Increase (2 sc) in every stitch around. (12 stitches)

Round 3:
- 1 sc, 1 inc repeat around. (18 stitches)
Round 4:
- 2 sc, 1 inc repeat around. (24 stitches)
Round 5:
- 3 sc, 1 inc repeat around. (30 stitches)
Round 6:
- 4 sc, 1 inc repeat around. (36 stitches)
Round 7:
- 5 sc, 1 inc repeat around. (42 stitches)
Rounds 8–14:
- Single crochet in each stitch around for 7 rounds, maintaining 42 stitches per round.
Shaping with Decreases and Stuffing
Round 15:
- 5 sc, 1 invisible decrease repeat around. (36 stitches)
Round 16:
- 4 sc, 1 invisible decrease repeat around. (30 stitches)
Round 17:
- 3 sc, 1 invisible decrease repeat around. (24 stitches)
- Begin stuffing the head firmly with toy stuffing.
Round 18:
- 2 sc, 1 invisible decrease repeat around. (18 stitches)
- Stuff generously.
Shaping with Increases
Round 19:
- 2 sc, 1 inc repeat around. (24 stitches)
Round 20:
- 3 sc, 1 inc repeat around. (30 stitches)

Round 21:
- 4 sc, 1 inc repeat around. (36 stitches)
Round 22:
- 5 sc, 1 inc repeat around. (42 stitches)
Round 23:
- 6 sc, 1 inc repeat around. (48 stitches)
Arm Partition
- Fold the work in half so that front and back sides align.
- Place a stitch marker on the first increase on one side.
- Count 10 stitches and place a second stitch marker.
- Repeat for the other side to mark the second arm partition (also 10 stitches).
Body
Rounds 24 to 28:
- Using brown yarn, work 5 rounds of 28 sc evenly around.
- Add toy stuffing after these rounds for girth and shaping.
Leg Partition
- Divide the 28 stitches evenly into 2 partitions of 14 stitches each.
- Insert stitch markers to mark each leg section.
Legs:
- For each leg partition, work 2 rounds of single crochet using brown yarn.
- Change to yellow yarn for the 3rd round for accent.
- Add stuffing once the yellow round is completed.
- Fasten off yarn leaving a tail.
- Using a needle, sew the leg openings closed by stitching through back loops only for a neat finish.

Arms
- Remove stitch markers marking arm partitions.
- Attach brown yarn to arm section start.
- Work 3 rounds of single crochet.
- Fasten off with a chain of 1.
- Stuff arms and close openings using back loop only sewing technique similar to legs.
Ears
Yellow Ears:
- Begin with a magic ring, chain 1.
- Work 6 sc into the ring (pull tight).
- Round 2: Increase in every stitch (12 sc).
- Chain 1, fasten off leaving a long tail for sewing.
Make two yellow ears.
Brown Ears Outline:
- Make magic ring and 6 sc as before.
- Round 2: Increase around to 12 sc.
- Without fastening off, join brown yarn to first stitch of the yellow ear.
- Crochet 1 round of sc around the yellow ear to create a brown outline (12 sc).
- Chain 1 and fasten off leaving a long tail.
Make two brown outlined ears.
Facial Features
- Using black yarn/thread, embroider the nose and other facial accents.
- Use red yarn/thread to embroider the mouth.
- Attach felt pieces (white and red) on the face securely with fabric glue or sewing.
- Safety eyes are placed prior to stuffing head for stability and fixed position.

Stomach Patch
- With white yarn, create a magic ring and chain 1.
- Round 1: 6 sc in ring.
- Round 2: 12 sc (increase in every stitch).
- Rounds 3–4: Single crochet around maintaining 12 stitches.
- Finish with slip stitch, chain 1, and fasten off leaving a tail for sewing.
- Sew onto body front to complete Rilakkuma’s chest detail.

Assembly & Finished Size
The completed Amigurumi Rilakkuma stands approximately 15 to 20 cm tall. The parts are carefully sewn together to provide balanced proportions and plush softness. The mix of brown and yellow yarn creates contrast adhering to the original character’s coloring. Finished facial and body details add personality and warmth. Fit ears carefully for correct placement and sew securely. Stuff limbs firmly without overfilling to maintain flexibility and cuddly feel.
Conclusion
This Amigurumi Rilakkuma pattern combines fundamental crochet skills with thoughtful design to make a charming and approachable doll suitable for intermediate crocheters. The step-by-step guidance on shaping, color changes, stuffing, and finishing details ensures a professional and satisfying result. With patience and care, this project yields a delightful handmade companion full of character.
Leave a Reply